Automate Document Generation from Wrike Projects
TurboDocx integrates with Wrike to automatically generate professional documents, proposals, and presentations directly from your project management data. When you change a task status in Wrike, TurboDocx can automatically create and attach documents to your projects.
What You Can Create
- 📄 Statements of Work (SOWs): Generate comprehensive SOWs from project folders with timelines and deliverables
- 💼 Project Proposals: Create proposals from opportunity data in Wrike
- 📊 Status Reports: Automatically generate project status reports from task data
- 📋 Meeting Summaries: Turn Wrike tasks into professional meeting documentation
- 🚀 Client Deliverables: Generate client-facing documents from project information
- 📈 Executive Summaries: Create management reports from Wrike folder data
Before You Begin
This guide walks you through the entire setup process step-by-step. If you can create a task in Wrike, you can set this up! 🎯
You'll need:
- Admin access to your Wrike workspace
- Admin access to your TurboDocx organization
- About 10-15 minutes
- A template ready in TurboDocx
- Postman or similar tool for initial Webhook Setup for API calls
How It Works
The Wrike integration uses a status-triggered workflow:
- You set up a webhook in Wrike that monitors specific folders or projects
- When a task status changes to a trigger status (like "Generate Document" or "Send for Signature"), Wrike notifies TurboDocx
- TurboDocx automatically generates the document using your template and Wrike data
- The finished document is attached back to the Wrike task
Step 1: Create and Configure Your Template
First, create a template in TurboDocx that will be used for document generation.
See our How to Create a Template guide for detailed instructions on creating templates.
A. Create Your Template
- Log into TurboDocx
- Navigate to Templates
- Create a new template or select an existing one
- Add variables that will be populated from Wrike data
Your template can include variables like {CompanyName}, {ProjectTitle}, {TaskDescription}, etc. The AI will automatically populate these from Wrike data.
B. Configure Default Values and AI Smart Prompts (Optional)
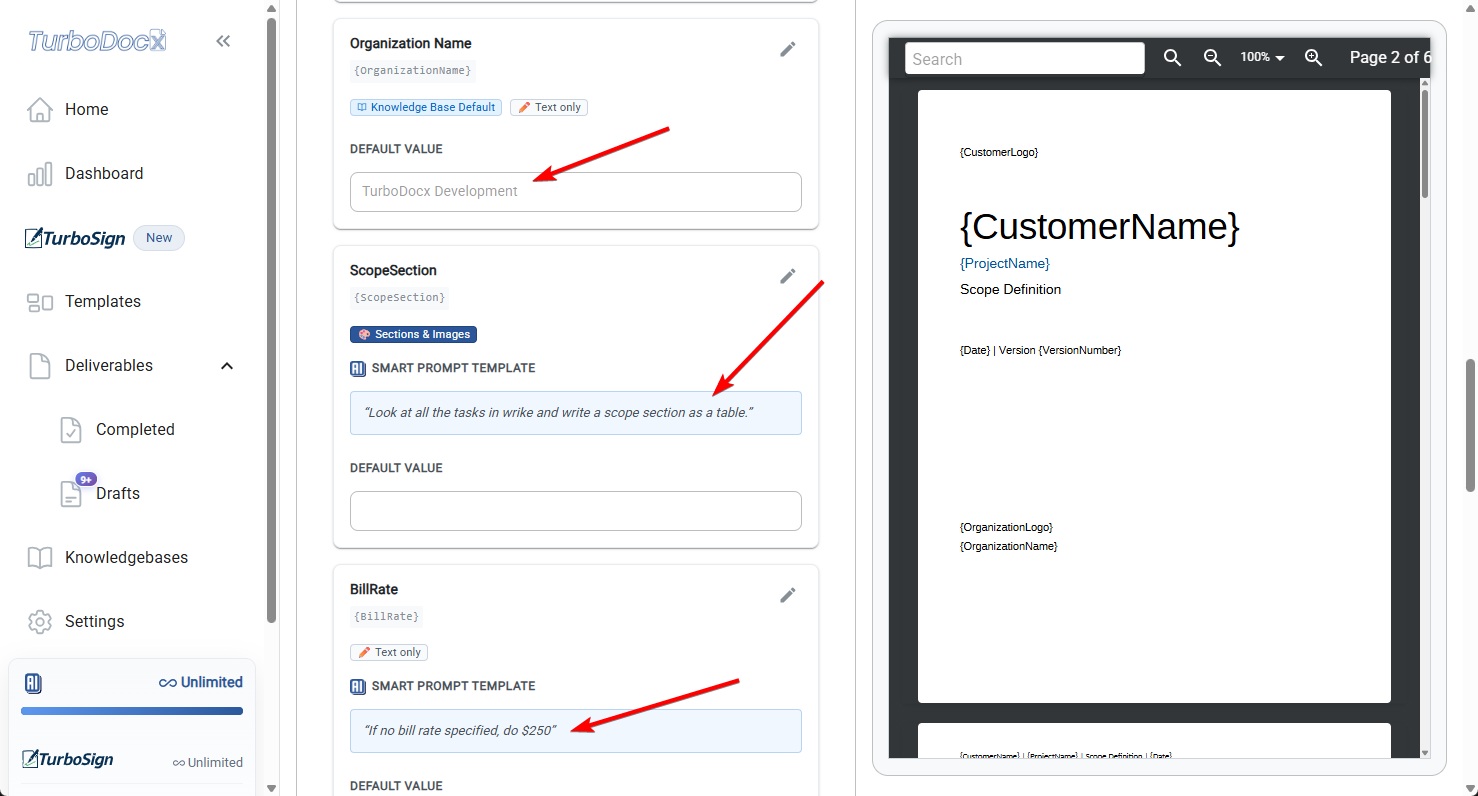
- Open your template in TurboDocx
- Click on "Edit Template Preferences"
- Fill in the Default Values for any variables that should have fallback content
- Configure the Smart Prompt Template to customize how AI generates content from Wrike data
- Test the AI generation to ensure it works as expected
If you plan to use the TurboSign signature workflow with this template, you need to include signature anchor fields in both your document template AND in the default values:
Required Signature Anchor Fields:
{SalesSignerName},{SalesDate},{SalesSignerSignature}{ClientSignerName},{ClientDate},{ClientSignerSignature}
Setup Instructions:
- In your document template, add these fields where you want the signature elements to appear (usually at the end of your document)
- In TurboDocx Default Values, set each anchor field to map to itself:
- Variable:
{SalesSignerName}→ Default Value:{SalesSignerName} - Variable:
{SalesDate}→ Default Value:{SalesDate} - Variable:
{SalesSignerSignature}→ Default Value:{SalesSignerSignature} - Variable:
{ClientSignerName}→ Default Value:{ClientSignerName} - Variable:
{ClientDate}→ Default Value:{ClientDate} - Variable:
{ClientSignerSignature}→ Default Value:{ClientSignerSignature}
- Variable:
Why this is needed: When TurboDocx generates the document from Wrike, it needs to preserve these anchor fields as literal text (not replace them with data from Wrike). By setting the default value to the same field name, the anchor remains in the generated document for TurboSign to locate and replace with actual signature elements.
See the TurboSign Documentation for more details on signature workflows.
C. Note Your Template ID
- Open your template in TurboDocx
- Look at the URL - it will contain your template ID
- Copy the template ID (you'll need this for Step 4)
Example:
URL: https://app.turbodocx.com/templates/bad30fa3-cf34-440f-8029-3410d2ff52e6
Template ID: bad30fa3-cf34-440f-8029-3410d2ff52e6
Step 2: Configure Wrike Integration in TurboDocx
You need to set up both your Wrike access token and create a special API key for webhook verification.
A. Get Your Wrike Access Token
- Log into Wrike
- Go to Settings → Apps & Integrations → API
- Create a new permanent access token or use an existing one
- Copy the token - you'll need it in the next step
For detailed instructions on creating a Wrike API token, see Wrike's official API documentation.
B. Configure Wrike in TurboDocx
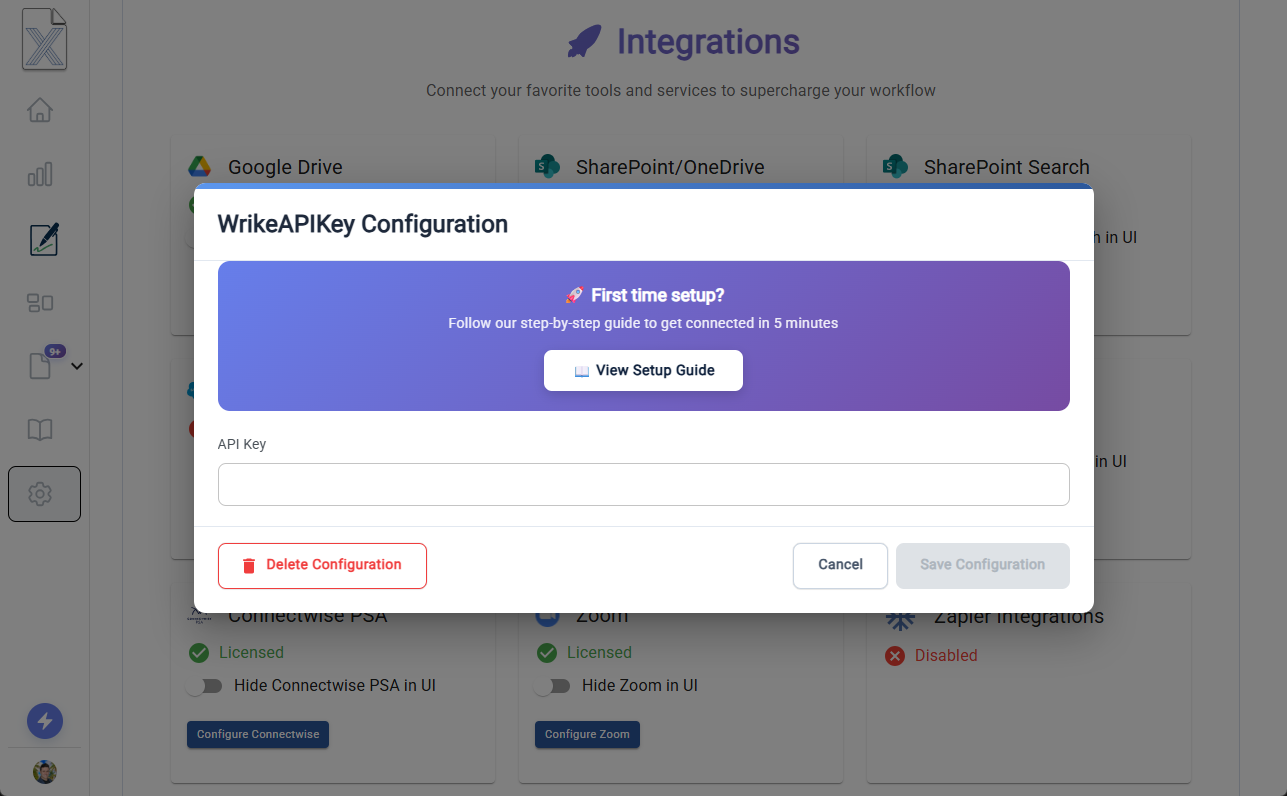
- Log into TurboDocx
- Go to Settings → Organization Settings → Integrations
- Select "Wrike" from the integrations list
- Paste your Wrike access token from Step 2A
- Save the configuration
This stores your Wrike access token so TurboDocx can communicate with the Wrike API.
C. Create the Webhook API Key
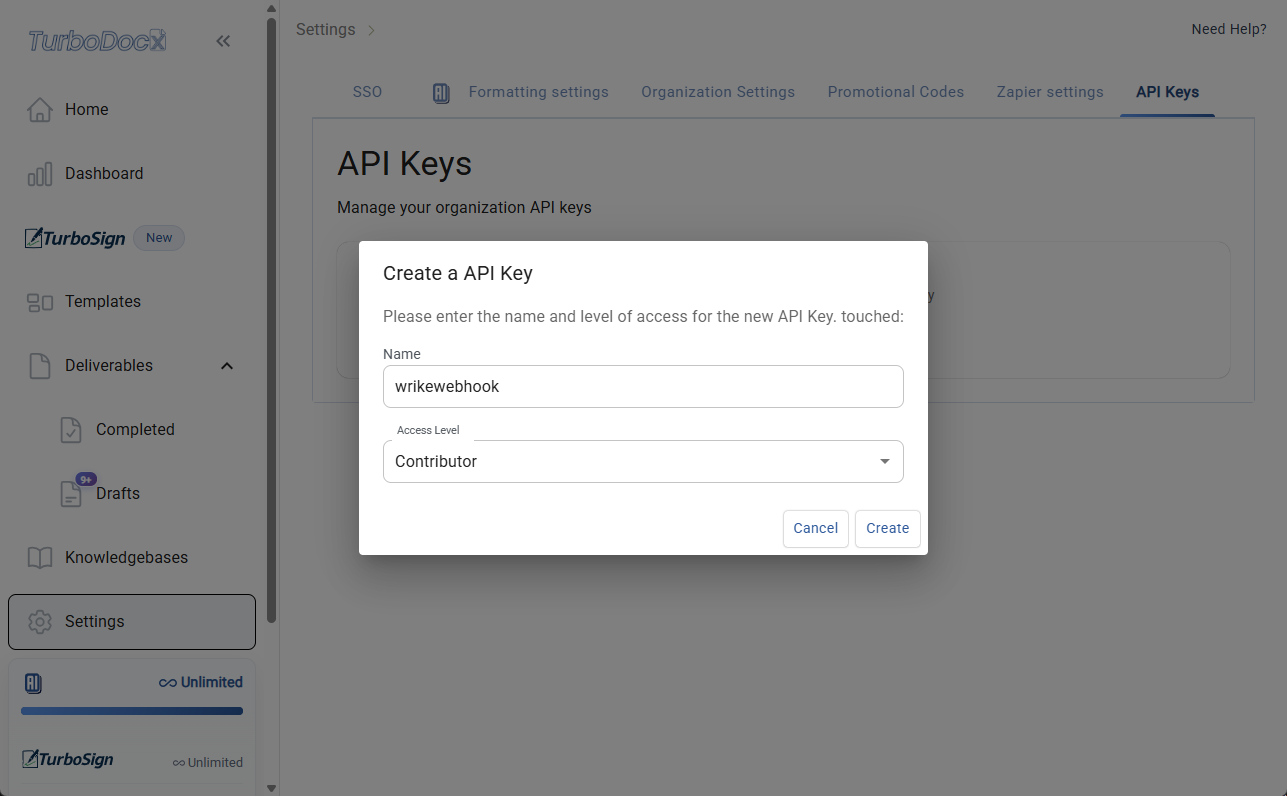
- Go to Settings → Organization Settings
- Click on "API Keys" in the left sidebar
- Click "Create New API Key"
- Set the name to
wrikewebhook(this exact name is required - no dash, all one word!) - Select a role:
- Contributor: Can create and modify documents (recommended)
- User: Can create documents but not modify templates
- Click "Create"
The API key MUST be named exactly wrikewebhook (lowercase, no spaces, no dash, all one word). The integration won't work with any other name.
D. Save Your API Key
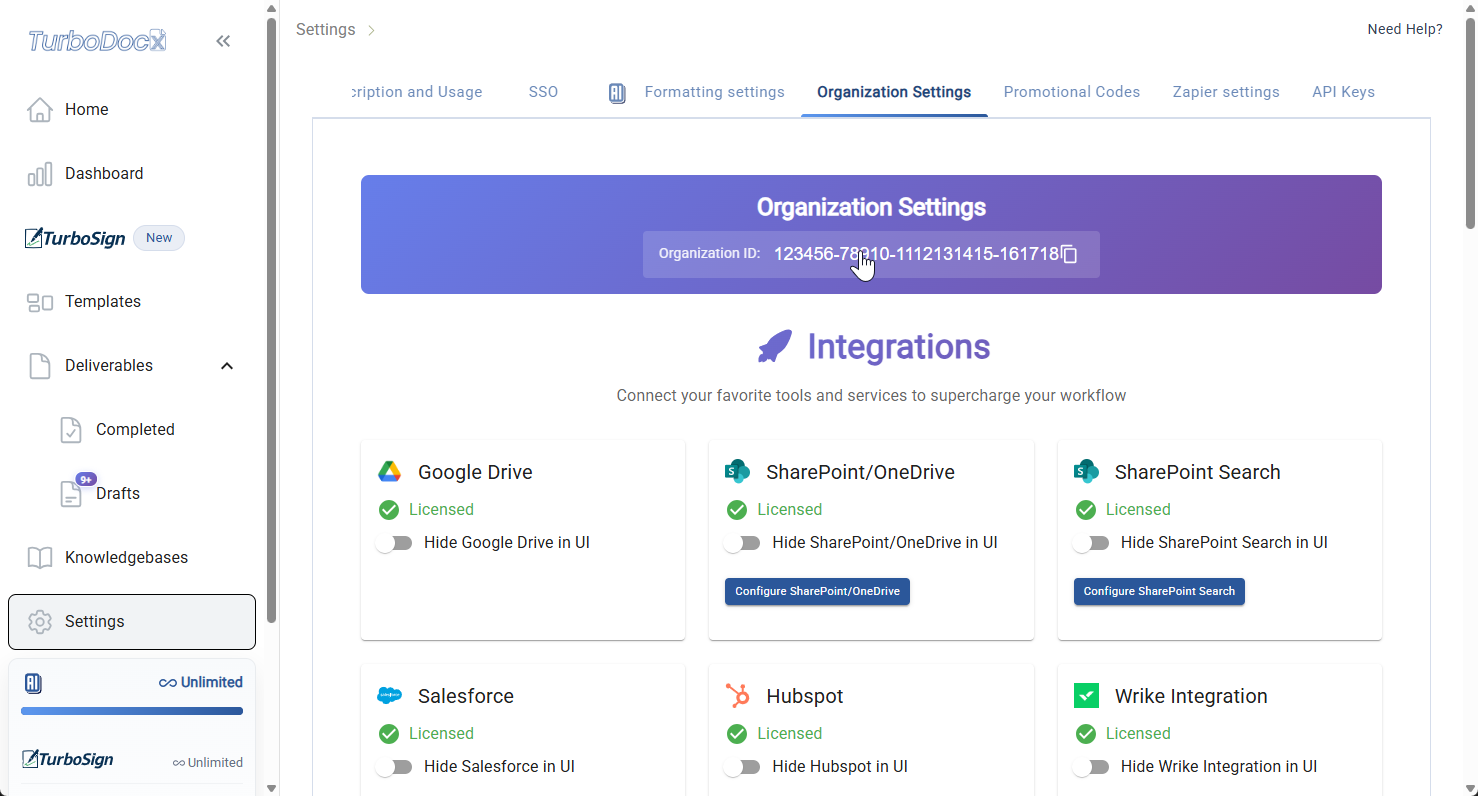
- Copy the API key that appears (you'll only see this once!)
- Store it securely - you'll need it for Step 3
- Note your Organization ID from the settings page
Step 3: Get Your Wrike Folder ID
You need to identify which Wrike folder, space, or project to monitor for status changes.
A. Get the Folder Permalink
- Open Wrike in your browser
- Navigate to the folder or project you want to monitor
- Right-click on the folder name and select "Copy Link" (or click the share icon)
- Paste the link somewhere - it will look like:
https://www.wrike.com/open.htm?id=1490378047
B. Get the Folder ID via API
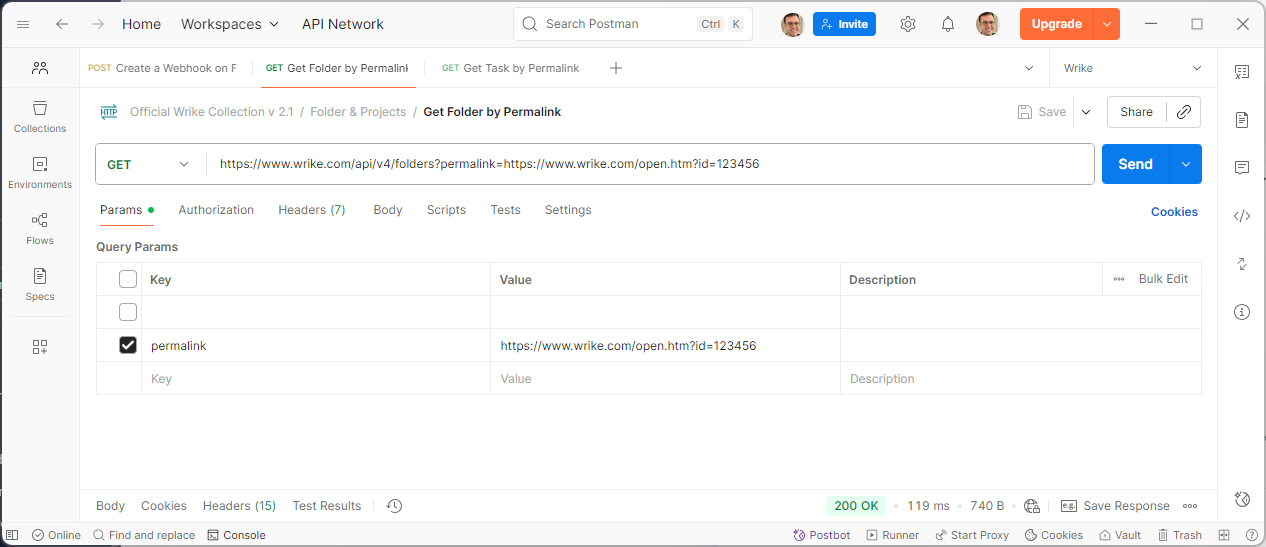
Use the Wrike API to convert the permalink to a folder ID:
- Open Postman (or your browser)
- Create a GET request to:
https://www.wrike.com/api/v4/folders?permalink=YOUR_PERMALINK_HERE - Set up authentication:
- Type: Bearer Token
- Token: Your Wrike API token from Step 2A
- Replace
YOUR_PERMALINK_HEREwith your copied permalink
Example Request:
https://www.wrike.com/api/v4/folders?permalink=https://www.wrike.com/open.htm?id=1490378047
Send the request and look for the folder ID in the response:
{
  "data": [
    {
      "id": "IEAAAAAAI4567890",
      "title": "Your Folder Name",
      ...
    }
  ]
}
Copy the folder ID (e.g.,
IEAAAAAAI4567890) - you'll need this for Step 4
You can create different webhooks for different folders and templates. For example, one webhook for sales proposals and another for project SOWs.
Step 4: Create a Wrike Webhook
Currently, you need to use Postman (or similar API tool) to create the webhook. We're working on adding this to the TurboDocx UI.
A. Create Webhook via Postman
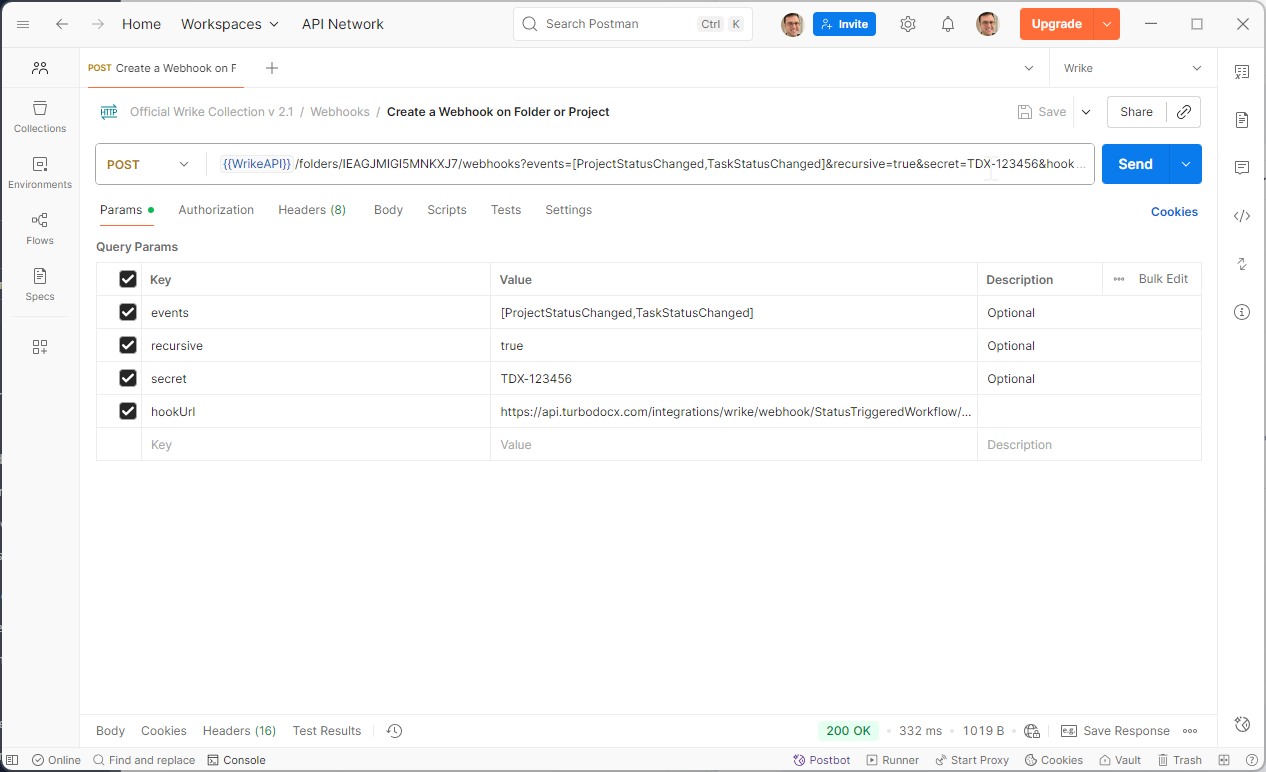
Open Postman (or download it from postman.com)
Create a new POST request to:
https://www.wrike.com/api/v4/folders/{WRIKE_FOLDER_ID}/webhooksSet up authentication:
- Type: Bearer Token
- Token: Your Wrike API token from Step 2A
Configure the Query Parameters:
Parameter Value Description events[ProjectStatusChanged,TaskStatusChanged]The Wrike events to monitor. TurboDocx listens for status changes. recursivetrueMonitor all tasks within the folder and its subfolders. hookUrlhttps://api.turbodocx.com/integrations/wrike/webhook/StatusTriggeredWorkflow/{YOUR_ORG_ID}/{YOUR_TEMPLATE_ID}The TurboDocx webhook endpoint URL. secret{YOUR_WRIKE_WEBHOOK_API_KEY}Your wrikewebhookAPI key from Step 2D for secure verification.Replace the placeholders:
{WRIKE_FOLDER_ID}: The Wrike folder/space to monitor (from Step 3){YOUR_ORG_ID}: Your TurboDocx organization ID (from Step 2D){YOUR_TEMPLATE_ID}: Your template ID (from Step 1D){YOUR_WRIKE_WEBHOOK_API_KEY}: ThewrikewebhookAPI key (from Step 2D)
B. Example Request
Full URL with all parameters:
https://www.wrike.com/api/v4/folders/IEAAAAAI4567890/webhooks?events=[ProjectStatusChanged,TaskStatusChanged]&recursive=true&hookUrl=https://api.turbodocx.com/integrations/wrike/webhook/StatusTriggeredWorkflow/abc123-org-id/def456-template-id&secret=TDX-12345
- events: Include both
ProjectStatusChangedandTaskStatusChangedto ensure the webhook triggers for all relevant status updates - recursive: Setting this to
trueensures all tasks in subfolders are monitored, not just the top-level folder - hookUrl: This tells Wrike where to send webhook notifications when events occur
- secret: This is used to cryptographically verify webhook requests are authentic
C. Send the Request
- Click "Send" in Postman
- Check the response - you should see a webhook ID
- Save the webhook ID for future reference
If the request succeeds, you'll get a 200 response with a webhook object containing your webhook ID. If you get an error, double-check your Wrike API token and request body.
Step 5: Configure Wrike Custom Statuses
For the webhook to trigger document generation, you need to set up custom statuses in Wrike.
A. Create Custom Workflow Statuses
- In Wrike, go to Settings → Workflows
- Select the workflow for your project type
- Add custom statuses for document automation:
Generate Document- Triggers document generationGenerate SOW- Alternative trigger for SOW generationSend for Signature- Triggers signature workflow
For detailed instructions on creating custom workflow statuses in Wrike, see Workflows in Wrike.
B. Allowed Status Triggers
TurboDocx listens for these status changes (case-insensitive):
Document Generation Statuses:
generate documentgenerate sow
Signature Workflow Status:
send for signature
When a task changes to any of these statuses, TurboDocx will automatically trigger.
The webhook also filters for specific Wrike event types:
taskstatuschanged- When task status changestaskcommentadded- When a comment is added to a task
Step 6: Test the Integration (Magic Time! ✨)
Now let's test the entire workflow to see the magic happen!
A. Create a Test Task in Wrike
- Open the Wrike folder you configured in the webhook
- Create a new task with some project details
- Add a description with relevant information (the AI will use this!)
B. Trigger Document Generation
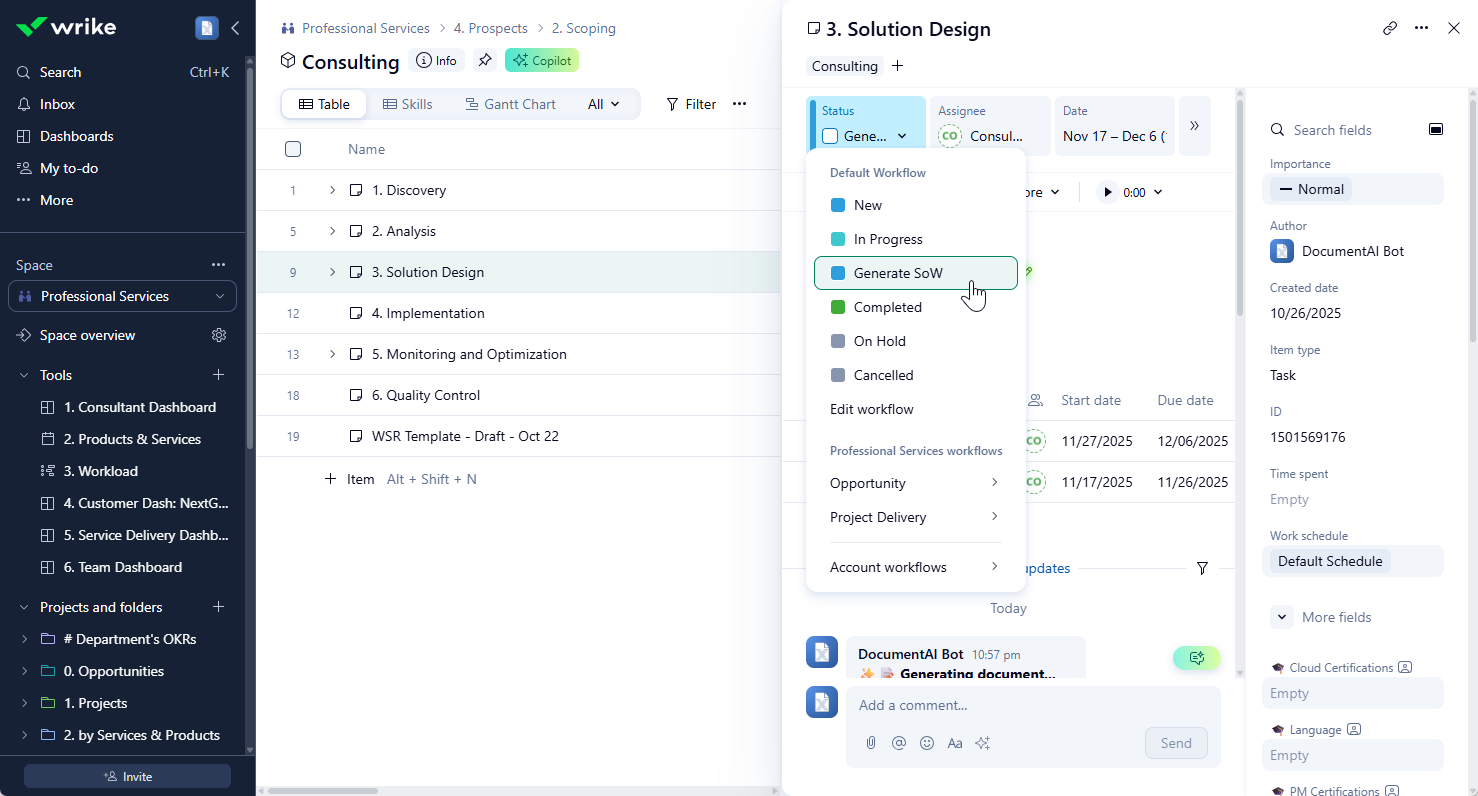
- Change the task status to one of the trigger statuses:
- "Generate Document" or
- "Generate SOW"
- Wait 30 seconds to 2 minutes (depending on document complexity)
- Check the task attachments - your generated document should appear!
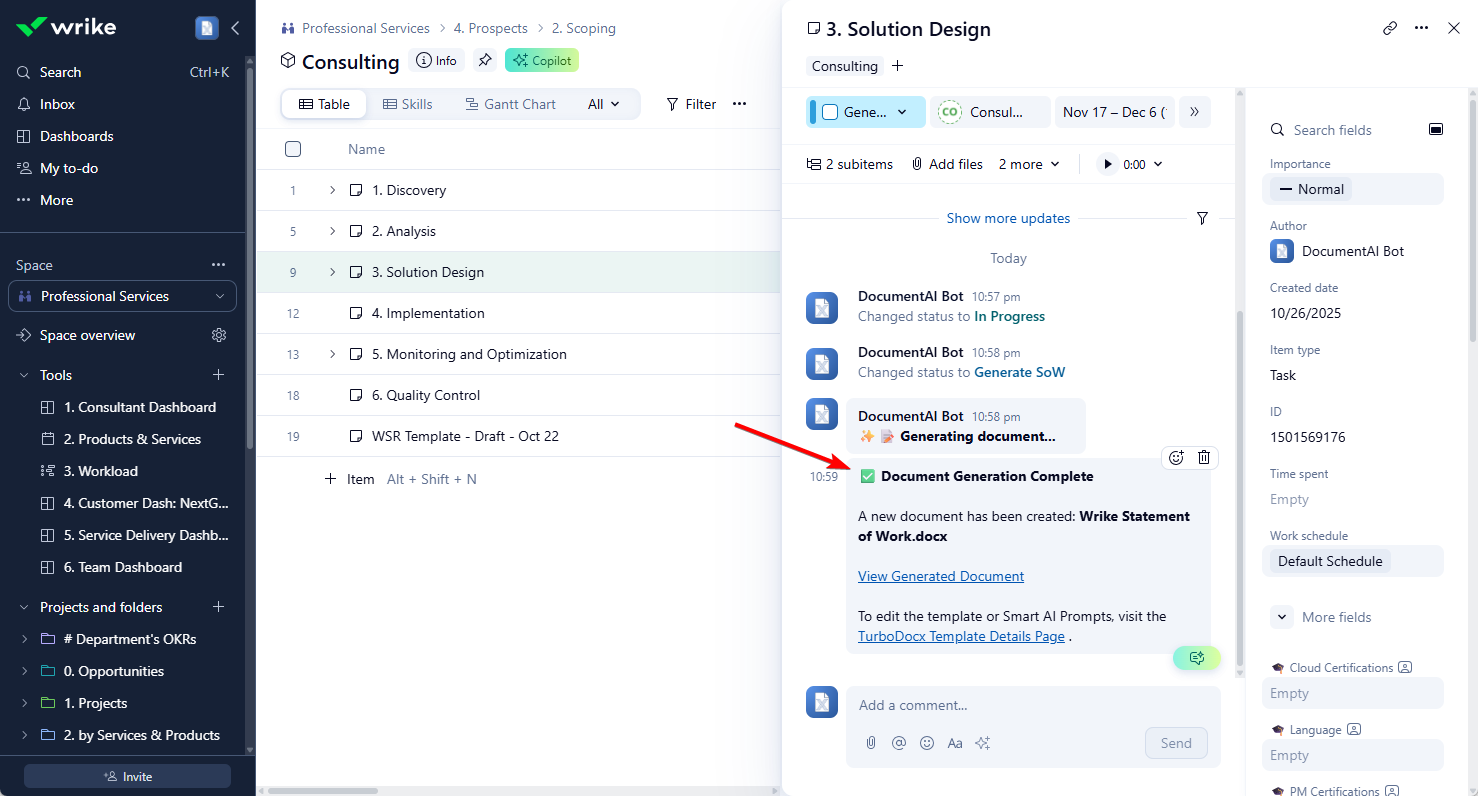
- The document appears as an attachment on the Wrike task
- The task status may automatically update to show generation completed
- You can download and review the generated document
Signature Workflow
TurboDocx also supports a signature workflow for Wrike tasks.
How It Works
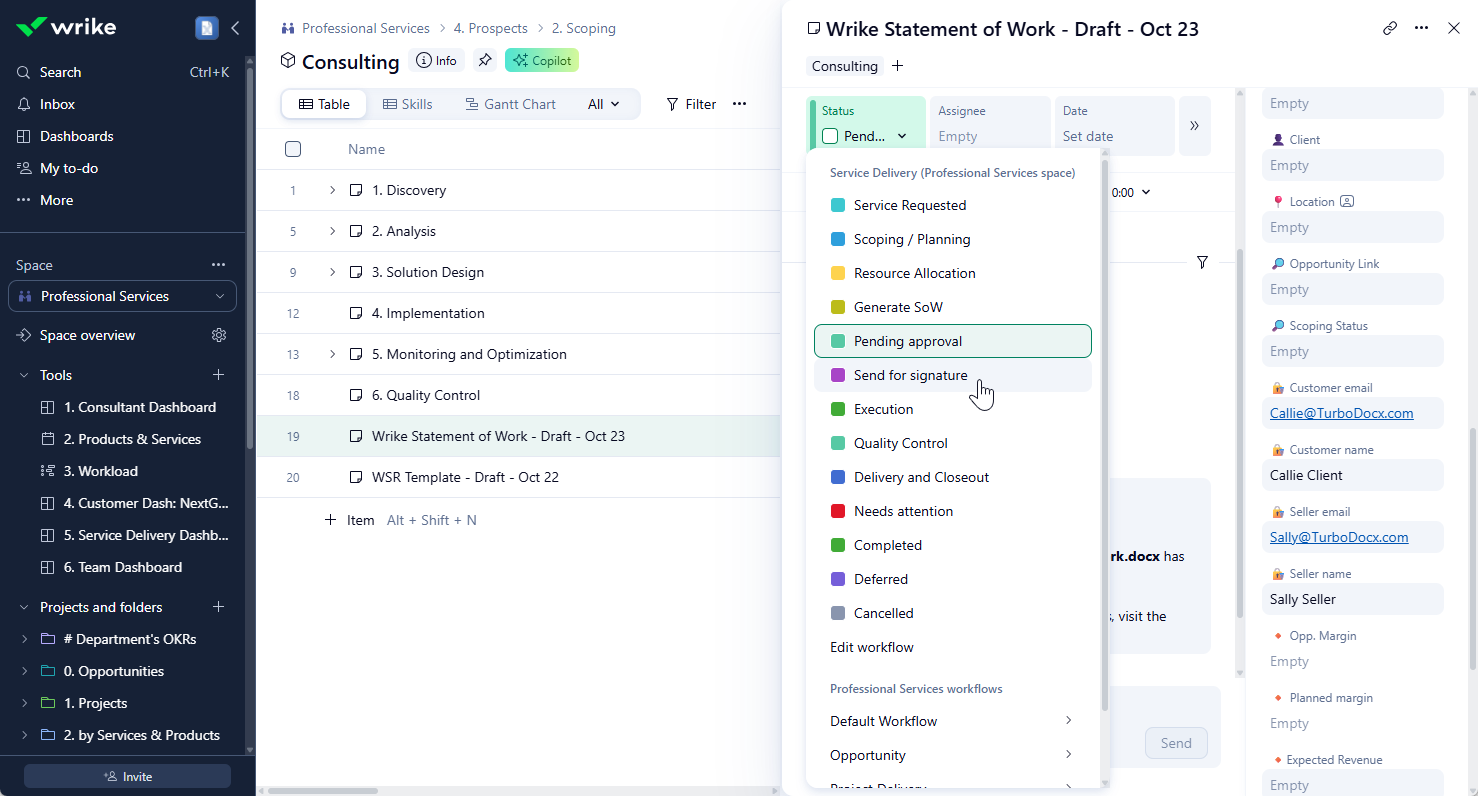
- Change a task status to
Send for Signature - TurboDocx fetches the most recent attachment from the task
- TurboDocx extracts signature recipients from Wrike custom fields
- TurboDocx sends it through the TurboSign workflow for digital signatures
Required Wrike Custom Fields
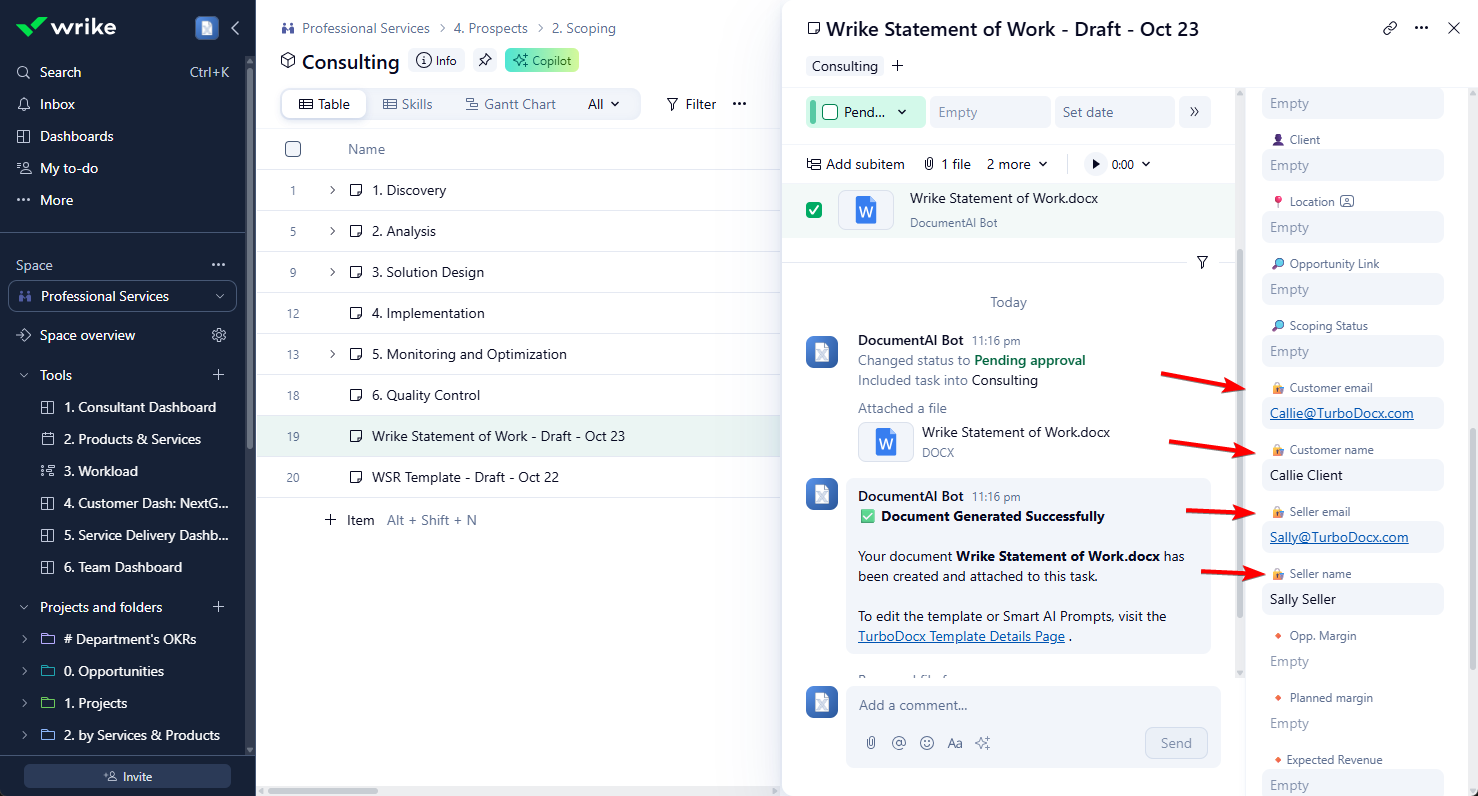
TurboSign for Wrike is configured by default to look for the following custom fields on your Wrike task or folder:
| Custom Field Name | Required | Description |
|---|---|---|
🔏 Seller email | Yes | Email address of the seller/vendor signer |
🔏 Customer email | Yes | Email address of the customer/client signer |
🔏 Seller name | No | Name of the seller/vendor signer (defaults to "Seller") |
🔏 Customer name | No | Name of the customer/client signer (defaults to "Customer") |
The signature workflow will fail if the required custom fields are missing. Make sure to add these custom fields to your Wrike workflow and populate them before triggering the signature workflow:
🔏 Seller emailorSeller email(required)🔏 Customer emailorCustomer email(required)
The 🔏 (lock) emoji is optional but recommended to help identify signature-related fields in Wrike.
The system accepts field names with or without the 🔏 emoji prefix. Both 🔏 Seller email and Seller email will work, but using the 🔏 emoji helps identify signature-related fields in Wrike.
Required Document Fields
Your document template must include the following anchor fields for TurboSign to place signature elements:
{SalesSignerName}- Where the seller's name will appear{SalesDate}- Where the seller's signature date will appear{SalesSignerSignature}- Where the seller's signature field will be placed{ClientSignerName}- Where the customer's name will appear{ClientDate}- Where the customer's signature date will appear{ClientSignerSignature}- Where the customer's signature field will be placed
- TurboSign must be configured in your TurboDocx organization
- The Wrike task must have at least one document attachment
- The document must contain all required signature anchor fields
- The Wrike task/folder must have the required custom fields populated
Troubleshooting
Wrike API Key Not Found
Cause: The wrikewebhook API key doesn't exist in your TurboDocx organization.
Solution:
- Go to TurboDocx Settings → Organization Settings → API Keys
- Verify an API key named exactly
wrikewebhook(no dash, all one word) exists - If not, create one following Step 2C
- Common mistake: Make sure the key is named
wrikewebhooknotwrike-webhook(no dash!)
Invalid Webhook Signature
Cause: The webhook secret doesn't match the API key.
Solution:
- Verify the
secretin your webhook matches thewrikewebhookAPI key exactly - Delete the webhook in Wrike and recreate it with the correct secret
- Make sure you copied the full API key without extra spaces
Invalid Webhook Payload
Cause: Wrike sent an unexpected payload format.
Solution:
- This is usually a Wrike configuration issue
- Verify your webhook is set up for the correct event types
- Check the Wrike webhook logs in Wrike Settings → Webhooks
Status Not Supported
Cause: The task status changed to a status that TurboDocx doesn't monitor.
Solution:
- This is normal behavior - the webhook only triggers for specific statuses
- Make sure you're using one of the allowed statuses:
generate document,generate sow, orsend for signature - Check your Wrike workflow configuration
Document Generation Takes Too Long
Cause: Complex templates or AI generation can take 1-2 minutes.
Solution:
- Wait at least 2 minutes before assuming failure
- Simplify your template or reduce the number of AI-generated variables
Document Not Attached to Wrike Task
Cause: Generation succeeded but attachment failed.
Solution:
- Check that your Wrike API token has permission to add attachments
- Verify the Wrike folder/task still exists
Join our Discord community for support! Our team and community members are ready to help you troubleshoot any issues. 🚀
Security and Privacy
Best Practices
- Rotate API Keys Regularly: Update your
wrikewebhookAPI key every 90 days - Use Contributor Role: Only grant the minimum permissions needed
- Monitor Webhook Activity: Review webhook logs in Wrike settings
- Secure Your Secrets: Never commit API keys or secrets to version control
Tips for Success
Getting the Best Documents
Keep Wrike Data Clean:
- Use descriptive task titles and descriptions
- Fill in custom fields with relevant project information
- Add context in task comments (AI uses this!)
Optimize Your Templates:
- Create specific templates for different document types
- Use AI variable generation for complex sections
- Test templates before setting up webhooks
Use Descriptive Status Names:
- Make custom statuses clear: "Generate Client Proposal" vs. "Generate Document"
- Document your workflow for team members
- Consider different statuses for different document types
Workflow Ideas
SOW Generation Workflow:
- Create project folder in Wrike
- Add all deliverables as tasks
- Move folder to "Generate SOW" status
- TurboDocx generates comprehensive SOW from all tasks
- Review and send to client
Proposal Automation:
- Create opportunity in Wrike
- Add project details and pricing
- Change status to "Generate Proposal"
- Review AI-generated proposal
- Change status to "Send for Signature"
- Client receives signed proposal
Weekly Reporting:
- Create "Weekly Report" task
- Link to relevant project tasks
- Every Friday, change status to "Generate Document"
- Auto-generated report appears in attachments
What's Next? 🎯
Congratulations! You've successfully set up the Wrike integration. Now you can:
✅ Automatically generate documents from Wrike status changes ✅ Create SOWs, proposals, and reports without manual data entry ✅ Send documents for signature directly from Wrike ✅ Save hours every week on document generation
Next Steps:
- Create multiple webhooks for different project types or templates
- Train your team on using the trigger statuses
- Build a template library for common document types
- Set up custom workflows in Wrike to streamline your processes
FAQ
Can I use multiple templates with the same Wrike folder?
No, each webhook is tied to one template. However, you can create multiple webhooks for the same folder with different templates, and use different trigger statuses to determine which webhook fires.
What happens if I delete the API key?
All webhooks using that API key will stop working and return 404 errors. Create a new wrikewebhook key to restore functionality.
Can I use this with Wrike tasks or only folders?
Both! The webhook monitors a specific folder, but the status changes happen on tasks within that folder. You can also monitor entire spaces or projects.
How do I know if document generation failed?
If document generation fails, you won't see the document attached to your Wrike task. Join our Discord community for help troubleshooting any issues.
Can the AI use data from multiple Wrike tasks?
Yes! If you trigger from a folder, the AI can access all tasks within that folder. If you trigger from a task, it can access parent/child tasks as well.
May your documents generate themselves, your workflows automate effortlessly, and your Wrike projects always stay on track! 🚀✨