How to Get a Document Signed with TurboSign
Ready to send your first document for e-signature? You're in the right place! This step-by-step guide will walk you through the entire process of preparing and sending your document using TurboSign.
What You'll Accomplish
By the end of this guide, you'll know how to:
- 📄 Upload or select documents for signature
- 👥 Add recipients and manage signing order
- ✏️ Place signature fields exactly where you need them
- 📤 Send documents for signature with confidence
- 🔄 Track the signing process from start to finish
This entire process takes less than 5 minutes once you get the hang of it. We'll have you sending professional signature requests in no time! 🚀
Before You Begin
To use TurboSign effectively, you'll need:
- Access to TurboDocx
- A document ready for signing (PDF, Word, or existing TurboDocx deliverable)
- Email addresses for all recipients who need to sign
- About 60 seconds of your time ⏰
Have your document ready and know exactly where signatures are needed before you start. This makes the whole process much smoother!
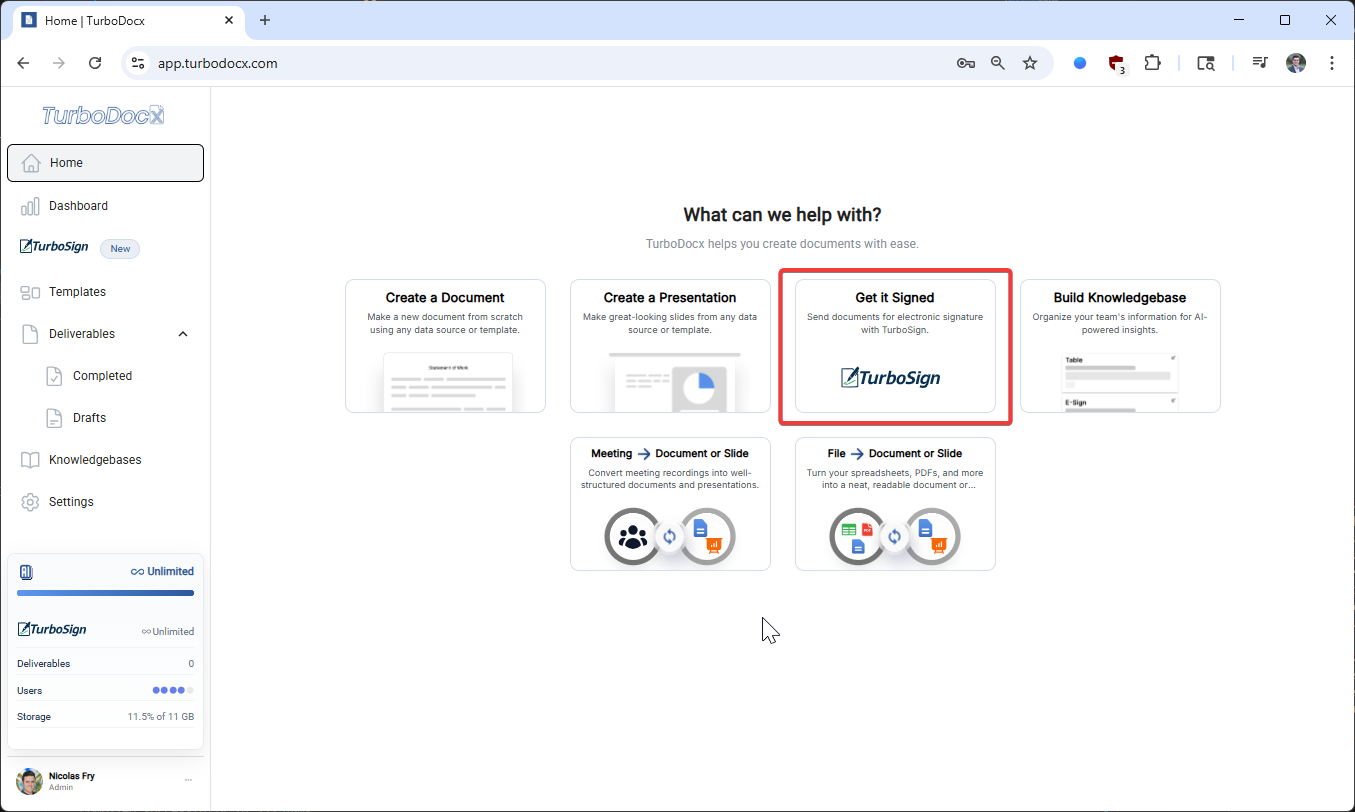
Step 1: Click "Get It Signed"
Let's start by getting to TurboSign from your main dashboard.
From the TurboDocx homepage, look for the "Get It Signed" button and click it. This will take you directly to TurboSign where all the magic happens.
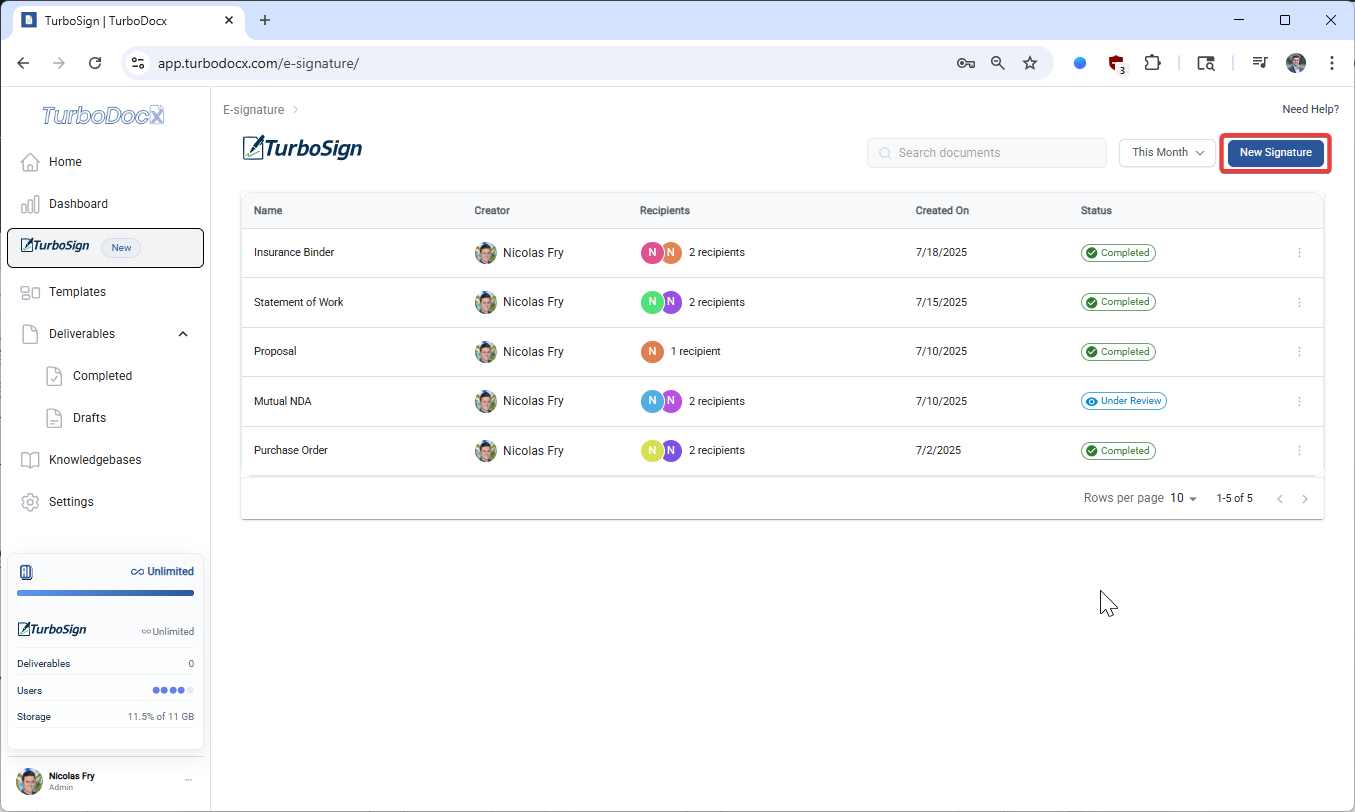
Step 2: Start a New Signature Request
Now that you're in TurboSign, it's time to create your first signature request.
In the top right corner of the TurboSign interface, you'll see a "New Signature" button. Click it to begin preparing your document for signatures.
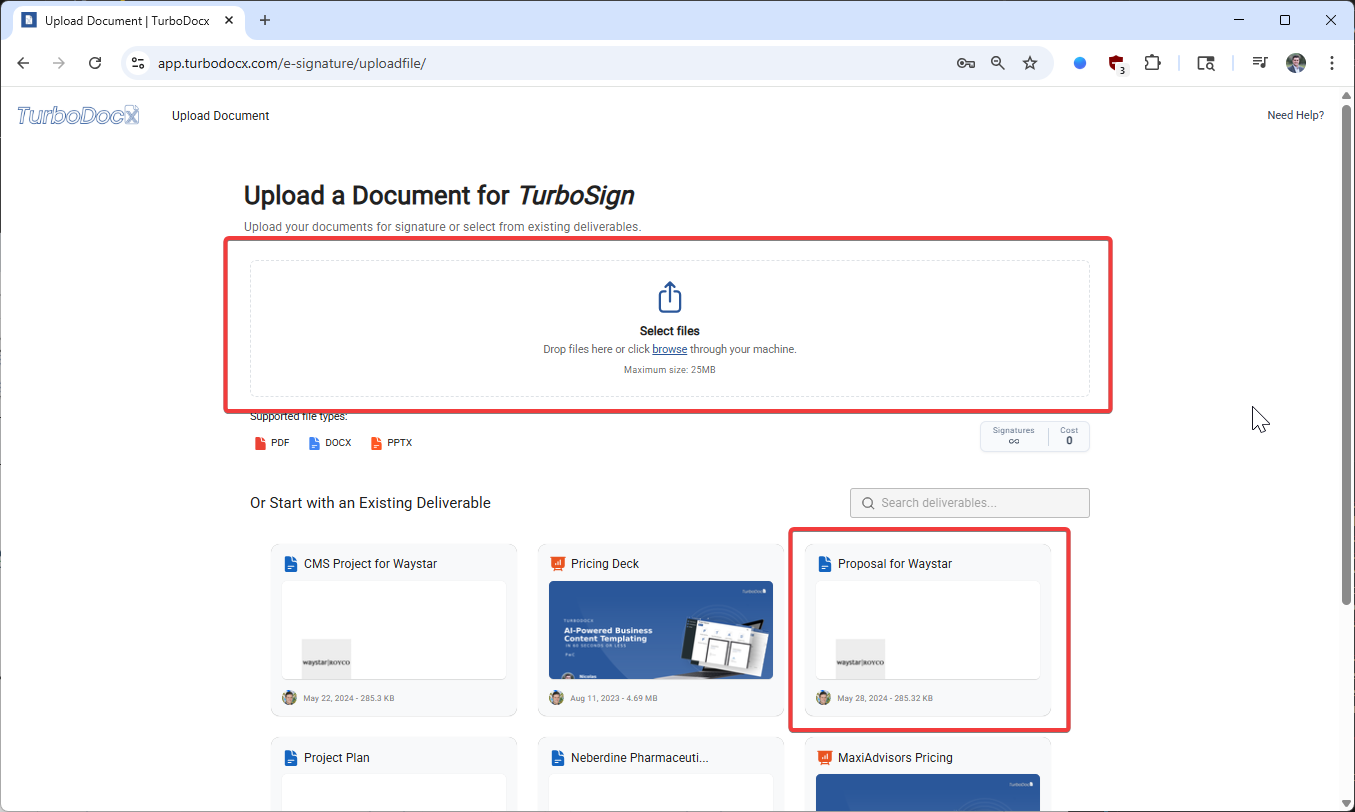
Step 3: Upload or Select a Document
Time to choose your document! TurboSign gives you two convenient options:
Option A: Upload a New Document
Upload a new document from your computer by clicking the upload area or dragging and dropping your file.
Supported formats:
- PDF files (.pdf)
- Word documents (.docx)
- Other common document formats
Option B: Select an Existing Deliverable
Select an existing deliverable you've already created within TurboDocx. This is perfect if you've already generated a document and want to get it signed.
- PDF files work best for consistent formatting across all devices
- Keep file sizes reasonable (under 10MB) for faster loading
- Make sure your document is final before uploading - you can't edit content after this step
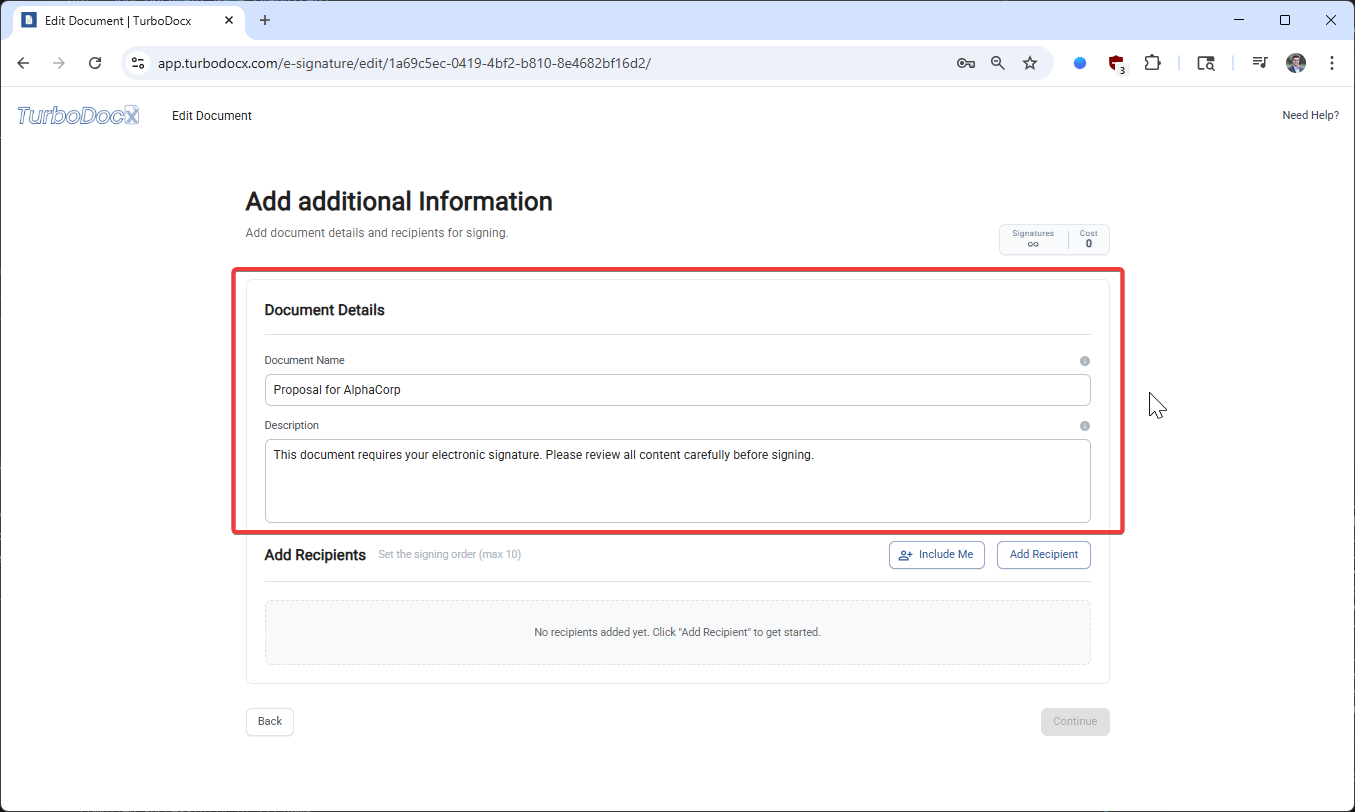
Step 4: Add Document Details
Now let's add some important information about your document.
Fill in the required information:
Document Name (Required)
Give your document a clear, descriptive name. This will help you and your recipients identify the document easily.
Good examples:
- "Q3 Marketing Agreement - ABC Corp"
- "Employment Contract - John Smith"
- "Service Agreement - Project Alpha"
Description (Optional)
Add a brief description to provide context for your recipients. This appears in the signature request email.
Good examples:
- "Please review and sign this quarterly marketing agreement"
- "New employee contract for review and signature"
- "Service agreement for the upcoming project"
Step 5: Add Recipients
Time to add the people who need to sign your document. This is where you control who signs and in what order.
Adding Recipients
Click "Add Recipient" to assign others to sign the document. You can add multiple recipients as needed.
For each recipient, you'll need:
- Full name (as it should appear on the signature)
- Email address (where they'll receive the signature request)
Including Yourself
Click "Include Me" if you also need to sign the document. This adds you to the recipient list automatically.
Setting Signing Order
Drag to change the signing order if it matters for your document. The signing order determines who gets the document first.
When order matters:
- Legal documents that require witness signatures
- Contracts where one party must sign before the other
- Documents with approval workflows
When order doesn't matter:
- Simple agreements between equal parties
- Documents where all parties can sign simultaneously
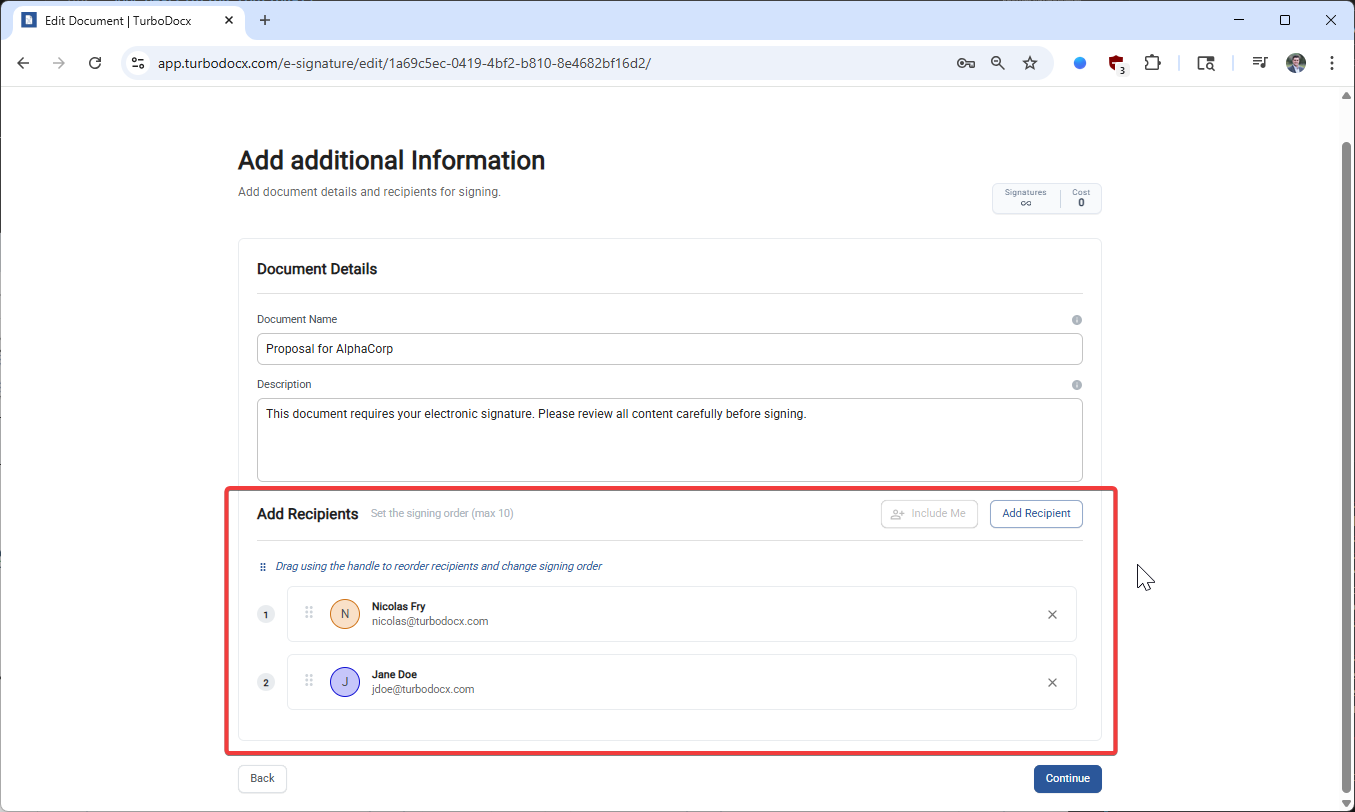
CC Emails (Optional): You can also add CC email addresses for people who should receive a copy of the document. These individuals will get the final signed copy when everyone has completed signing, but they won't need to sign the document themselves.
- Use professional email addresses for business documents
- Double-check email addresses - typos mean delayed signatures
- Add yourself first if you need to sign before others
- Keep signing order simple unless legally required
Step 6: Continue to Field Placement
Almost there! Now we'll move to the most important part - telling TurboSign exactly where signatures and other information should go.
Click "Continue" in the bottom right corner to move to the field placement interface. This is where you'll drag and drop signature fields onto your document.
Step 7: Place Signature Fields
Here's where the magic happens! You'll drag and drop the necessary fields onto your document exactly where you want them.
Available Field Types
The field editor provides several types of fields you can add:
Essential Fields:
- Signature - The actual signature field
- Name - Typed name field
- Date - Date when signed
- Initials - For initialing pages or sections
Additional Fields:
- Text - For additional information
- Checkbox - For confirmations or agreements
- Dropdown - For selecting from options
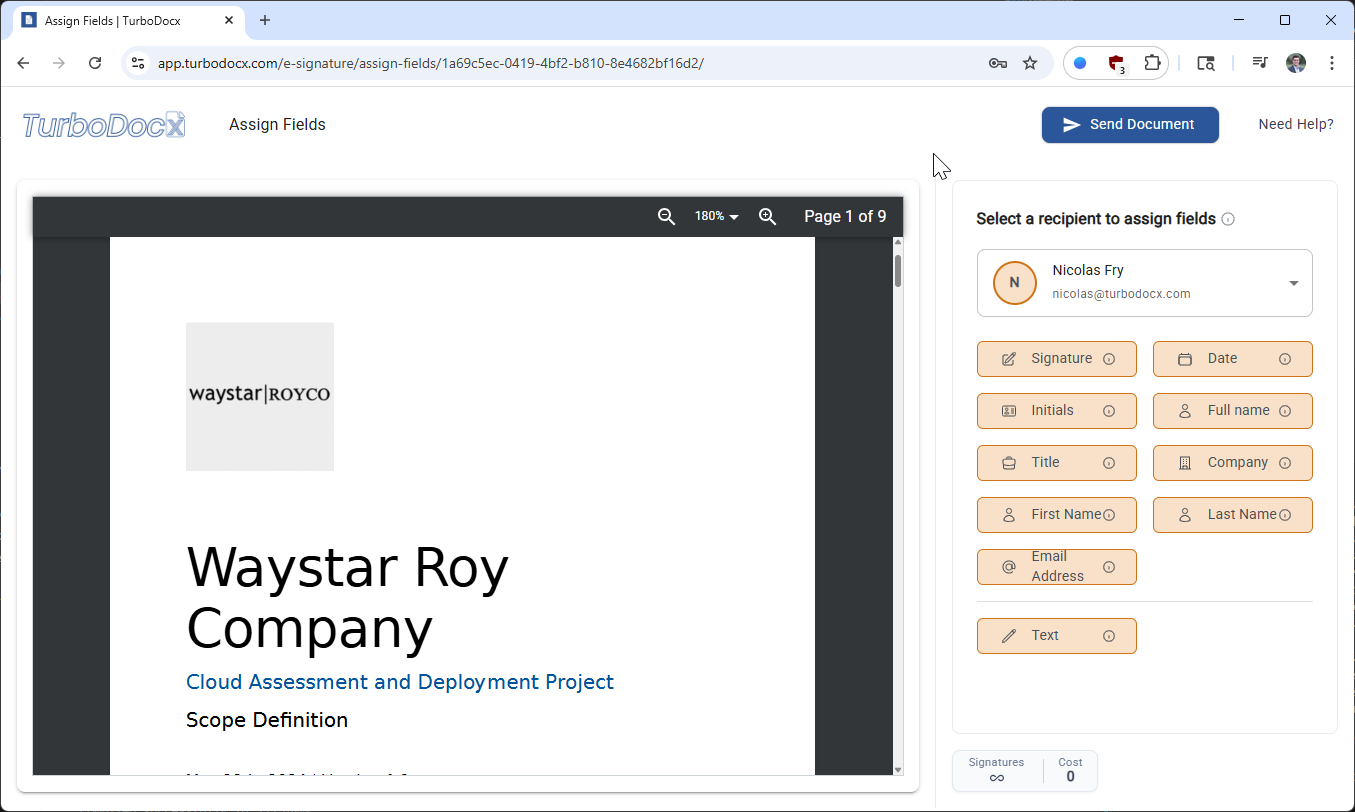
How to Place Fields
- Drag the field type from the left panel
- Drop it onto the document where you want it to appear
- Resize if needed by dragging the corner handles
- Assign to the correct recipient using the dropdown
Assigning Fields to Recipients
Each field must be assigned to a recipient. Make sure you:
- Assign signature fields to the correct person
- Place fields in logical locations on the document
- Ensure all required fields are present

- Place signature fields near signature lines if your document has them
- Add date fields near signatures for legal completeness
- Use initials fields for multi-page documents
- Test field sizes - they should be large enough for signatures but not overwhelming
- Group related fields together for better user experience
Step 7.5: Setting Default Values (Optional)
Want to save your recipients time by pre-filling some information? TurboSign lets you set default values that will automatically appear in fields when recipients open the document. This is especially useful for common information you already know about your signers.
What Are Default Values?
Default values are pre-filled text that appears in fields automatically. Recipients can see this information already filled in and:
- Keep it as-is if it's correct
- Edit it if they need to make changes
- Save time by not typing common information from scratch
Perfect for information you already know:
- Shipping addresses for order forms
- Client contact details from your records
- Company information for regular business partners
- Any information recipients can review and correct if needed
How to Set Default Values
You can set default values for each recipient to pre-fill common information.
Signature, Initials, and Date fields cannot have default values because they must be completed by the recipient at signing time.
Setting Default Values Per Recipient
Default values are set per recipient and will pre-fill their fields.
Step 1: Find the Default Values Accordion
Scroll down in the right sidebar until you see the "Default values for [recipient name] (Optional)" accordion. Click to expand it.
Step 2: Enter Default Values
Fill in any of the available fields:
- Full name - Complete name (e.g., "John Smith")
- First Name - Given name only (e.g., "John")
- Last Name - Family name only (e.g., "Smith")
- Email Address - Contact email (e.g., "john.smith@company.com")
- Title - Job title (e.g., "Senior Manager")
- Company - Organization name (e.g., "Acme Corporation")
Step 3: Switch Between Recipients
Use the recipient tabs at the top to set different default values for each signer.
Each field has a maximum character limit. TurboSign will show you a character counter when you're approaching the limit so you don't lose any information.
Practical Examples
Example: Service Order
You're sending a service agreement to a client named Sarah Johnson. You already have her information from a previous order:
Default values for Sarah:
- Full name: "Sarah Johnson"
- Email Address: "sarah.johnson@example.com"
- Company: "Acme Corporation"
- Text field for "Service Address": "123 Main Street, Suite 400, San Francisco, CA 94105"
Now when Sarah receives the document, these fields will be pre-filled with this information. She can review and correct anything if needed before signing.
Best Practices for Default Values
Do:
- ✅ Use accurate information - Double-check spelling and formatting
- ✅ Keep it concise - Stay within character limits
- ✅ Save time on repeat signers - Great for clients with existing records
- ✅ Pre-fill known facts - Addresses, contact details, company names
Don't:
- ❌ Don't force information - Recipients can edit defaults if needed
- ❌ Don't use for signatures/initials - These fields must be completed during signing
- ❌ Don't include sensitive data - Avoid passwords, SSNs, or confidential information
- ❌ Don't overfill - Only set defaults for information you truly know
If you send the same type of document to the same people regularly, setting default values can cut signing time in half! Recipients can review and submit much faster when common fields are already filled.
Step 8: Send the Document
The final step! Once all fields are placed and everything looks perfect, it's time to send your document for signatures.
Click "Send Document" in the top right corner to initiate the signing process.

What Happens Next
After clicking "Send Document":
- Email notifications are sent to all recipients
- Recipients receive a secure link to sign the document
- You get notifications as each person signs
- Everyone receives a copy of the fully signed document
Congratulations! 🎉
That's it! Your document is now on its way to being signed. You've successfully:
- ✅ Uploaded or selected your document
- ✅ Added recipients and set signing order
- ✅ Placed signature fields exactly where needed
- ✅ Sent the document for signatures
What to Expect
Timeline:
- Recipients usually receive emails within minutes
- Most people sign within 24-48 hours
- You'll get notifications for each signature
Tracking:
- Monitor progress in your TurboSign dashboard
- Send gentle reminders if needed
- Download the completed document when all signatures are collected
Tips for Success
For Faster Signatures
- Use clear document names so recipients know what they're signing
- Add helpful descriptions to provide context
- Send during business hours for faster response
- Follow up politely if signatures are delayed
For Professional Results
- Test your document by sending it to yourself first
- Use consistent field sizes for a clean look
- Place fields logically following document flow
- Keep signing order simple unless legally required
For Peace of Mind
- Double-check email addresses before sending
- Review field placement carefully
- Save templates for documents you use frequently
- Keep records of all signed documents
Troubleshooting Common Issues
"The Send Button is Disabled"
Solution: Make sure you've placed at least one signature field for each recipient. The Send button appears only when your document is ready.
"Recipient Says They Can't Haven't Received the Email"
Solution: Check that you used the correct email address and that the signing link hasn't expired. You can resend the invitation from your dashboard.
"I Made a Mistake in the Document"
Solution: It's best practice to void the document and send a new version.
What's Next?
Now that you know how to send documents for signature, you might want to explore:
- Creating signature templates for frequently used documents
- Setting up automated workflows for recurring signature processes
- Integrating TurboSign with your existing document workflows
- Managing completed documents and signatures
You've just mastered the art of digital signatures! Every document you send with TurboSign saves time, reduces errors, and provides a professional experience for all parties involved. Welcome to the future of document signing! 🚀
Ready to sign your next document? Go forth and get those signatures! 📝