End-to-End Example: Generate & Sign a Proposal
This walkthrough follows a real scenario from start to finish. A project manager generates a proposal document from a Wrike task and sends it to a client for digital signature — all by changing task statuses.
This page shows the workflow in action. For setup instructions, see the guides below.
The Scenario
Your team uses Wrike to manage client service delivery projects. Each project has deliverables, timelines, and billing milestones tracked as tasks. When a deliverable is ready, you need to generate a branded proposal with a project timeline, pricing, and signature fields — then send it to the client for signing. With TurboDocx, this entire flow is triggered by two status changes in Wrike.
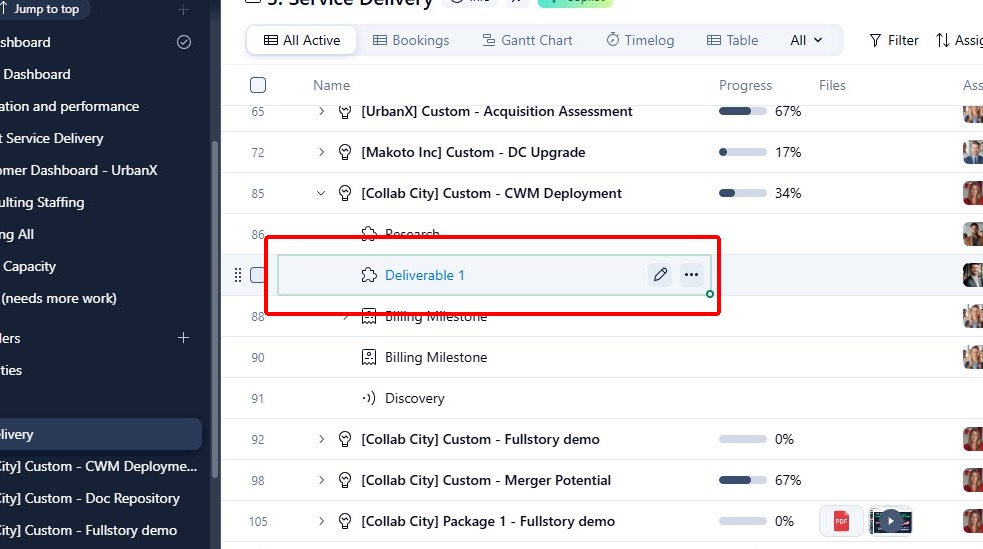
Step 1: Open the Task
Navigate to the task you want to generate a document for. In this example, we're working with "Deliverable 1" under a CWM Deployment project in the Service Delivery space.
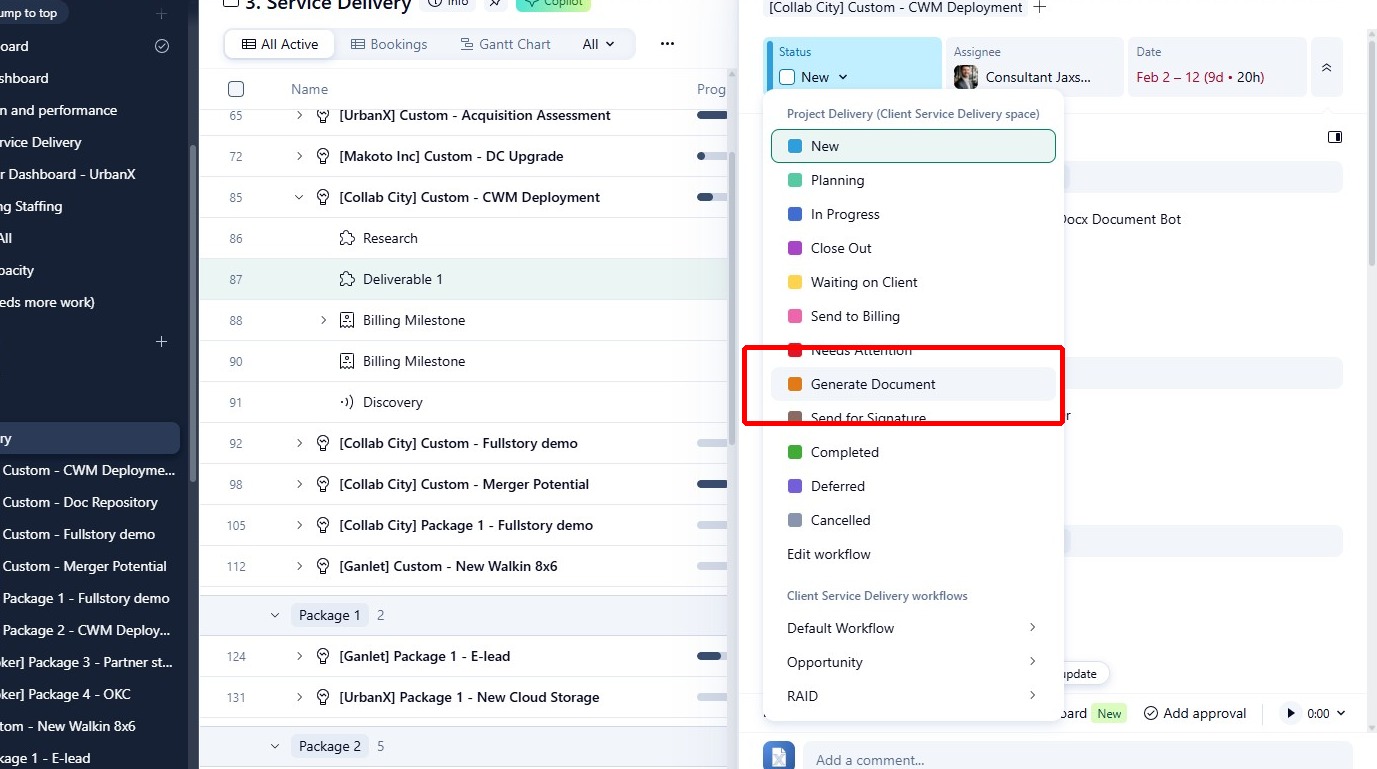
Step 2: Trigger Document Generation
See How to Setup Document Generation Automation to configure the trigger status and template for your automation.
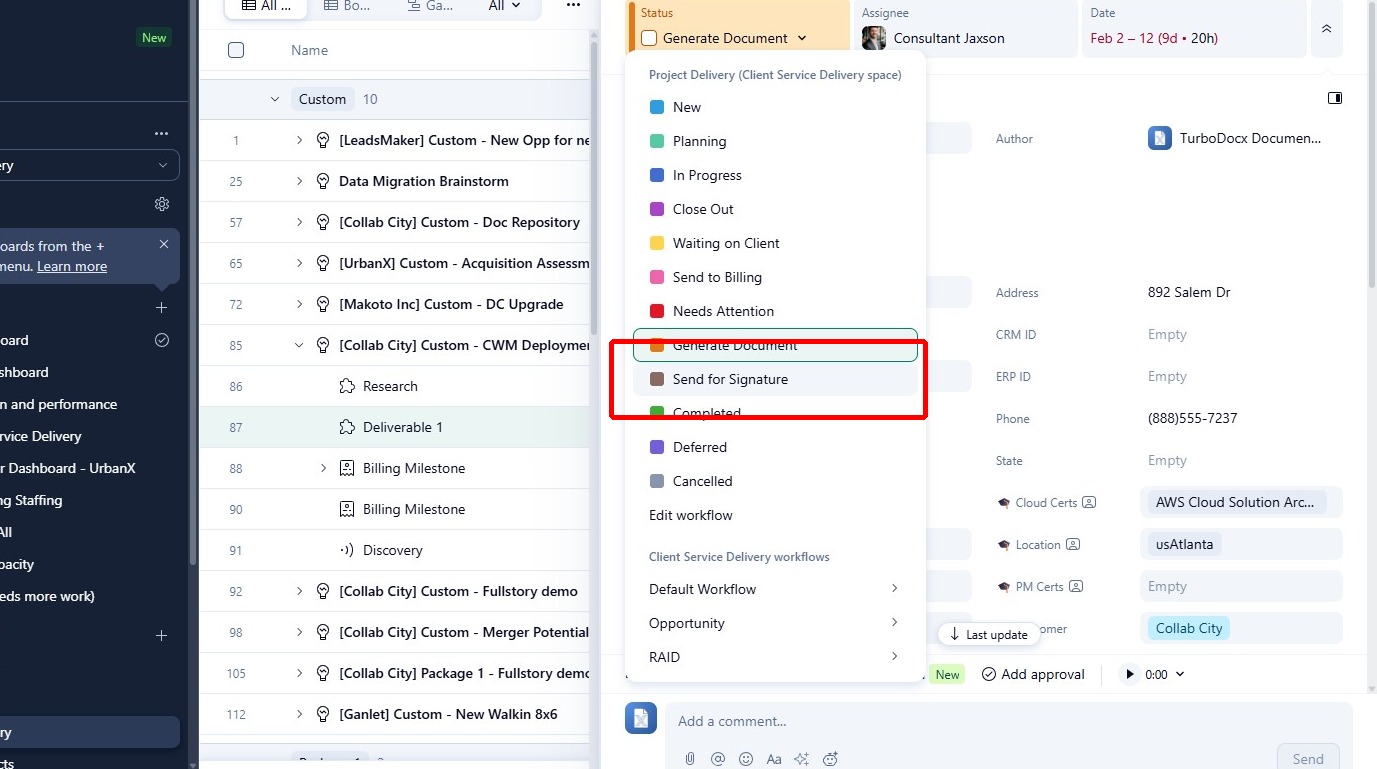
Change the task status to "Generate Document". This is the trigger status configured in the TurboDocx automation — as soon as the status changes, TurboDocx picks it up.
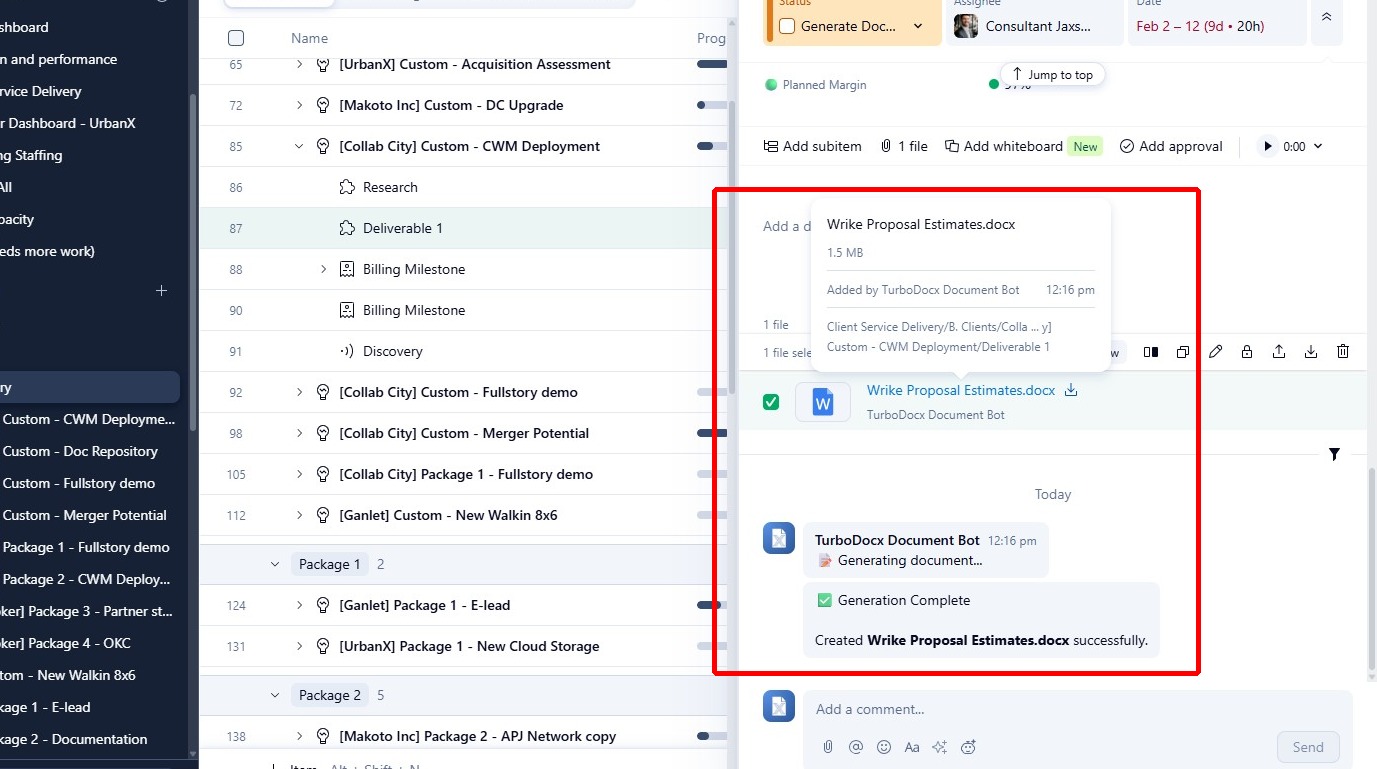
Step 3: Document is Generated and Attached
Within moments, the TurboDocx Document Bot generates the document and attaches it directly to the Wrike task. A comment confirms the file was created successfully — in this case, "Wrike Proposal Estimates.docx".
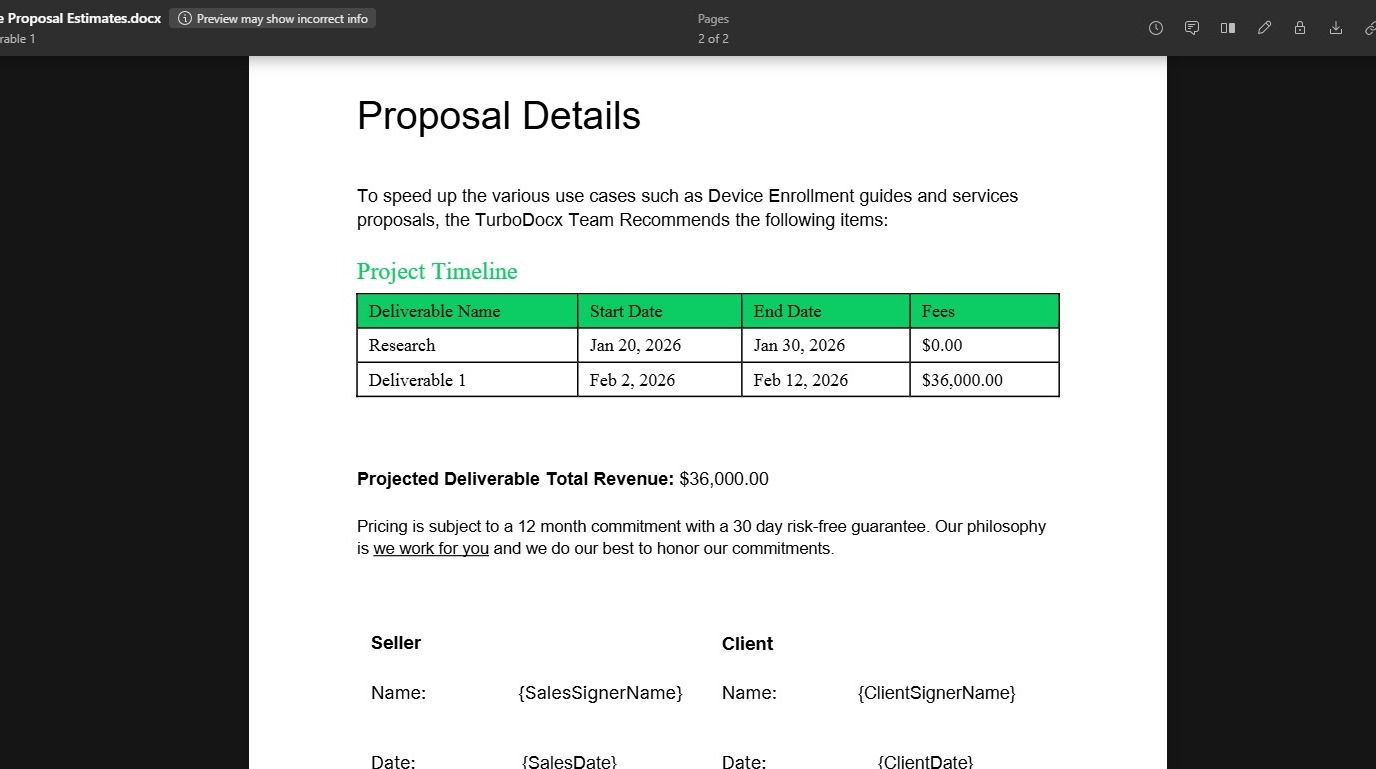
Step 4: Review the Generated Document
See How to Setup Static Field Mapping to map Wrike custom fields to template variables, and How to Setup AI Variable Configuration to configure AI-generated content.
Click the attachment to open and review the proposal. Notice two things:
- The Project Timeline table was generated by AI based on the project's tasks and dates
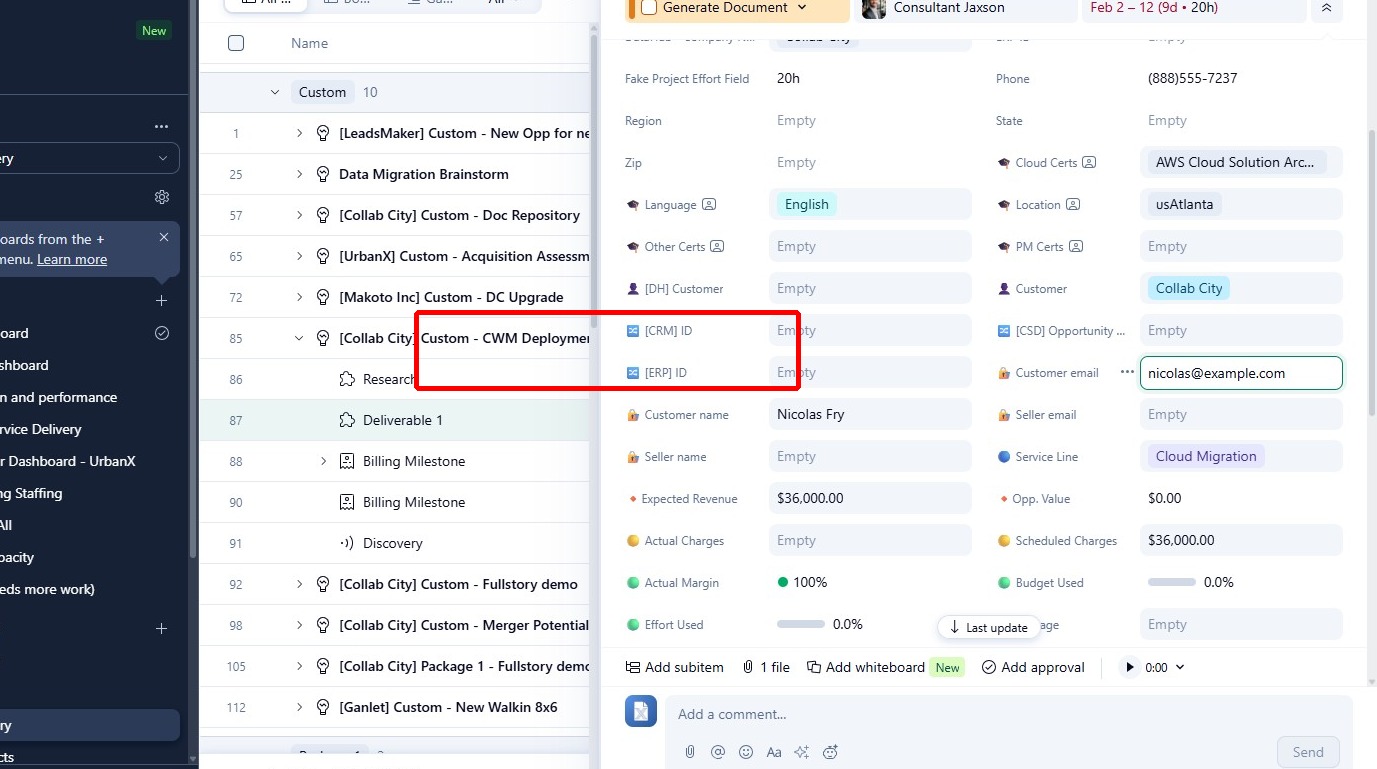
- The Projected Deliverable Total Revenue ($36,000.00) was pulled directly from a Wrike custom field
Step 5: Check the Signature Anchors
Scroll down to the signature section. The document contains signature anchor placeholders like {SalesSignerName}, {SalesSigner}, {ClientSignerName}, and {ClientSignerSignature}. These aren't visible to the final signer — TurboSign replaces them with interactive signature fields.

How are these anchors configured?
In the TurboDocx template settings, each of these variables is marked as a Wrike Signature Anchor. This tells TurboSign to treat them as placement markers for signature fields rather than regular text.
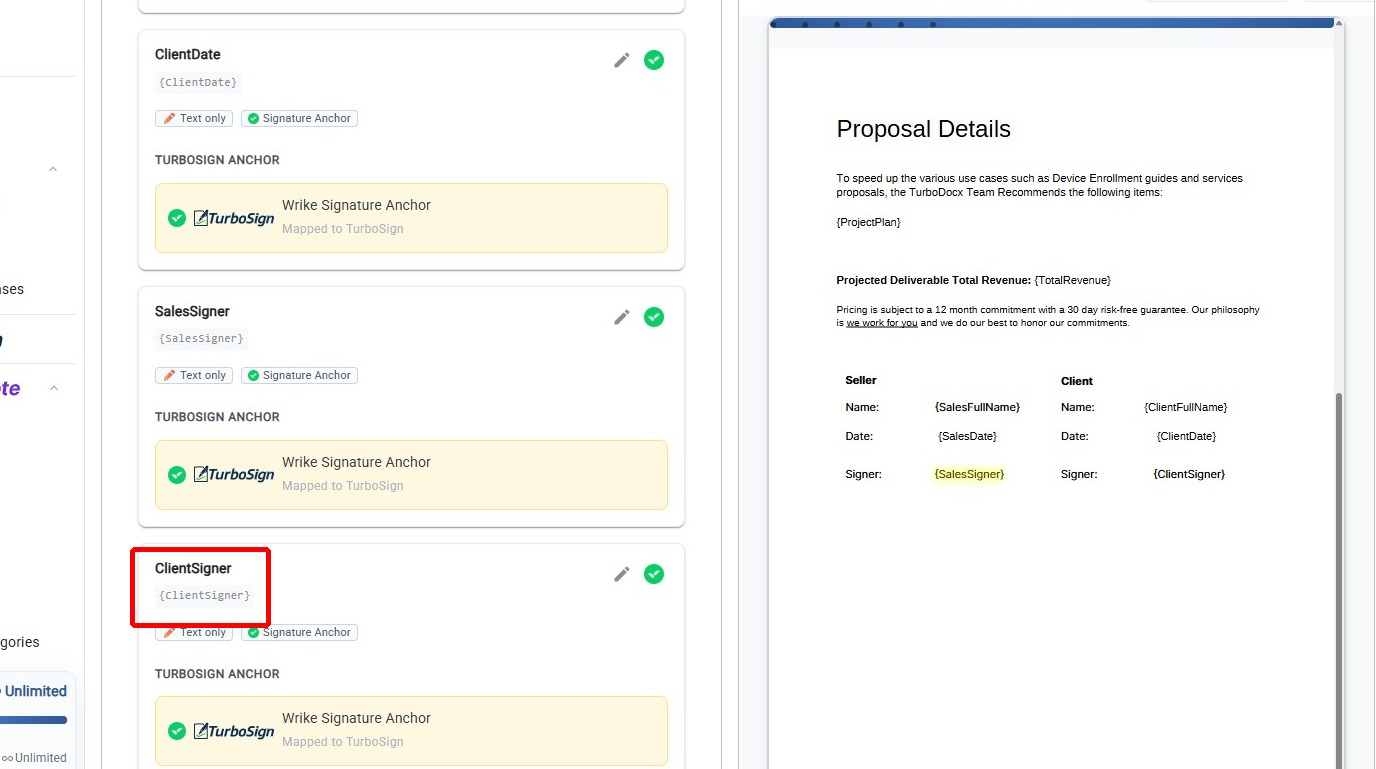
For the full setup guide, see How to Add Signature Anchors.
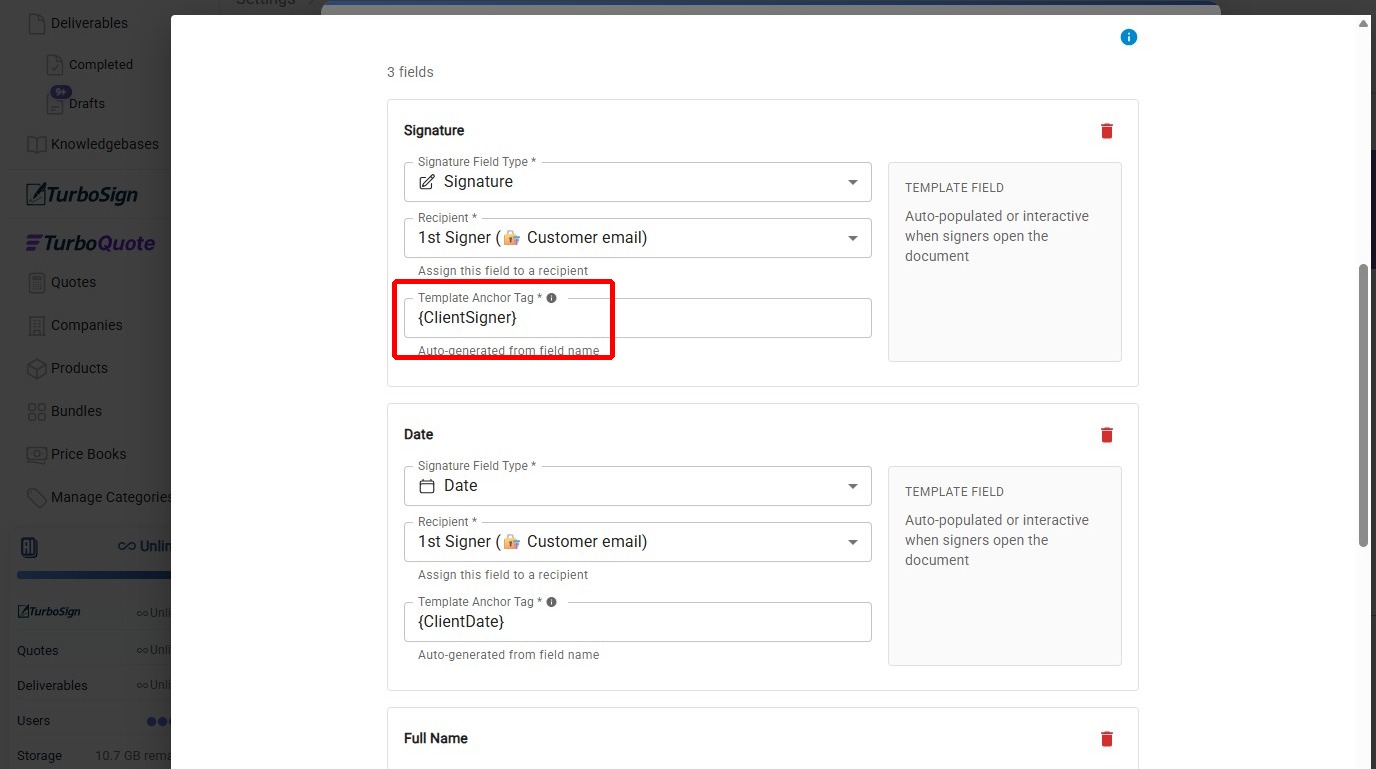
How do anchor tags map to signature fields?
In the e-signature automation configuration, each anchor tag is mapped to a specific signature field type and assigned to a recipient:
{ClientSigner}becomes a Signature box assigned to the 1st Signer (the customer)
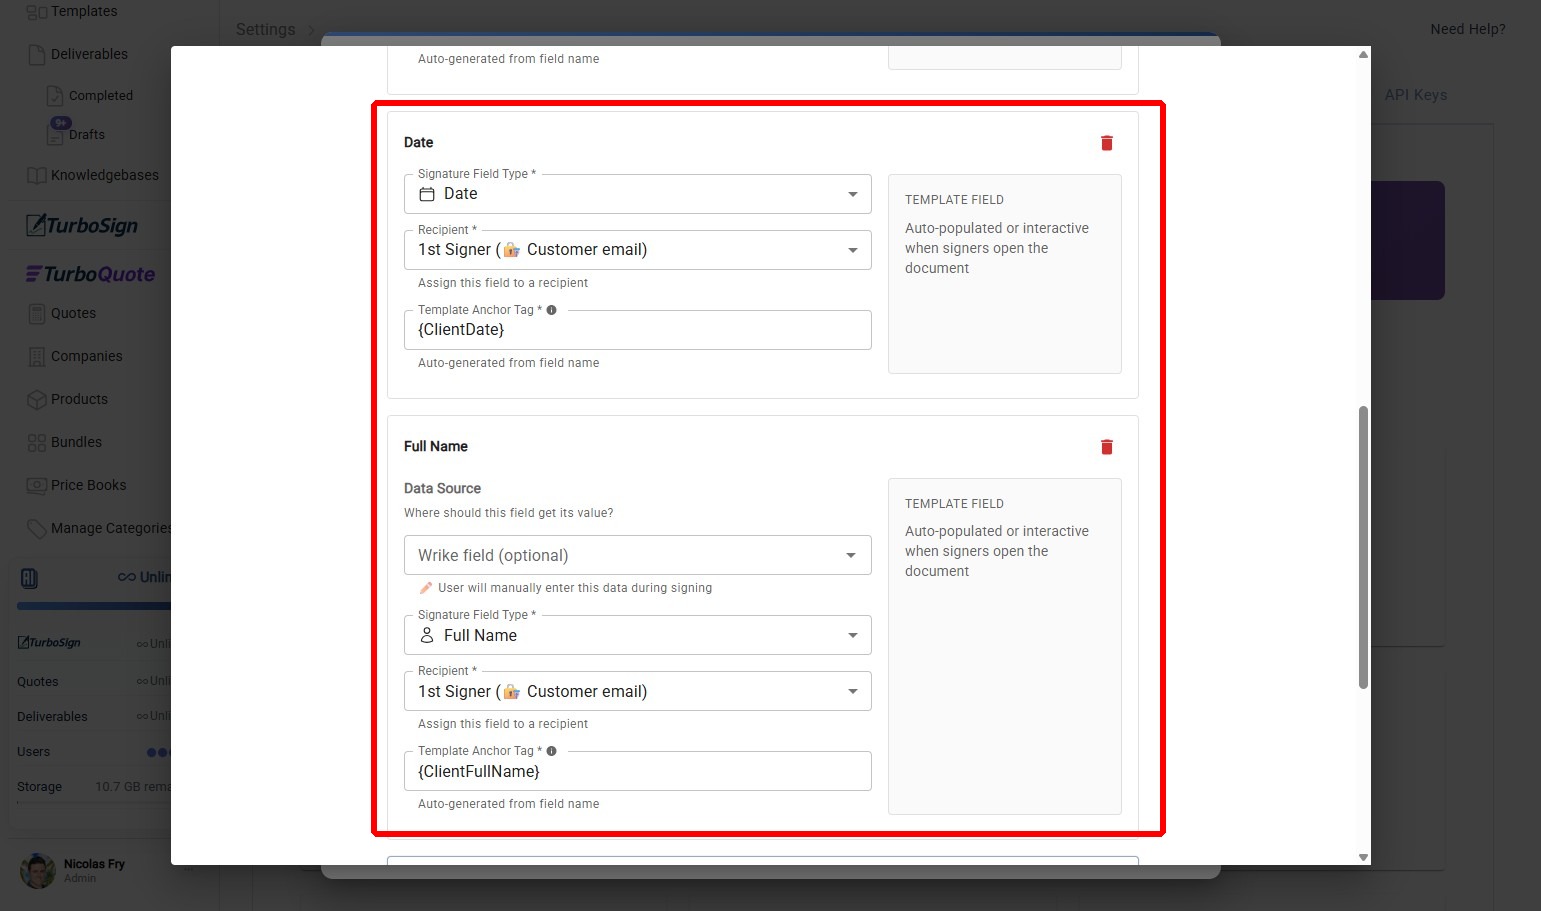
{ClientDate}becomes a Date field, and{ClientFullName}becomes a Full Name field — both auto-populated when the signer opens the document
For the full setup guide, see How to Setup E-Signature Automation.
Where does the recipient email come from?
The signing request is sent to the email address in the "Customer email" custom field on the Wrike task. In this example, that's nicolas@example.com. This field is mapped in the e-signature automation's recipient configuration.
For details on mapping recipient fields, see How to Setup E-Signature Automation.
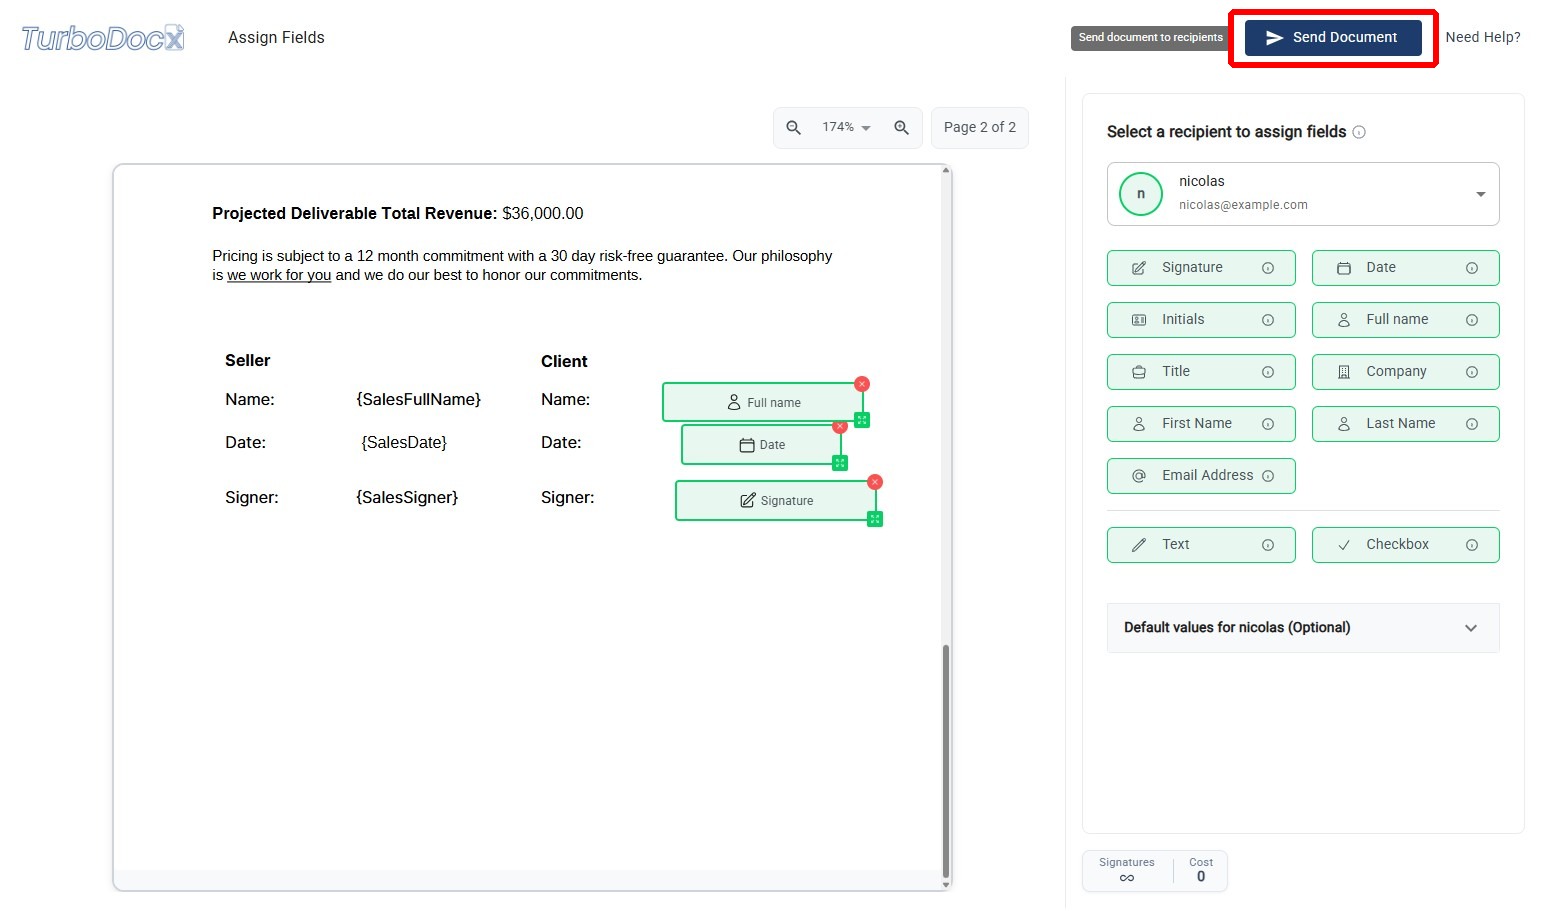
Here's what it looks like once TurboSign places the interactive signature fields on the final document — the anchors from the template become drag-and-drop fields assigned to each recipient:
Step 6: Send for Signature
See How to Setup E-Signature Automation to configure the signature trigger, recipients, and anchor tag mapping.
Back in Wrike, change the task status to "Send for Signature". This triggers the TurboSign signing workflow.
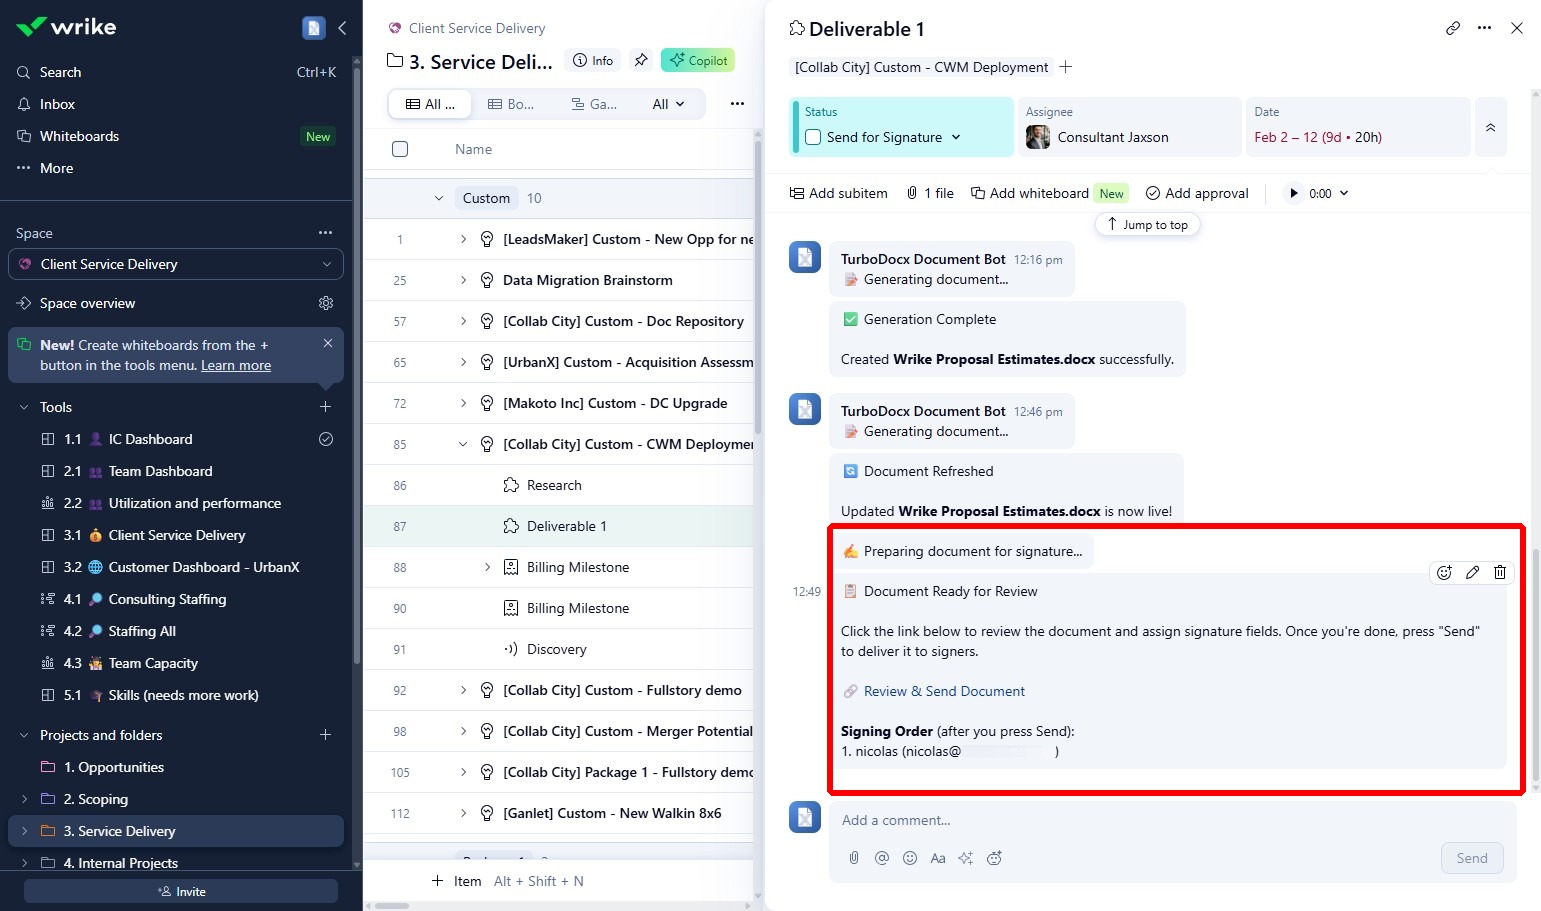
Step 7: Bot Posts Signing Status
The TurboDocx Bot comments on the task with the signing status, the signing order (for documents with multiple signers), and a review link for you to verify the document before it's sent.
Step 8: Review and Send
Click the review link to open TurboDocx's signature assignment view. Here you can verify that the signature fields (Full Name, Date, Signature) are correctly placed on the document. When everything looks right, click "Send Document" to deliver the signing request to the recipient's email.
Set This Up Yourself
Ready to configure this workflow for your team? Follow these guides in order:
| Step | Guide | What You'll Do |
|---|---|---|
| 1 | Setting Up a Wrike Automation | Connect Wrike and create your first automation |
| 2 | How to Setup Static Field Mapping | Map Wrike custom fields (revenue, dates) to template variables |
| 3 | How to Setup AI Variable Configuration | Set up AI-generated content like project timelines |
| 4 | How to Add Signature Anchors | Mark template variables as signature anchor fields |
| 5 | How to Setup E-Signature Automation | Configure recipients, anchor tags, and post-signature actions |