Embed Signing with the Web Component (No React)
Let an agent scaffold this for you
Install the TurboDocx Quickstart Skill and let Claude Code, Cursor, Copilot, Codex, or any agent that speaks the Agent Skills standard install the SDK, wire it into your app, and write a working TurboSign integration end-to-end.
$npx skills add TurboDocx/quickstart›/turbodocx-sdk turbosign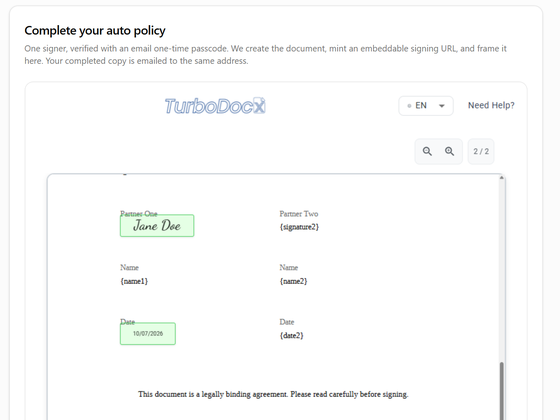
In this guide you drop the turbosign-form custom element into any page. It works in Vue, Angular, Svelte, server-rendered templates, or plain HTML, with no React and no build step required.
The element renders the iframe, checks where each message comes from, and fires a turbosign:completed DOM event when the signer finishes. TurboSign verifies the signer with a six-digit code sent to their email.
What you'll build:
- A server route that creates the document and returns a signing URL.
- A page with the
turbosign-formelement and an event listener.
Prerequisites
- The setup in Before you start: embedded signing on, your origin allowed, and an Administrator or Contributor API key.
- A PDF with
{signature1}and{date1}text anchors.
Step 1: Check your setup and choose how signers verify
An admin must have completed Set up your organization: Enable identity verification is on (it is the master switch for embedded signing), and your app's origin is under Allowed embedding domains.
This guide verifies each signer with an email passcode. Every embedded signer needs a verification method unless you use the sender override while testing. To use SMS, your own identity provider, or the override, see Identity verification.
Step 2: Load the element
Pick one of these. The element registers itself as turbosign-form when the module loads.
With a bundler (Vite, webpack, Angular CLI):
npm install @turbodocx/embed
import "@turbodocx/embed"; // registers <turbosign-form>
Without a build step, load the published ES module from a CDN:
<script type="module" src="https://cdn.jsdelivr.net/npm/@turbodocx/embed@0.2.1/dist/index.js"></script>
Pin an exact version in the CDN URL, as above, so a new release can't change your page without you knowing.
Step 3: Create the document and signing URL on your server
Add a route to your server, for example POST /api/signing-session. It calls createEmbeddedSignature and returns the signer's embedUrl. Your API key never reaches the browser.
- JavaScript / TypeScript
- Python
- PHP
- Go
- Java
- Ruby
import { readFile } from "node:fs/promises";
import { TurboSign } from "@turbodocx/sdk";

TurboSign.configure({
  apiKey: process.env.TURBODOCX_API_KEY!, // an Administrator or Contributor key
  orgId: process.env.TURBODOCX_ORG_ID!,
  senderEmail: "contracts@yourcompany.com",
  senderName: "Your Company",
});

// Call this from your POST /api/signing-session route.
export async function startSigning({ name, email }: { name: string; email: string }) {
  const { documentId, recipients } = await TurboSign.createEmbeddedSignature({
    file: await readFile("contract.pdf"),
    fileName: "contract.pdf",
    documentName: `Service Agreement - ${name}`,
    recipients: [
      {
        name,
        email,
        auth: { emailOtp: true }, // email passcode before the document opens
        fields: { signature: "{signature1}", date: "{date1}" },
      },
    ],
  });

  const signer = recipients[0];
  if (!signer.embedUrl) throw new Error(`Cannot start signing: recipient is ${signer.status}`);
  return { documentId, embedUrl: signer.embedUrl };
}
import os
from turbodocx_sdk import TurboSign

TurboSign.configure(
    api_key=os.environ["TURBODOCX_API_KEY"],  # an Administrator or Contributor key
    org_id=os.environ["TURBODOCX_ORG_ID"],
    sender_email="contracts@yourcompany.com",
    sender_name="Your Company",
)

# Call this from your POST /api/signing-session route (for example a FastAPI handler).
async def start_signing(name: str, email: str) -> dict:
    with open("contract.pdf", "rb") as f:
        pdf = f.read()

    result = await TurboSign.create_embedded_signature(
        file=pdf,
        file_name="contract.pdf",
        document_name=f"Service Agreement - {name}",
        recipients=[
            {
                "name": name,
                "email": email,
                "auth": {"email_otp": True},  # email passcode before the document opens
                "fields": {"signature": "{signature1}", "date": "{date1}"},
            }
        ],
    )

    signer = result["recipients"][0]
    if not signer["embedUrl"]:
        raise RuntimeError(f"Cannot start signing: recipient is {signer['status']}")
    return {"documentId": result["documentId"], "embedUrl": signer["embedUrl"]}
<?php

use TurboDocx\TurboSign;
use TurboDocx\Config\HttpClientConfig;
use TurboDocx\Types\Requests\CreateEmbeddedSignatureRequest;
use TurboDocx\Types\Requests\EmbeddedSignatureRecipient;
use TurboDocx\Types\Requests\EmbeddedRecipientAuth;
use TurboDocx\Types\Requests\EmbeddedRecipientFields;

TurboSign::configure(new HttpClientConfig(
    apiKey: getenv('TURBODOCX_API_KEY'), // an Administrator or Contributor key
    orgId: getenv('TURBODOCX_ORG_ID'),
    senderEmail: 'contracts@yourcompany.com',
    senderName: 'Your Company'
));

// Call this from your POST /api/signing-session route.
function startSigning(string $name, string $email): array
{
    $result = TurboSign::createEmbeddedSignature(new CreateEmbeddedSignatureRequest(
        recipients: [
            new EmbeddedSignatureRecipient(
                name: $name,
                email: $email,
                auth: new EmbeddedRecipientAuth(emailOtp: true), // email passcode before the document opens
                fields: new EmbeddedRecipientFields(signature: '{signature1}', date: '{date1}'),
            ),
        ],
        file: file_get_contents(__DIR__ . '/contract.pdf'),
        fileName: 'contract.pdf',
        documentName: "Service Agreement - {$name}",
    ));

    $signer = $result->recipients[0];
    if ($signer->embedUrl === null) {
        throw new RuntimeException("Cannot start signing: recipient is {$signer->status}");
    }
    return ['documentId' => $result->documentId, 'embedUrl' => $signer->embedUrl];
}
package signing

import (
	"context"
	"fmt"
	"os"

	turbodocx "github.com/TurboDocx/SDK/packages/go-sdk"
)

func newClient() (*turbodocx.Client, error) {
	return turbodocx.NewClientWithConfig(turbodocx.ClientConfig{
		APIKey:      os.Getenv("TURBODOCX_API_KEY"), // an Administrator or Contributor key
		OrgID:       os.Getenv("TURBODOCX_ORG_ID"),
		SenderEmail: "contracts@yourcompany.com",
		SenderName:  "Your Company",
	})
}

// StartSigning is called from your POST /api/signing-session handler.
func StartSigning(ctx context.Context, client *turbodocx.Client, name, email string) (documentID, embedURL string, err error) {
	pdf, err := os.ReadFile("contract.pdf")
	if err != nil {
		return "", "", err
	}

	result, err := client.TurboSign.CreateEmbeddedSignature(ctx, &turbodocx.CreateEmbeddedSignatureRequest{
		File:         pdf,
		FileName:     "contract.pdf",
		DocumentName: "Service Agreement - " + name,
		Recipients: []turbodocx.EmbeddedSignatureRecipient{
			{
				Name:   name,
				Email:  email,
				Auth:   &turbodocx.EmbeddedRecipientAuth{EmailOTP: true}, // email passcode before the document opens
				Fields: &turbodocx.EmbeddedRecipientFields{Signature: "{signature1}", Date: "{date1}"},
			},
		},
	})
	if err != nil {
		return "", "", err
	}

	signer := result.Recipients[0]
	if signer.EmbedURL == "" { // Go uses an empty string, not nil, when no URL was minted
		return "", "", fmt.Errorf("cannot start signing: recipient is %s", signer.Status)
	}
	return result.DocumentID, signer.EmbedURL, nil
}
import com.turbodocx.TurboDocxClient;
import com.turbodocx.models.*;
import java.nio.file.Files;
import java.nio.file.Paths;
import java.util.List;

public class SigningService {
    private final TurboDocxClient client = new TurboDocxClient.Builder()
        .apiKey(System.getenv("TURBODOCX_API_KEY")) // an Administrator or Contributor key
        .orgId(System.getenv("TURBODOCX_ORG_ID"))
        .senderEmail("contracts@yourcompany.com")
        .senderName("Your Company")
        .build();

    // Call this from your POST /api/signing-session route.
    public EmbeddedSignatureRecipientResult startSigning(String name, String email) throws Exception {
        CreateEmbeddedSignatureResponse result = client.turboSign().createEmbeddedSignature(
            new CreateEmbeddedSignatureRequest.Builder()
                .file(Files.readAllBytes(Paths.get("contract.pdf")))
                .fileName("contract.pdf")
                .documentName("Service Agreement - " + name)
                .recipients(List.of(
                    new EmbeddedSignatureRecipient.Builder()
                        .name(name)
                        .email(email)
                        .auth(EmbeddedRecipientAuth.emailOtp()) // email passcode before the document opens
                        .fields(new EmbeddedRecipientFields.Builder()
                            .signature("{signature1}")
                            .date("{date1}")
                            .build())
                        .build()))
                .build());

        EmbeddedSignatureRecipientResult signer = result.getRecipients().get(0);
        if (signer.getEmbedUrl() == null) {
            throw new IllegalStateException("Cannot start signing: recipient is " + signer.getStatus());
        }
        // Return result.getDocumentId() and signer.getEmbedUrl() to the browser.
        return signer;
    }
}
require "stringio"
require "turbodocx_sdk"

TurboDocxSdk::TurboSign.configure(
  api_key:      ENV.fetch("TURBODOCX_API_KEY"), # an Administrator or Contributor key
  org_id:       ENV.fetch("TURBODOCX_ORG_ID"),
  sender_email: "contracts@yourcompany.com",
  sender_name:  "Your Company"
)

# Call this from your POST /api/signing-session route.
def start_signing(name, email)
  result = TurboDocxSdk::TurboSign.create_embedded_signature(
    file:         StringIO.new(File.binread("contract.pdf")),
    fileName:     "contract.pdf",
    documentName: "Service Agreement - #{name}",
    recipients:   [
      {
        name:   name,
        email:  email,
        auth:   { emailOtp: true }, # email passcode before the document opens
        fields: { signature: "{signature1}", date: "{date1}" }
      }
    ]
  )

  signer = result["recipients"].first
  raise "Cannot start signing: recipient is #{signer['status']}" if signer["embedUrl"].nil?

  { "documentId" => result["documentId"], "embedUrl" => signer["embedUrl"] }
end
Step 4: Add the element and listen for completion
<turbosign-form
  id="signing"
  origin="https://app.turbodocx.com"
  height="720"
  title="Sign your agreement"
></turbosign-form>

<script type="module">
  const form = document.getElementById("signing");

  const res = await fetch("/api/signing-session", {
    method: "POST",
    headers: { "Content-Type": "application/json" },
    body: JSON.stringify({ name: "Jane Doe", email: "jane@example.com" }),
  });
  const { embedUrl } = await res.json();
  form.setAttribute("embed-url", embedUrl);

  form.addEventListener("turbosign:completed", (event) => {
    const { documentId, event: kind } = event.detail;
    // kind is "signing_complete", or "already_signed" when the signer reopened a finished link.
    // Confirm on your server (status or `completed` webhook) before you mark the deal as signed.
    form.replaceWith(Object.assign(document.createElement("p"), { textContent: "All set. You're signed." }));
  });
</script>
Attributes
| Attribute | Required | Description |
|---|---|---|
embed-url | Yes | The per-recipient URL from your server. |
origin | Yes, in practice | The exact TurboSign origin, https://app.turbodocx.com. You can also derive it from the URL you frame: new URL(embedUrl).origin. Without it, every message is ignored. |
height | No | A CSS length or a number of pixels. Defaults to 720px. |
title | No | The iframe's accessible name. Defaults to TurboSign signing. |
allow-any-origin | No | Development only. Accepts messages from any origin. Never ship it. |
The element re-emits turbosign:completed as a bubbling CustomEvent, so a listener on a parent element works too. It also defines turbosign:declined and turbosign:error, which the signing page does not send yet.
The element fails closed. If origin is missing, it ignores every message and turbosign:completed never fires. allow-any-origin turns that off for local debugging only.
What the signer sees
The signing panel inside turbosign-form is the same one the other build guides show. The screenshots below come from the sample app's Single signer tab, because it has no web component tab.
-
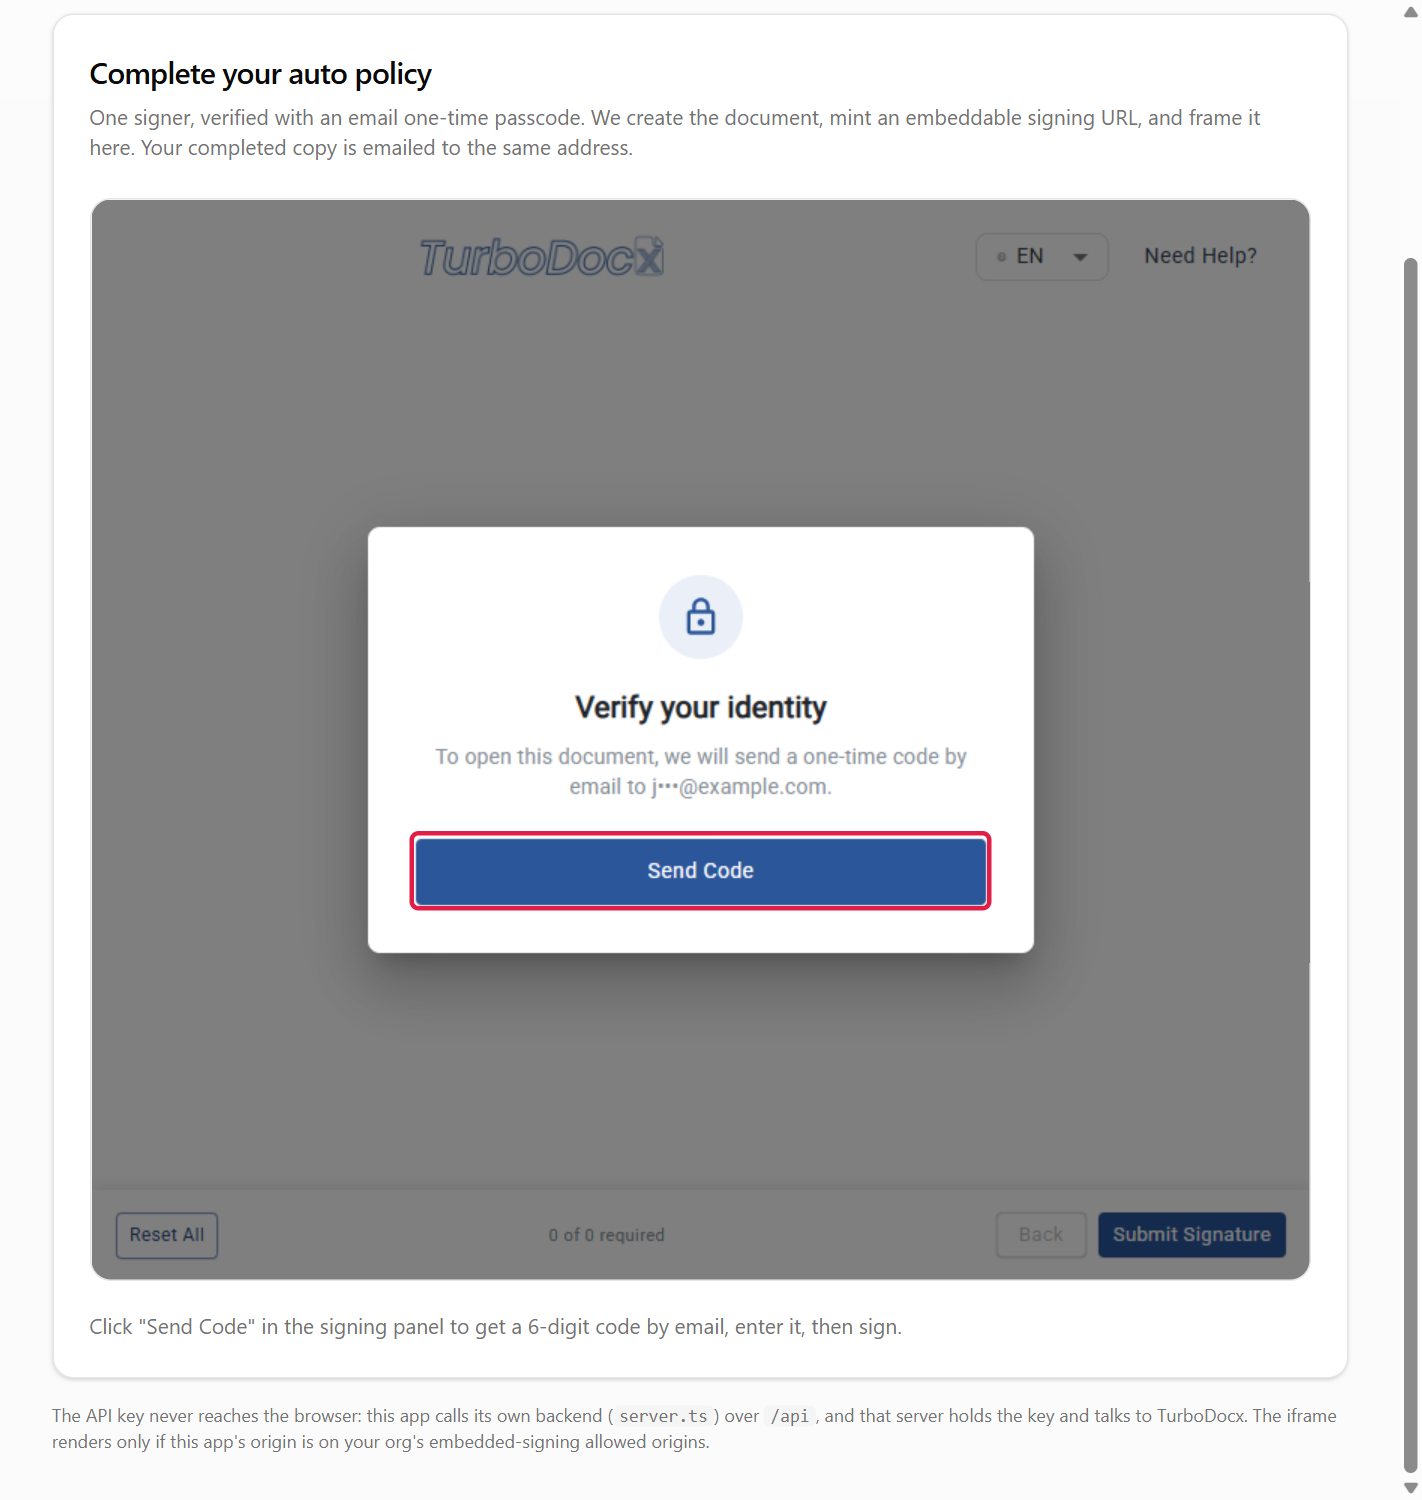
Your page shows the TurboSign signing panel. The signer clicks Send Code, and TurboSign emails a six-digit code to the signer's address.
-
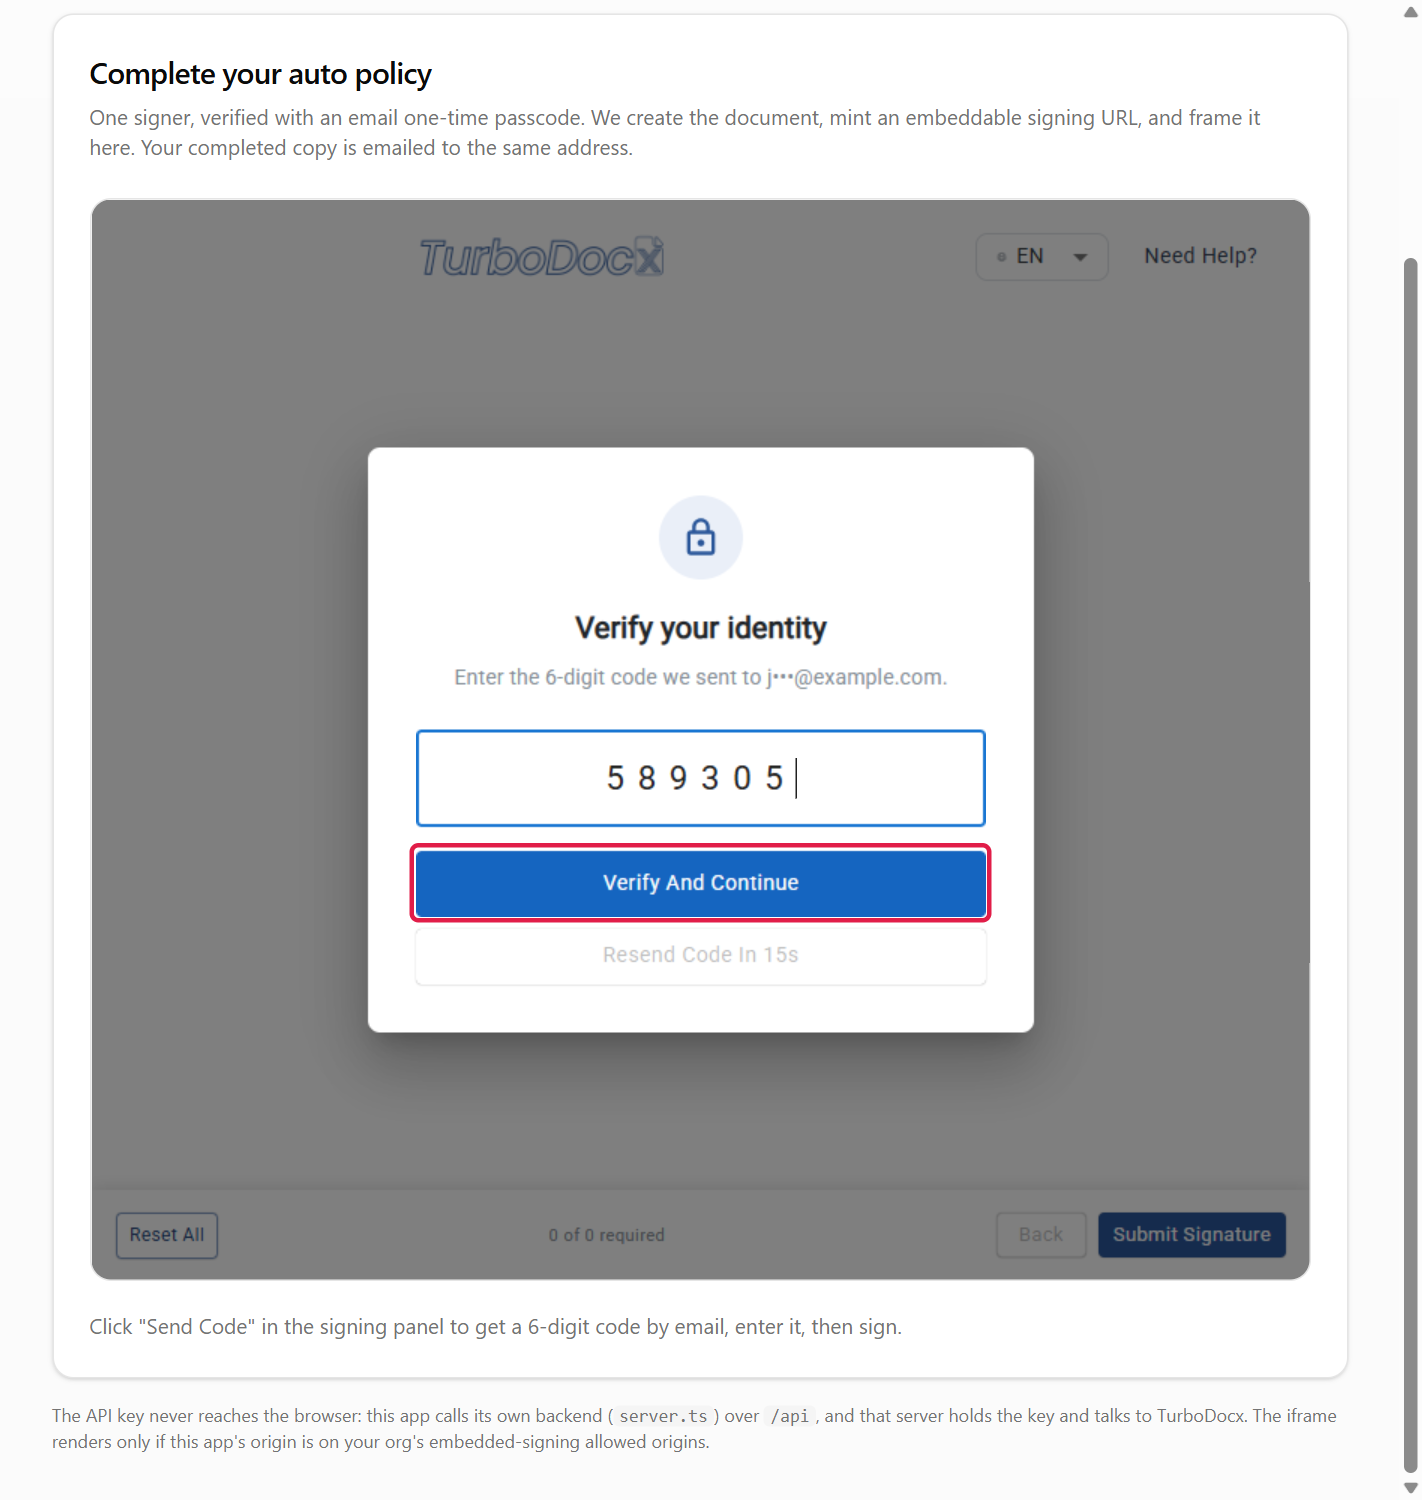
The signer types the code and clicks Verify And Continue.
-
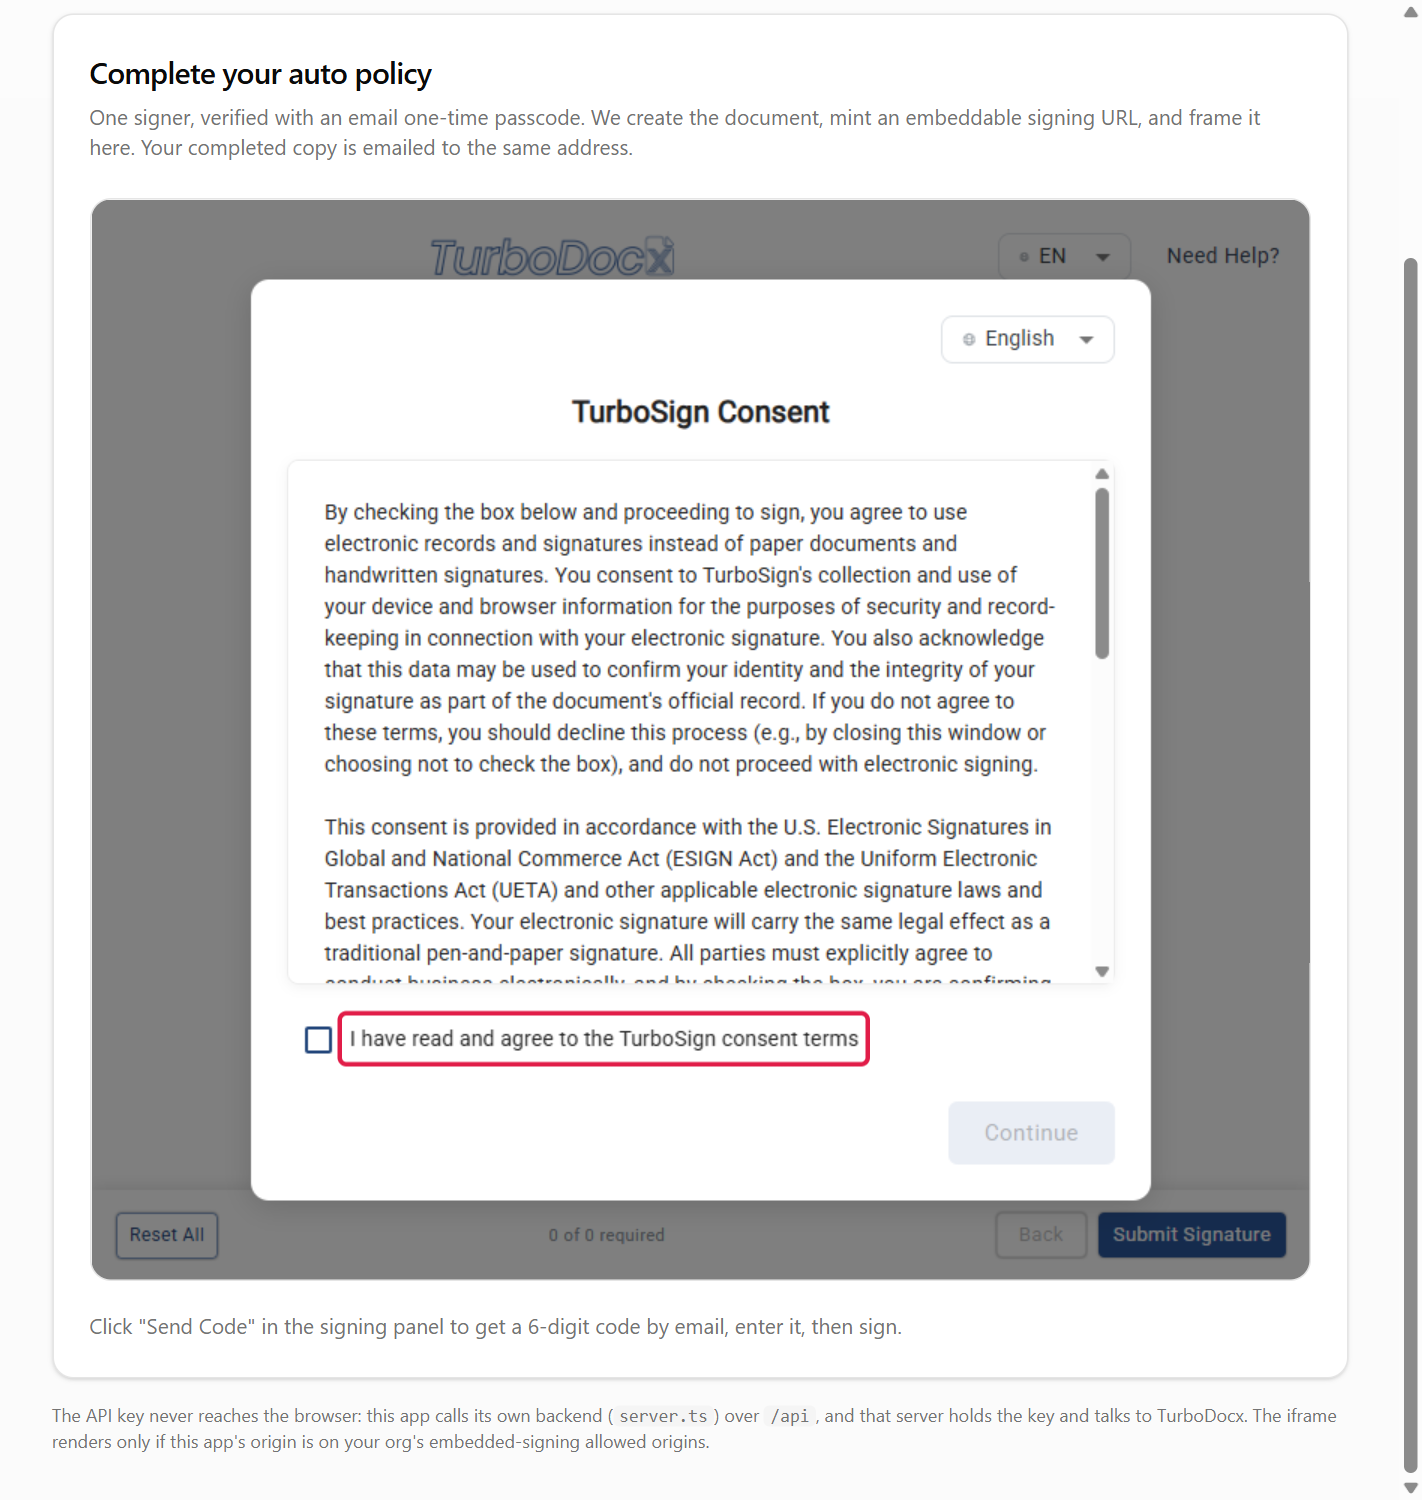
The signer ticks I have read and agree to the TurboSign consent terms and clicks Continue.
-
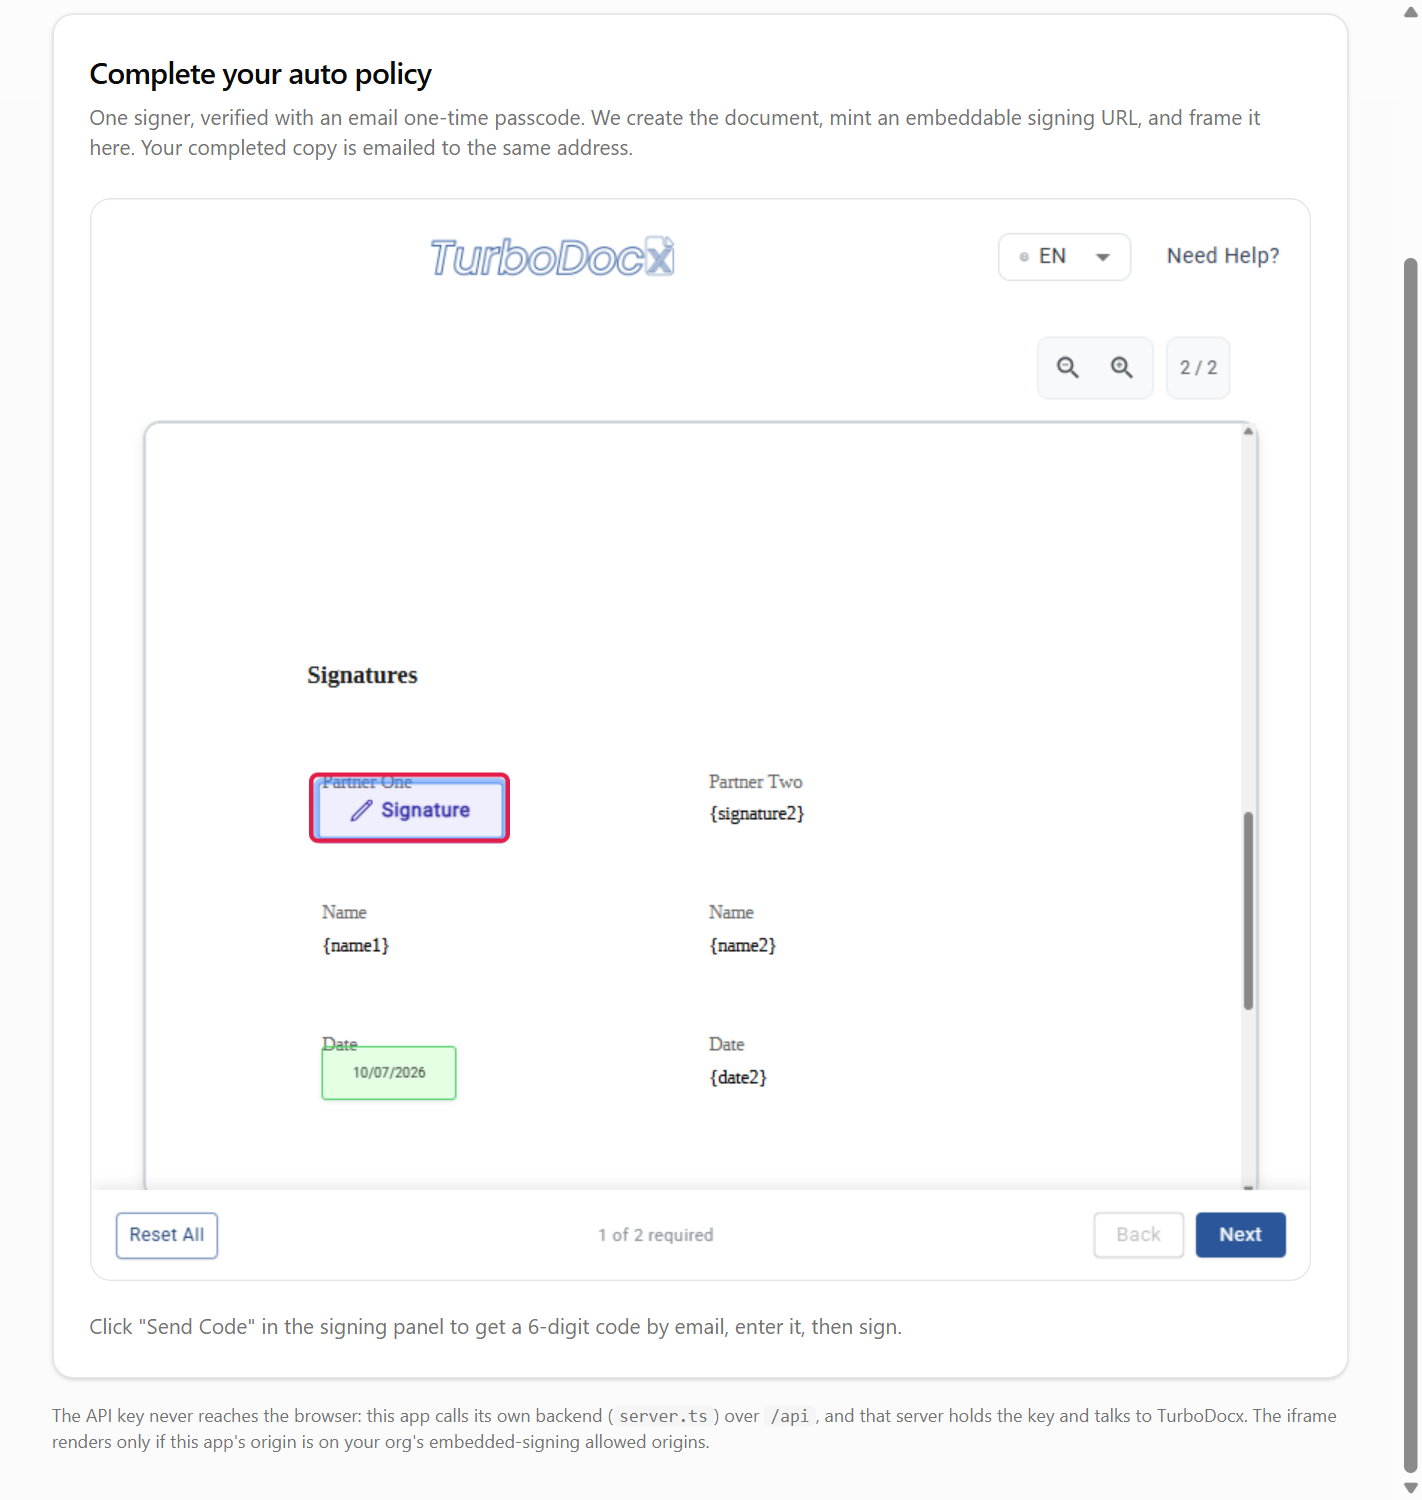
The document opens. The signer clicks the Signature field, types or draws a signature, and clicks Save.
-
The signer clicks Submit Signature. The element fires
turbosign:completed.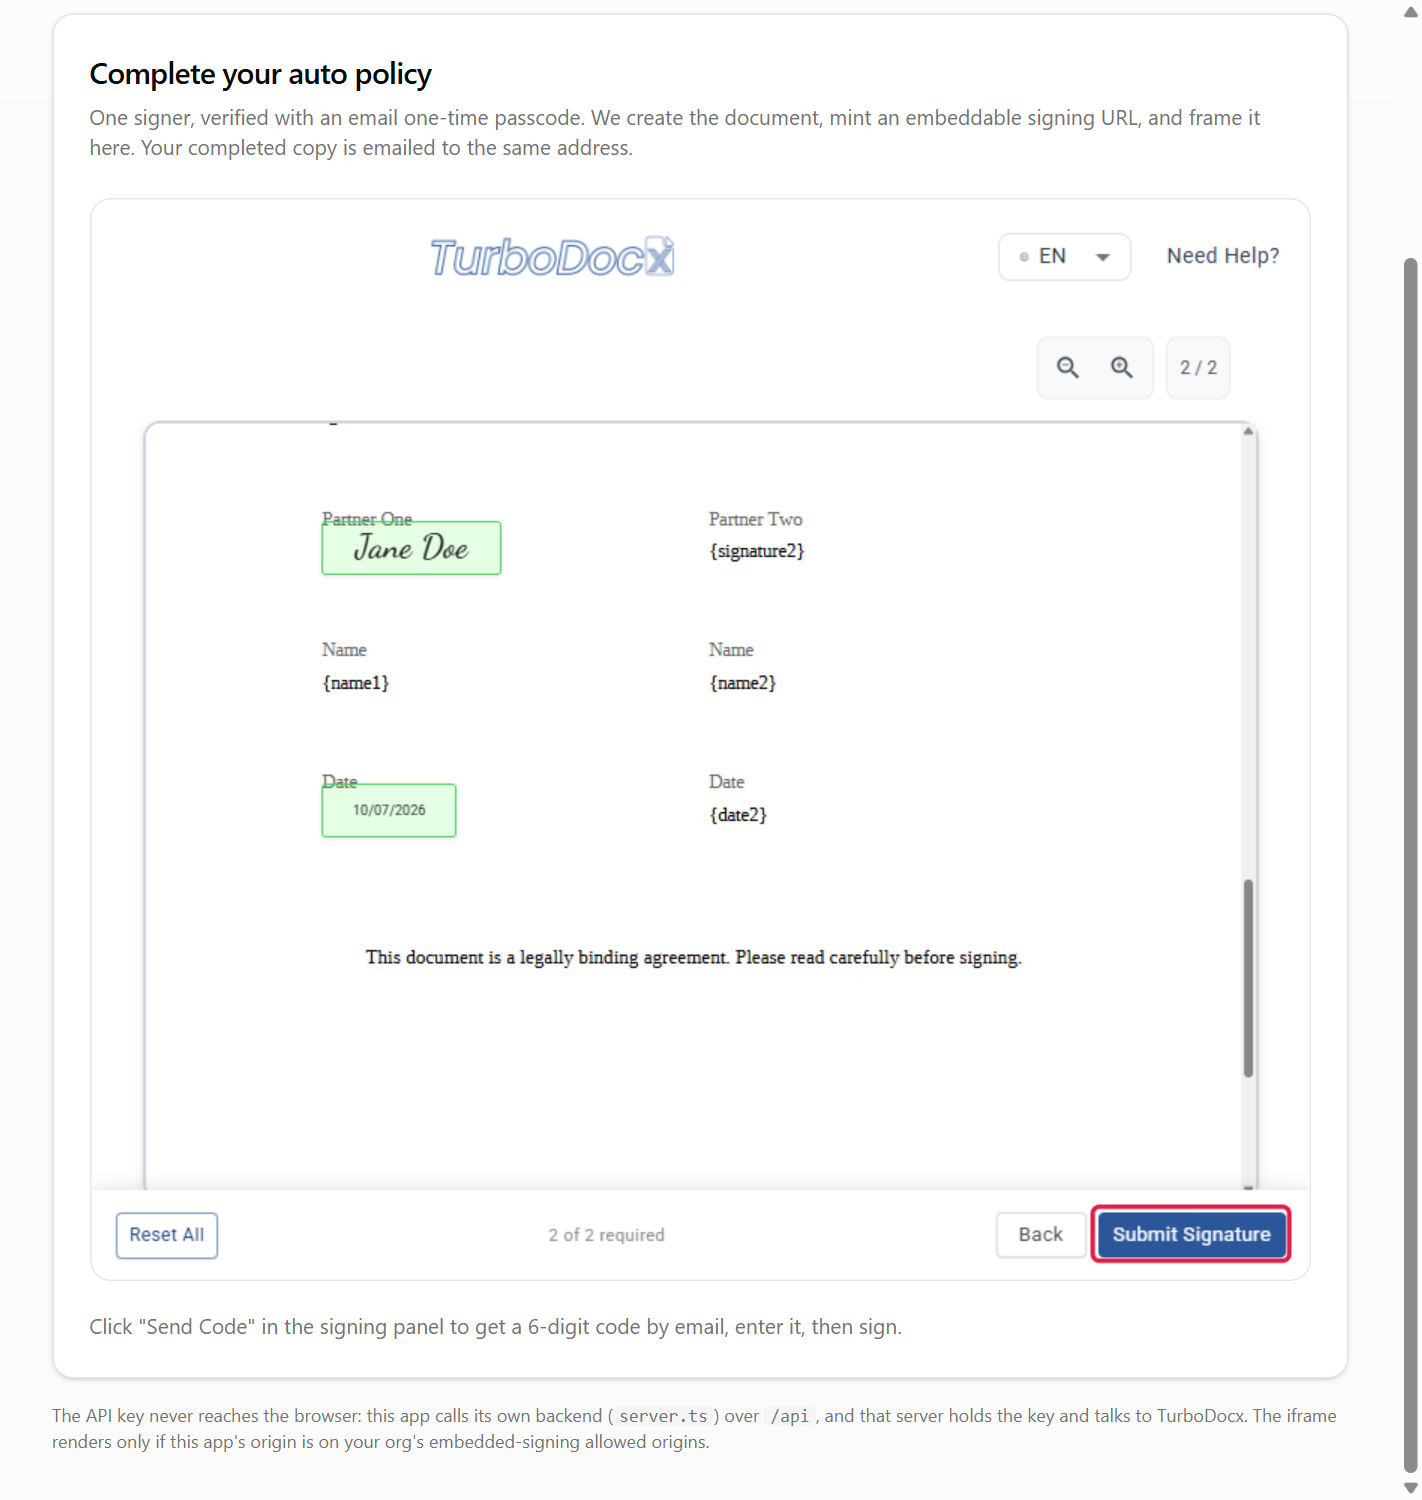
What the completion event contains
event.detail has the fields of the turbosign:completed message: documentId, status (completed), event (signing_complete or already_signed) and scope (recipient). See the API reference.
Common errors
| Symptom | Cause | Fix |
|---|---|---|
| The element is blank | Your origin is not under Allowed embedding domains. | Add the exact origin, including the port in development. |
| Signing finishes but no completion message arrives (often in Firefox) | The signing page posts only to an origin it can identify, and your page or iframe sends no referrer. | Don't use referrerpolicy="no-referrer" on the iframe or a no-referrer page policy; keep the default strict-origin-when-cross-origin. |
turbosign:completed never fires | origin is missing or wrong, or the listener is attached to the wrong element. | Set origin="https://app.turbodocx.com" and listen on the element (or a parent). |
| Nothing renders at all | The module never loaded, so the tag is an unknown element. | Check the network tab for the script, and that it is loaded with type="module". |
HTTP 403 when your server creates the URL | The API key belongs to a User, or Enable identity verification is off. | Use an Administrator or Contributor key, and ask an admin to check Step 1. |
HTTP 403 OtpOverrideNotAllowed | Your organization verifies every request and locked the method to a different channel. | Ask an admin to let senders change the method, or request an SMS passcode. |
What's next
- Next: Kiosk signing (two signers, one device).
- External identity verification, to skip the passcode when your identity vendor already verified the signer.
- API reference: every field, event and error.