Set up TurboSign for Salesforce
This guide walks a Salesforce admin through the whole setup, from storing your TurboDocx credentials to saving your first document setup. It takes about 20 minutes. When you finish, your reps can send documents for signature from an Opportunity.
Every credential and access step below can also be scripted. See Scripted setup for admins.
Before you begin
Have these ready:
- A TurboDocx account. If you are signing up now, TurboDocx asks you to verify your email before it creates your workspace. Click the link in the verification email, then continue.
- Your TurboDocx API key and Organization ID. In TurboDocx, open Settings, then API keys. That page shows the Organization ID. Create a key there and copy it right away: TurboDocx shows the key only once, when you create it. The Organization ID is also on Features and integrations. When you create the key, the User access level is enough for TurboSign for Salesforce. See Getting your credentials.
- A TurboDocx template with a text token wherever someone signs or dates, for example
{sig}and{date}. - System Administrator access to your Salesforce org.
- A supported Salesforce edition, such as Enterprise, Unlimited, Performance, or Developer Edition. See Which Salesforce orgs can use it.
- The TurboSign for Salesforce package installed in your org. See Install TurboSign for Salesforce.
Step 1: Store your API key and Organization ID
The package includes an External Credential called TurboDocx API. You add your key and Organization ID to it. Salesforce encrypts both, and nobody can view them again after you save.
-
Open Setup (the gear icon, top right, then Setup).
-
In the Quick Find box on the left, type
Named Credentials, then click Named Credentials.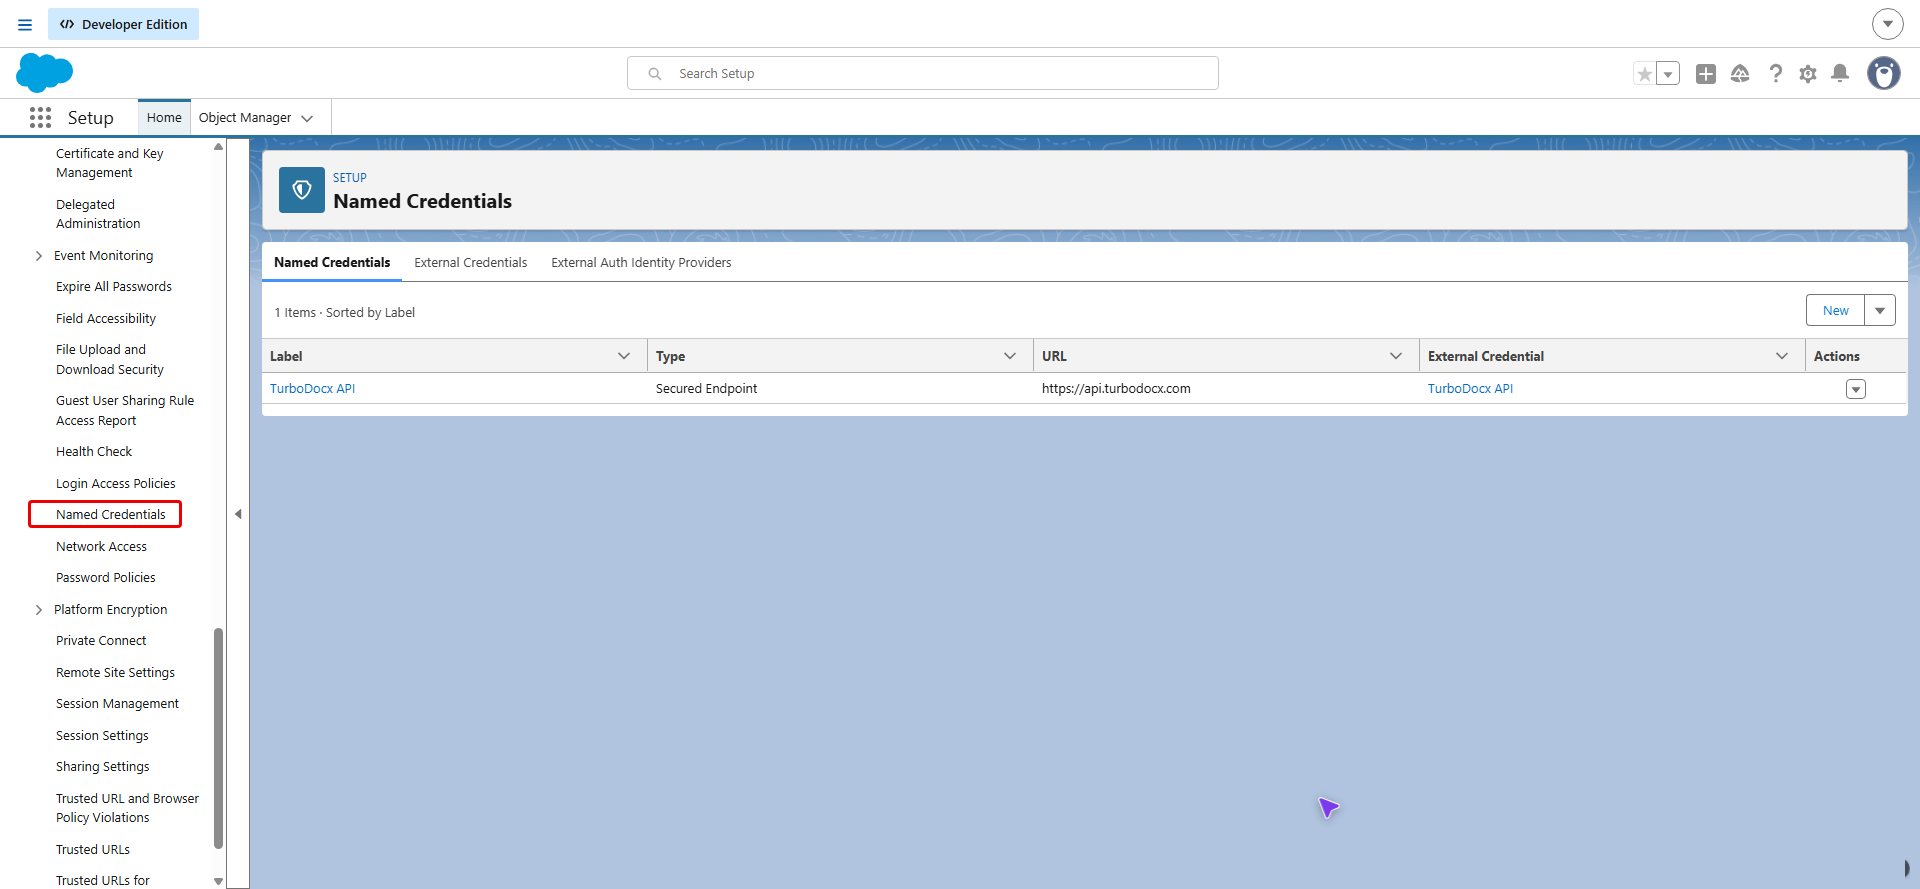
-
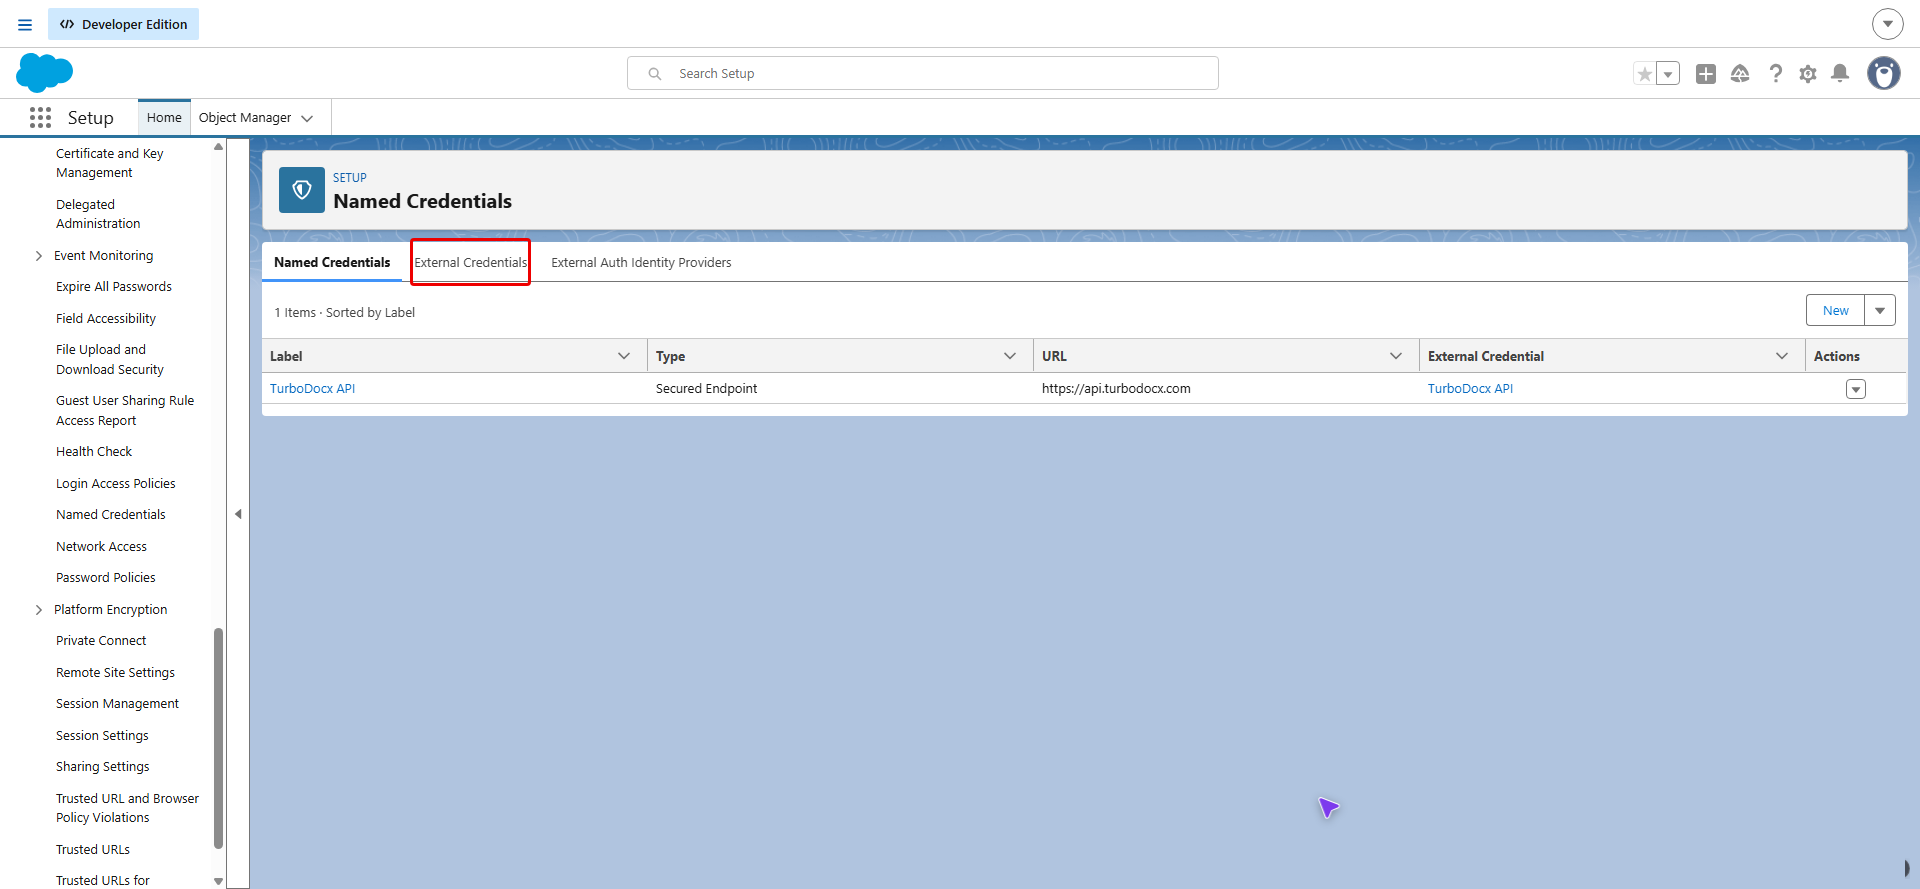
Click the External Credentials tab.
-
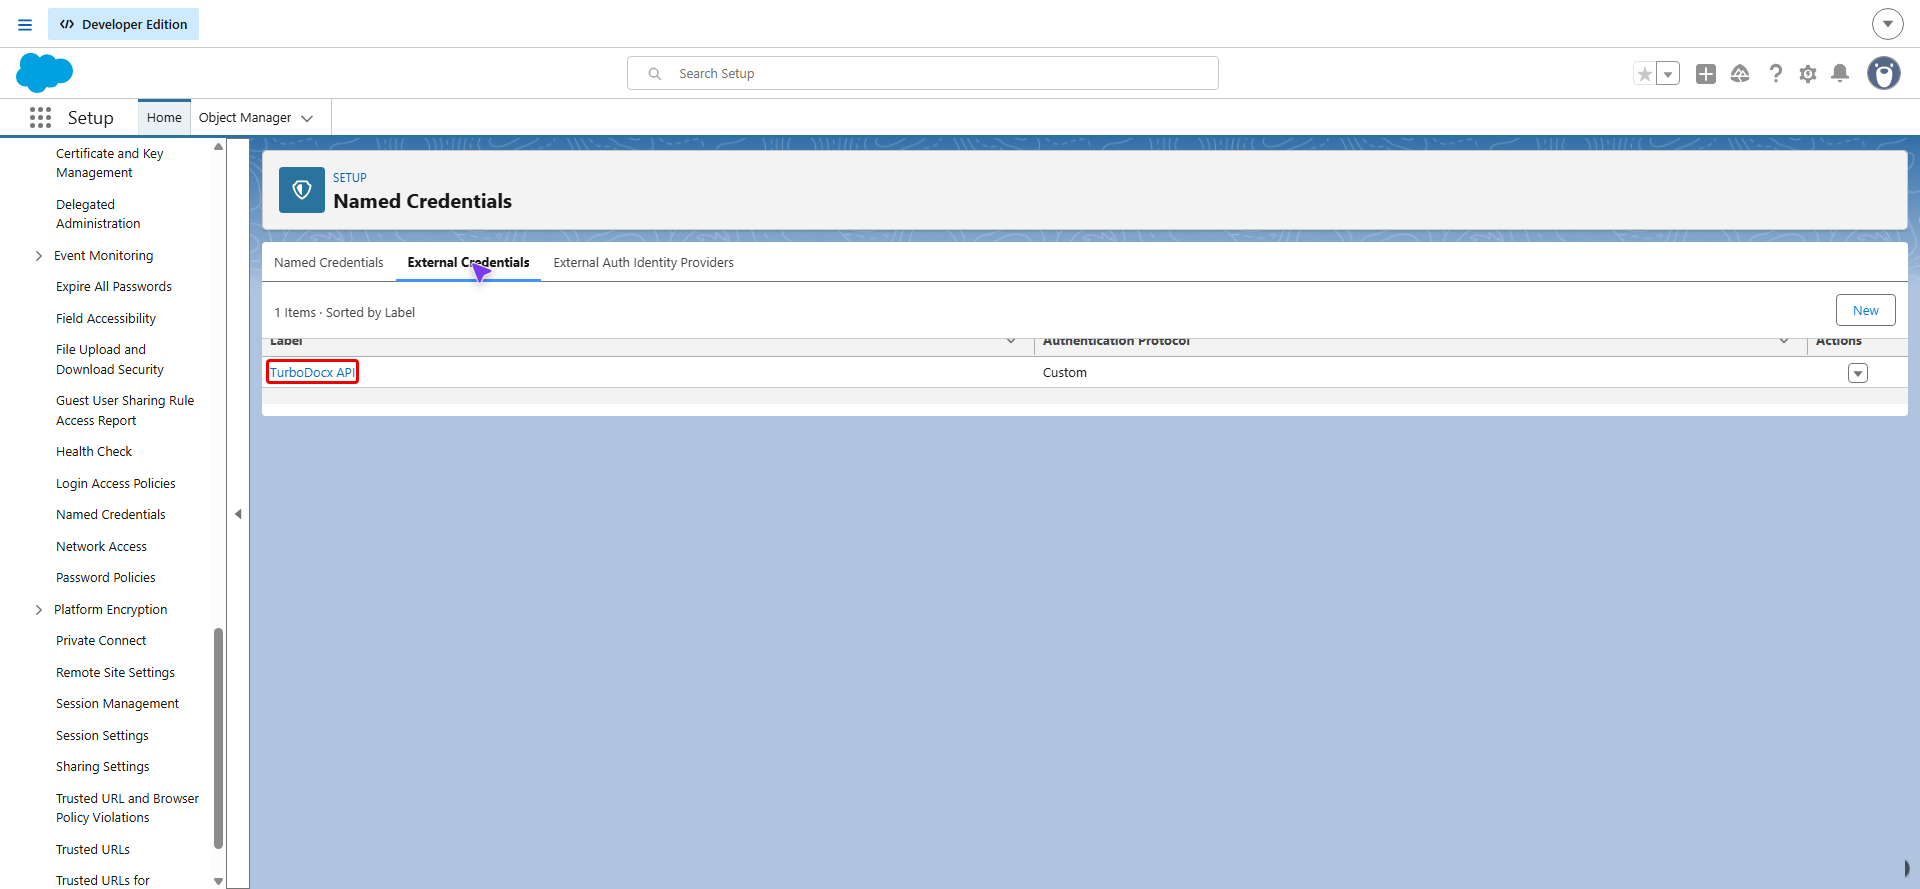
Click TurboDocx API.
-
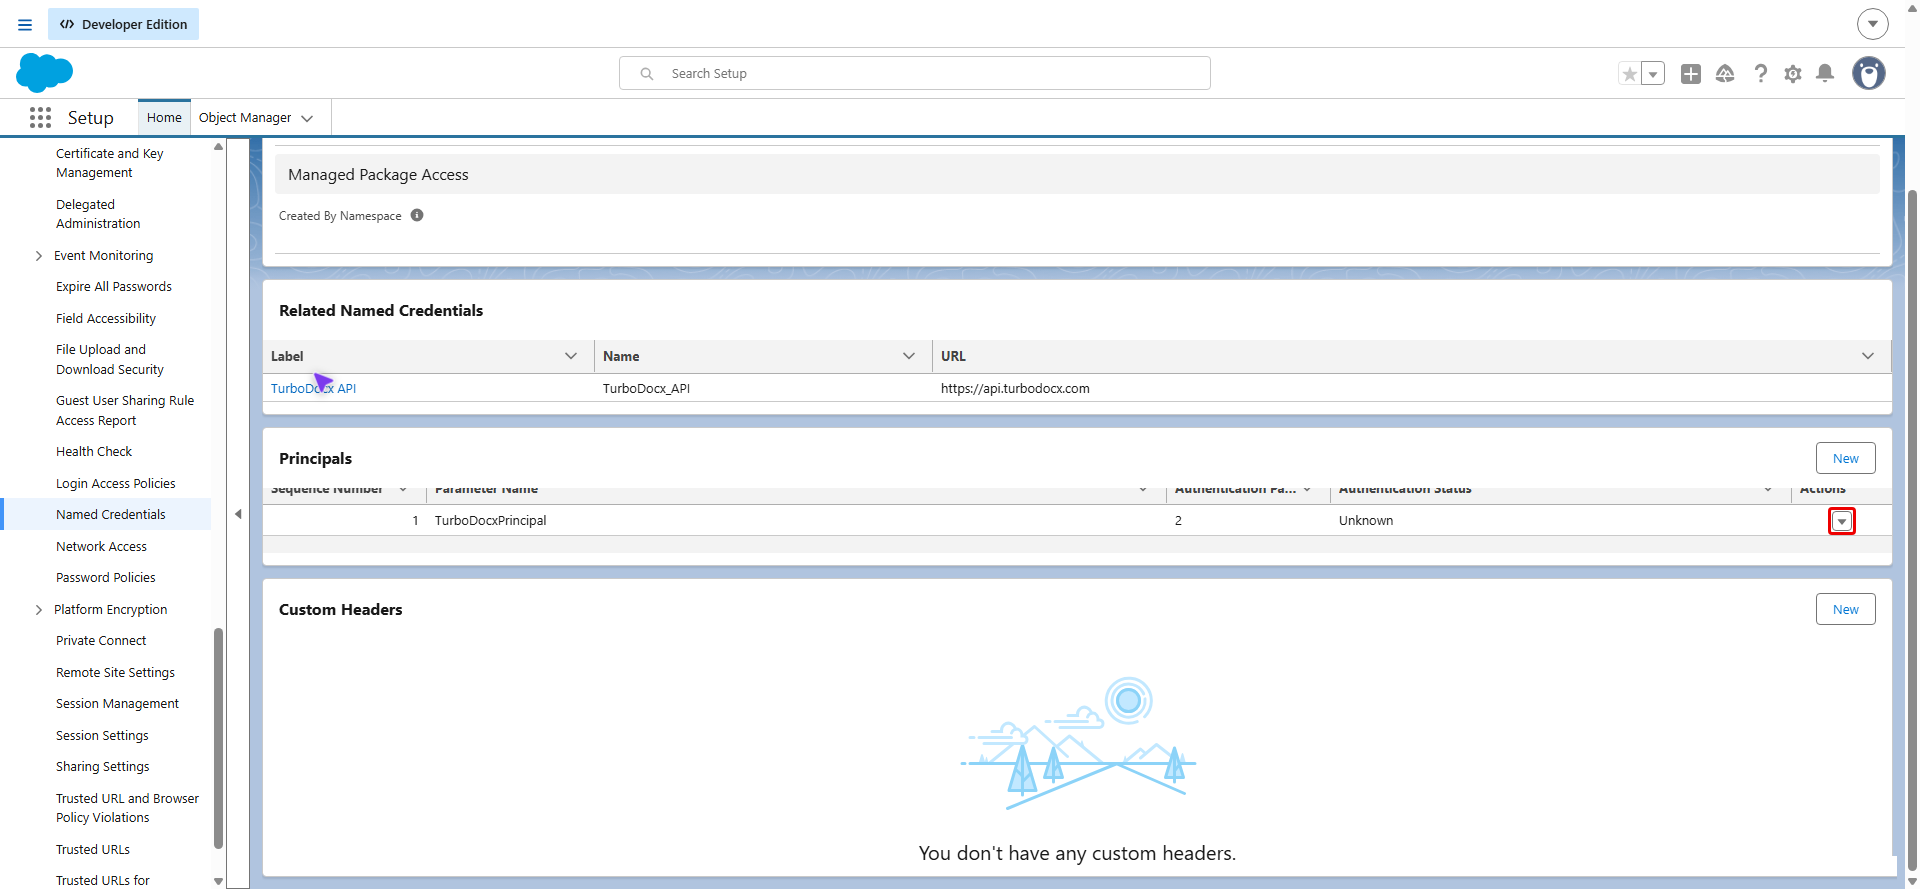
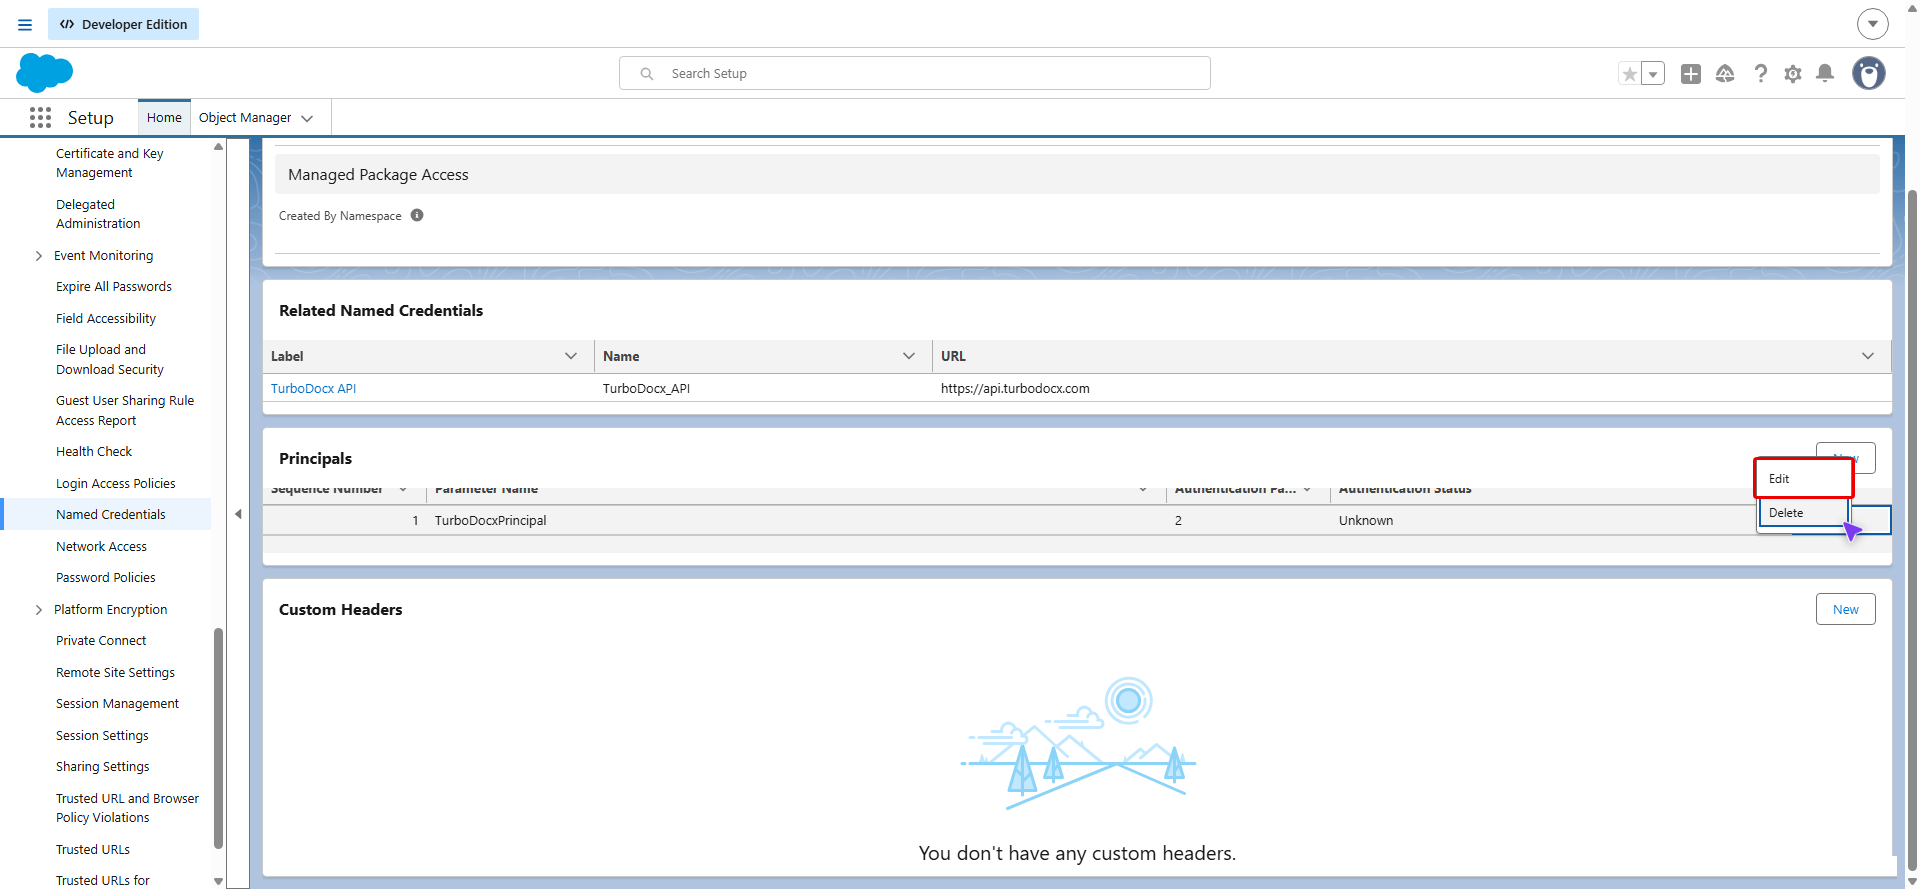
In the Principals section, click the arrow at the end of the TurboDocxPrincipal row.
-
Click Edit.
-
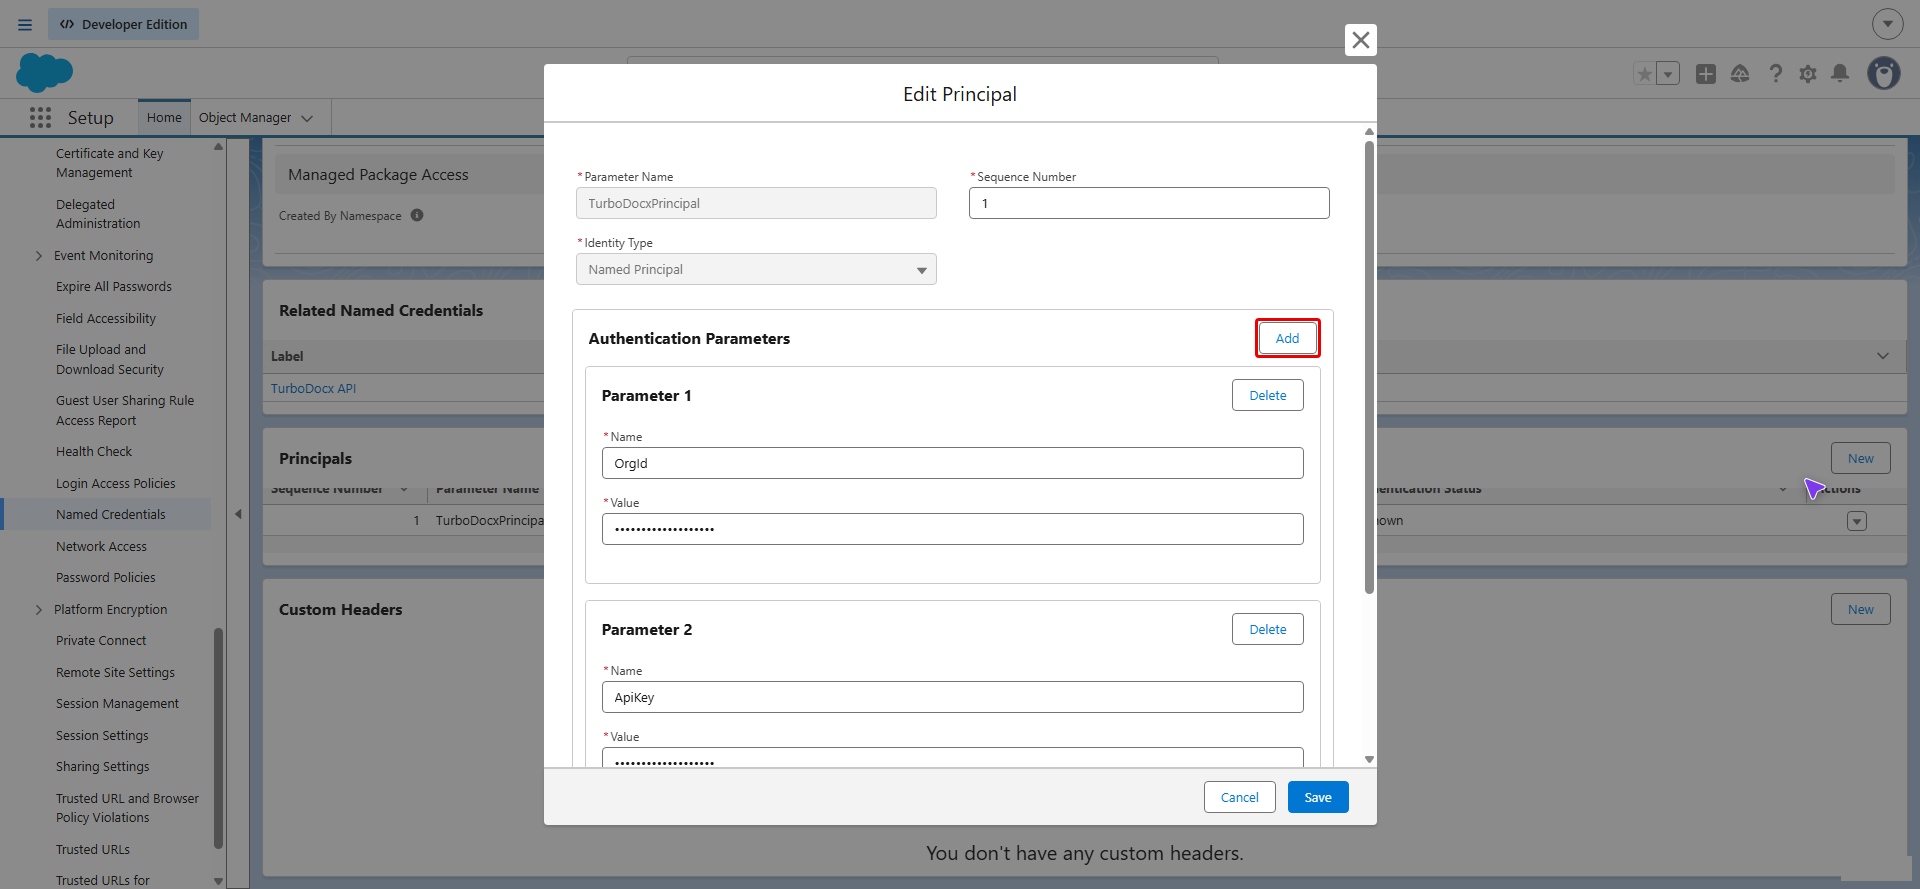
Under Authentication Parameters, click Add.
-
In Name, type
ApiKeyexactly as shown (the capital letters matter). In Value, paste your TurboDocx API key. -
Click Add again. In Name, type
OrgId. In Value, paste your Organization ID.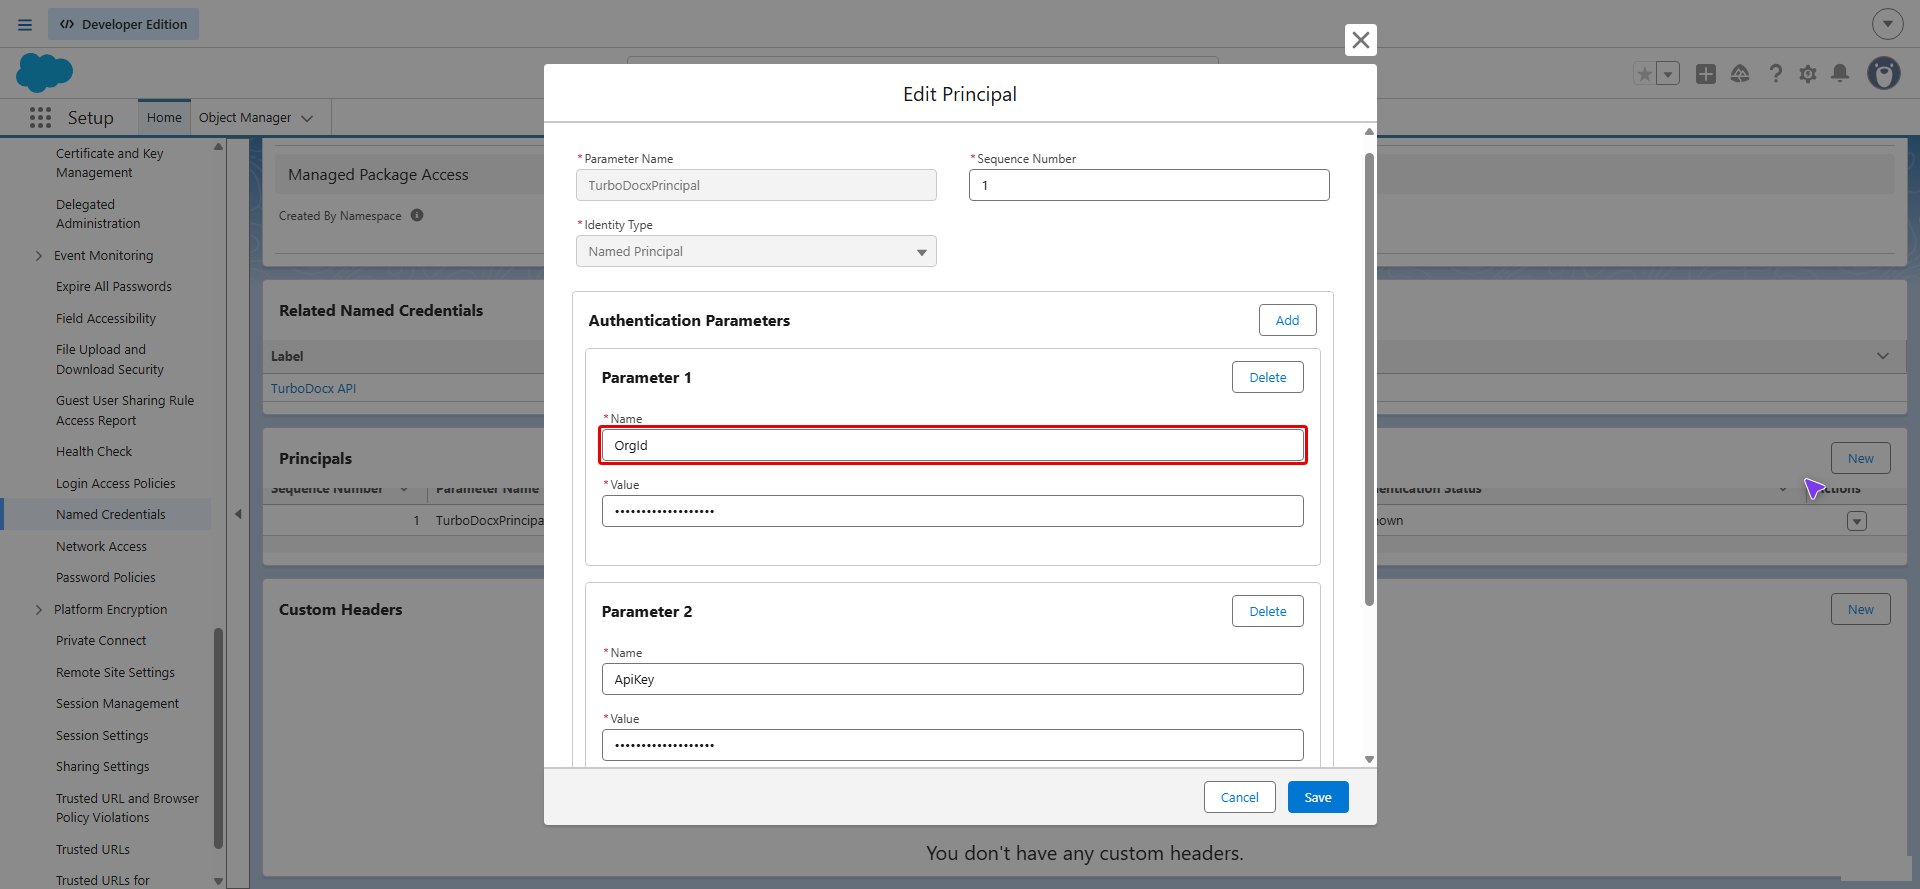
-
Click Save.
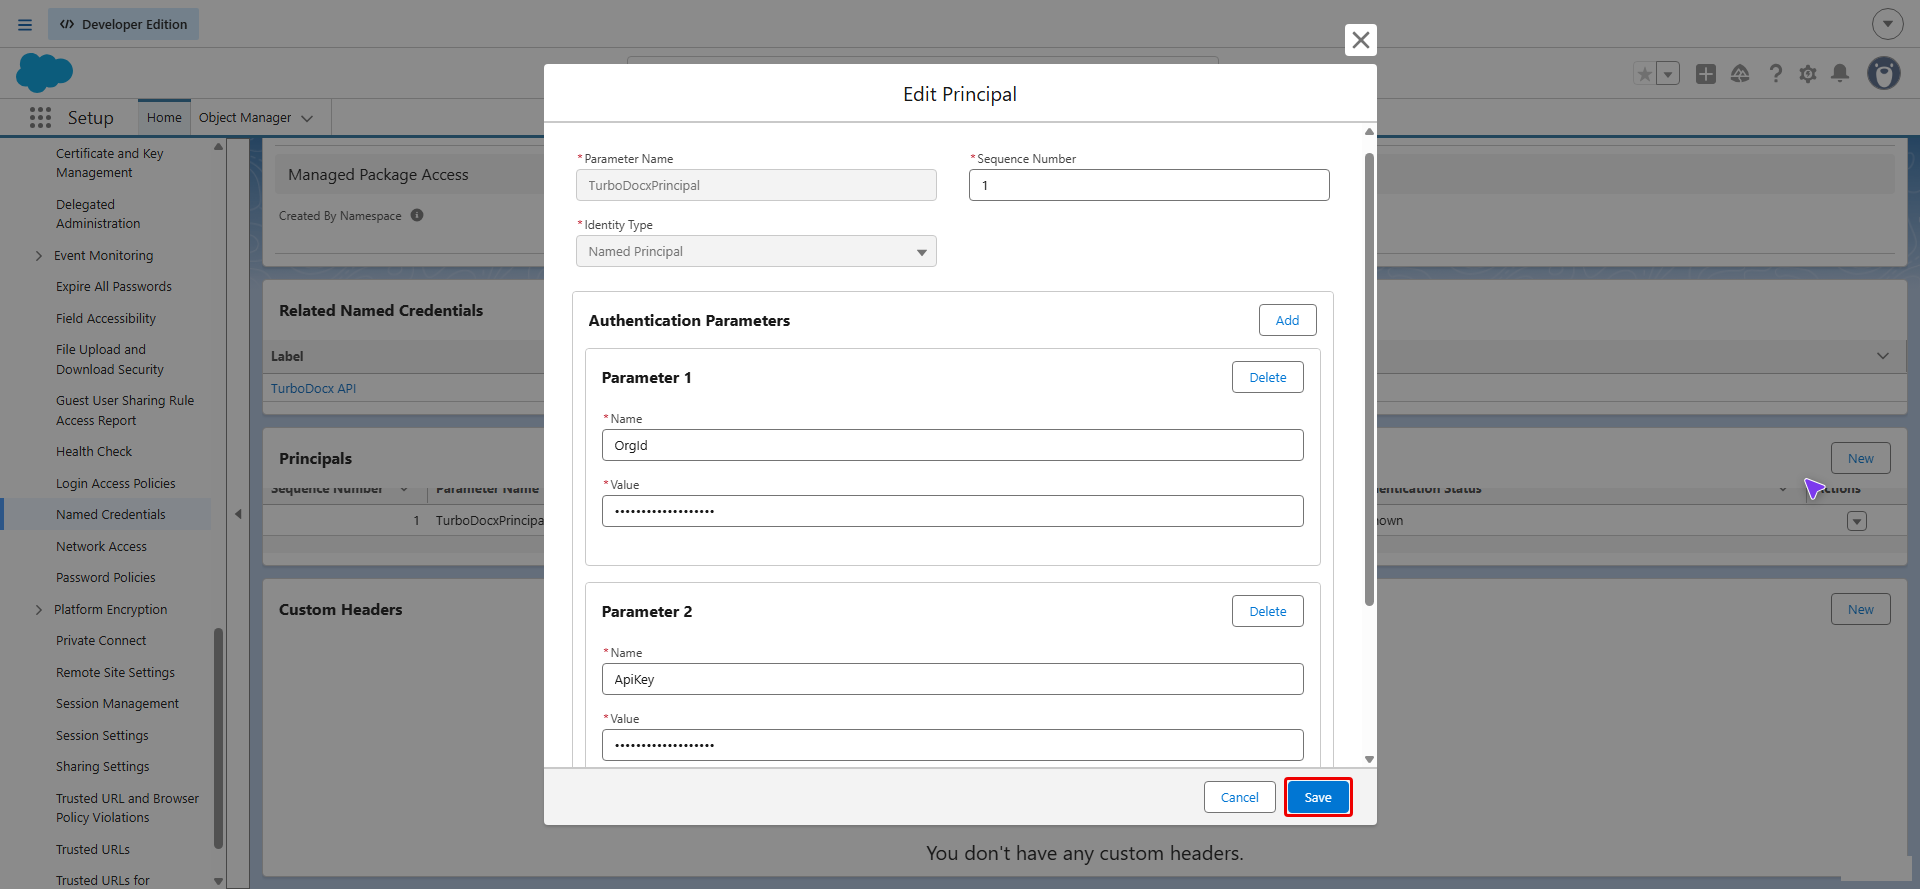
After you save, the TurboDocxPrincipal row shows 2 under Authentication Parameters. An Authentication Status of Unknown is normal for this kind of credential. Salesforce doesn't test it until the first request. The template list in Step 5 is your first real check.
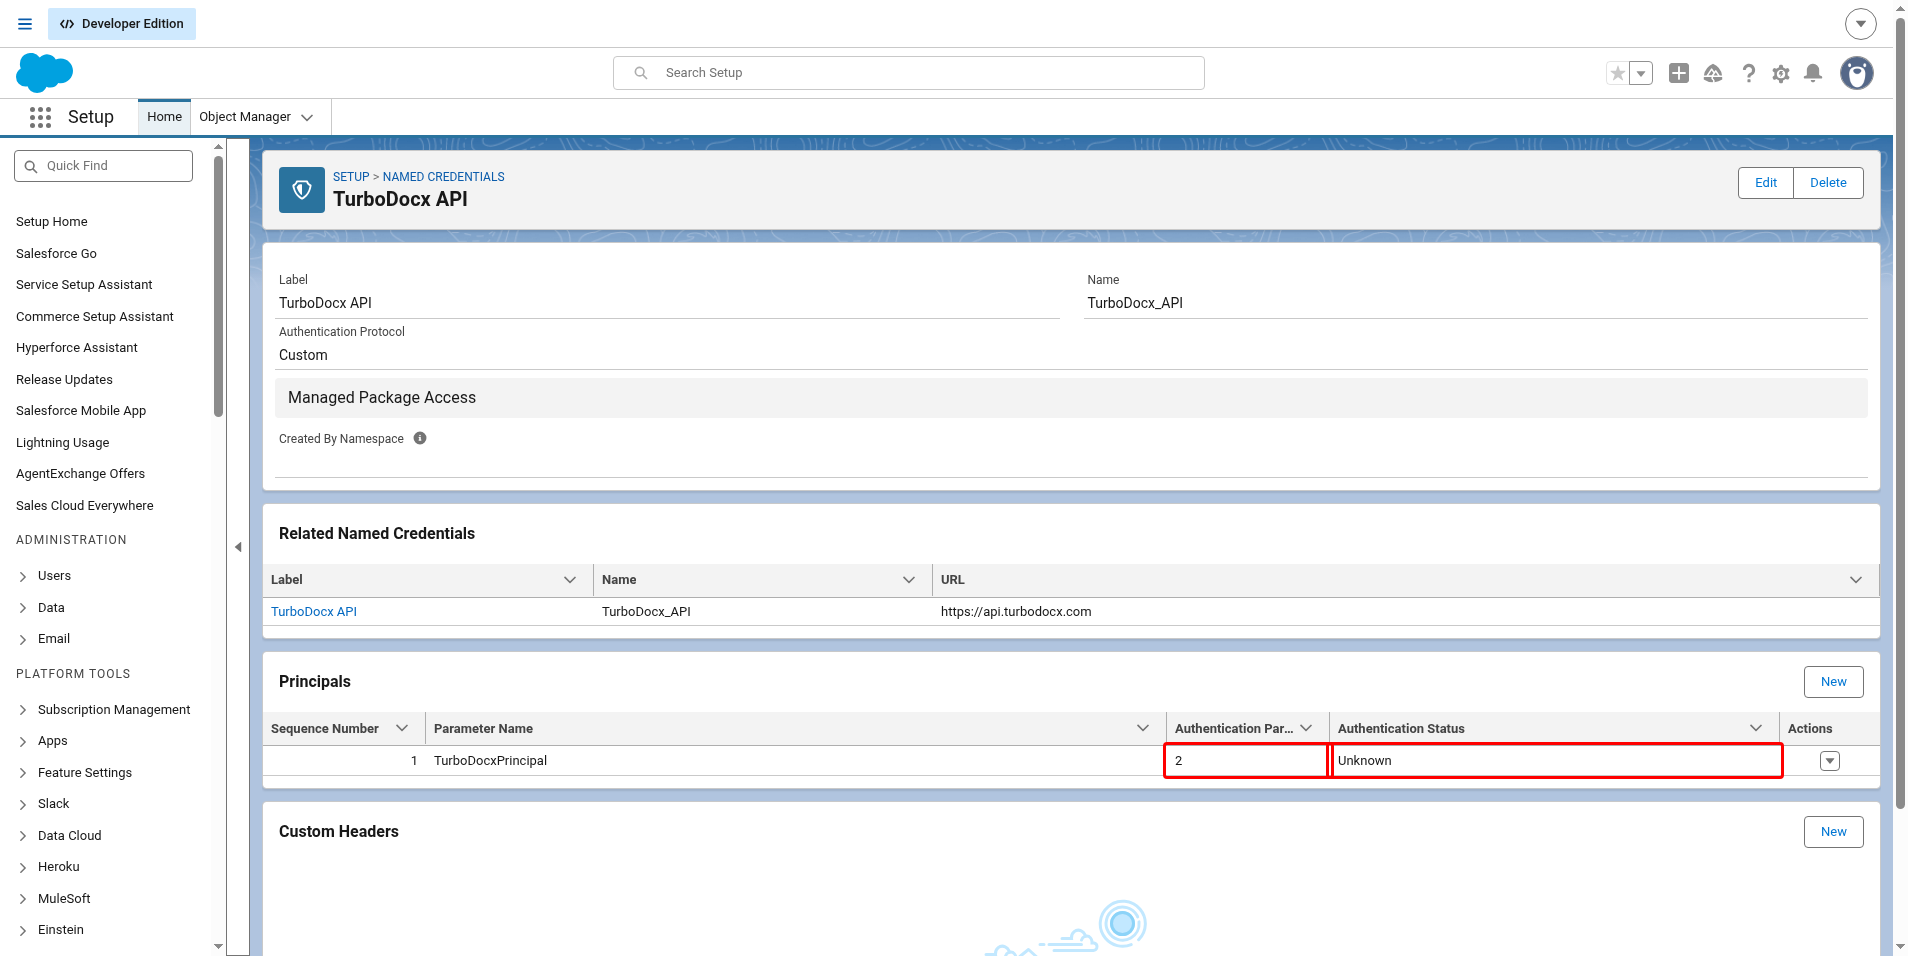
The package looks for parameters named ApiKey and OrgId. If either is missing or spelled differently, every send fails with Field TurboDocx_API.ApiKey does not exist (or OrgId).
To change the key later, edit the ApiKey value the same way. Nothing else needs to change. Change only the Value: if you change a parameter's Name in Edit Principal, Salesforce clears its value, so you have to paste it again.
Step 2: Check where Salesforce sends requests
The TurboDocx API Named Credential holds the TurboDocx address. It is set to https://api.turbodocx.com when you install, so usually you only need to look at it.
- On the same External Credential page, scroll to Related Named Credentials.
- Read the URL in the TurboDocx API row. It should be
https://api.turbodocx.com, or the address your TurboDocx team gave you. If it is, go on to Step 3.
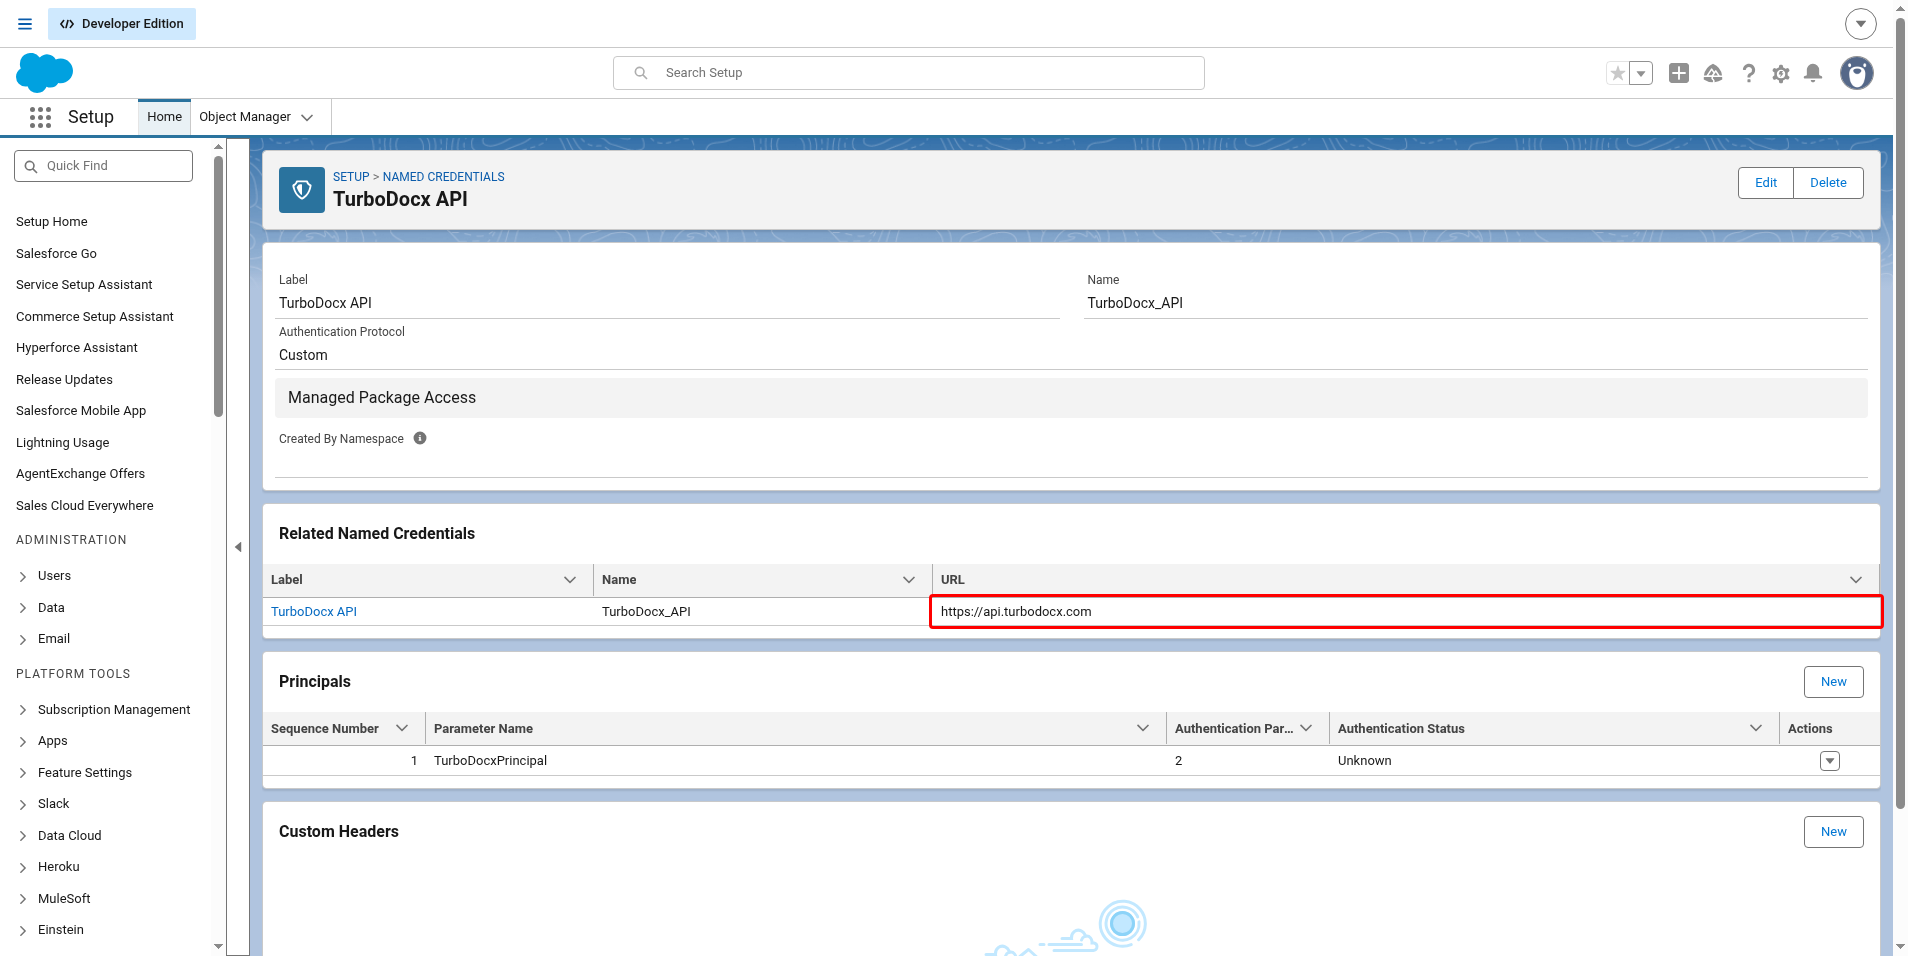
To change the URL:
-
In the Related Named Credentials row, click TurboDocx API.
-
Click Edit.
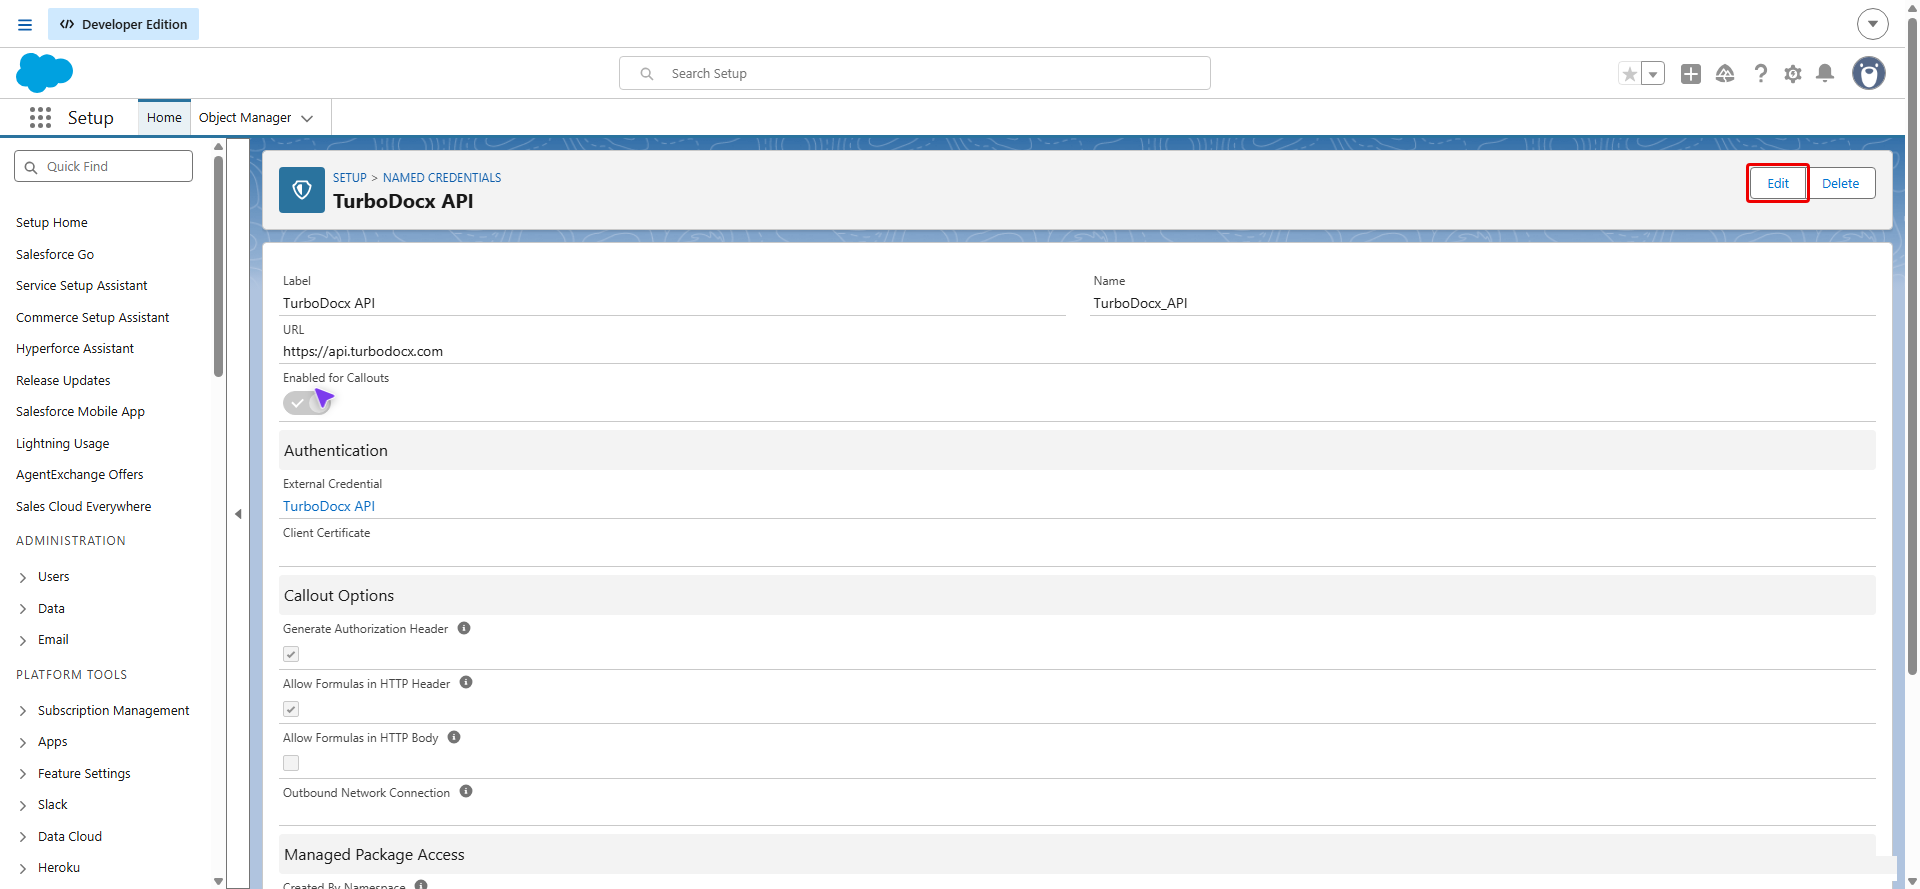
-
Change URL.
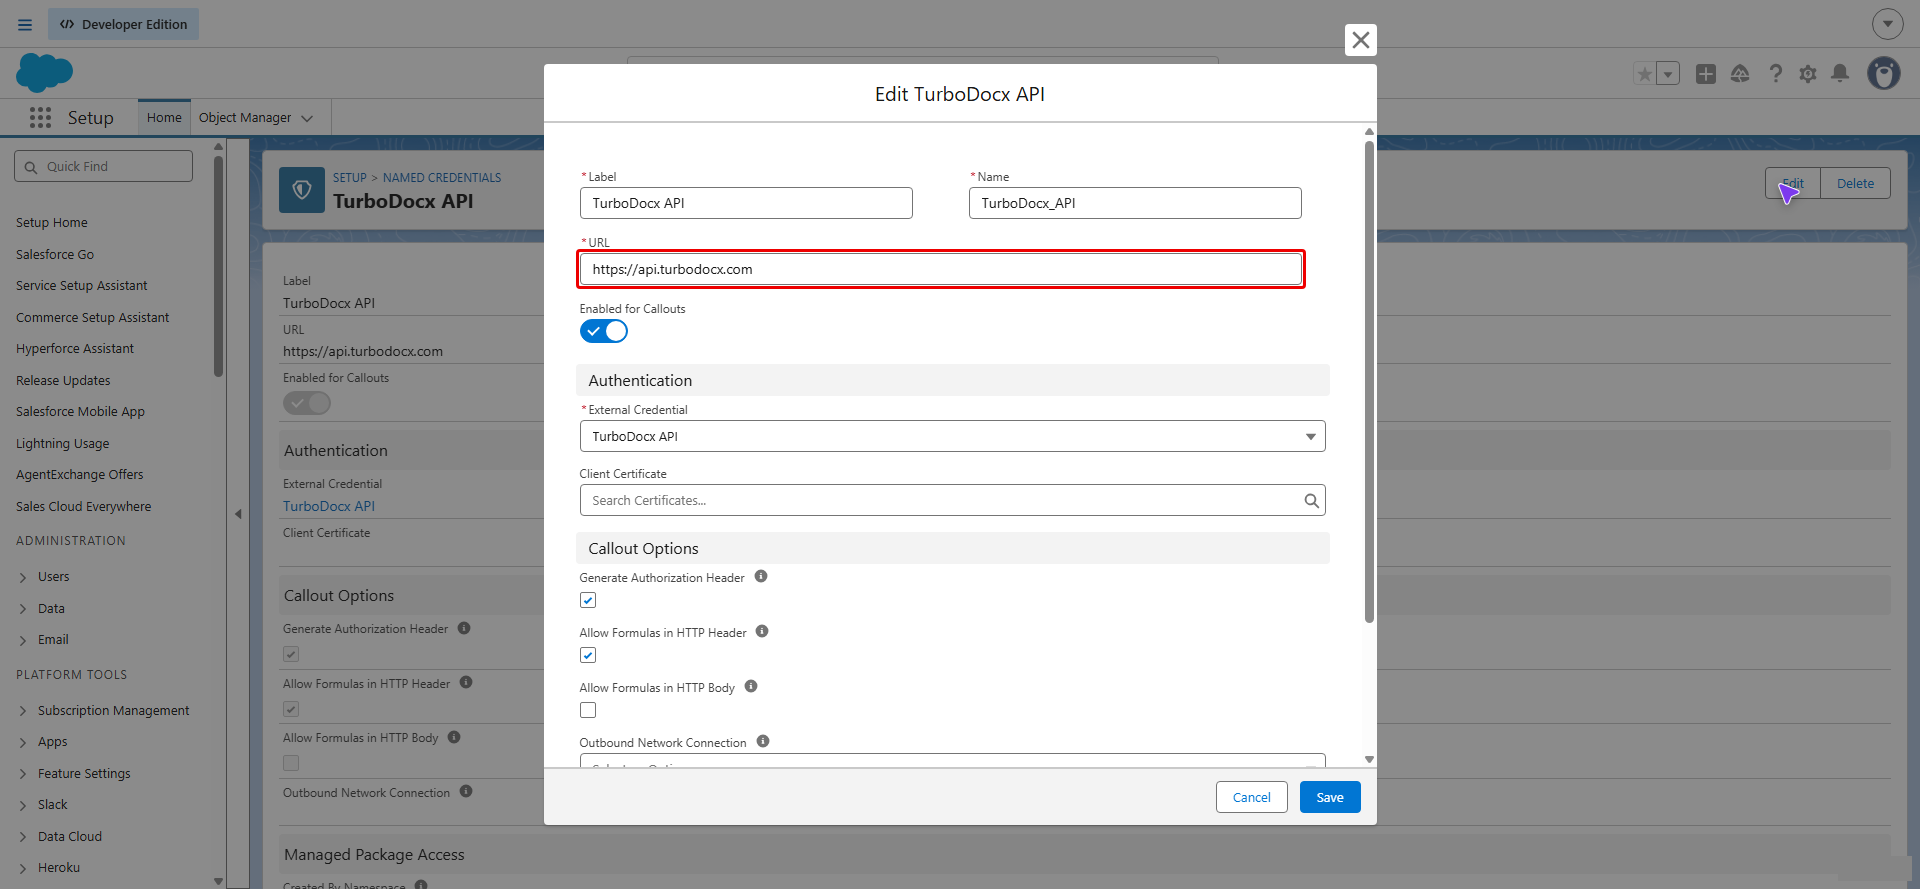
-
Click Save.
Installing a newer version of the package, or deploying it again from source, puts the packaged URL back on TurboDocx API. If you changed it, check it again after each upgrade or deploy.
Step 3: Give people access
The package has two permission sets. Both include access to the TurboDocx credential.
| Permission set | Assign it to |
|---|---|
| TurboSign Admin | Admins who build document setups |
| TurboSign User | Reps who send documents |
-
In Setup, type
Permission Setsin Quick Find and click Permission Sets. -
The list can be long. Click the letter T above the list.
-
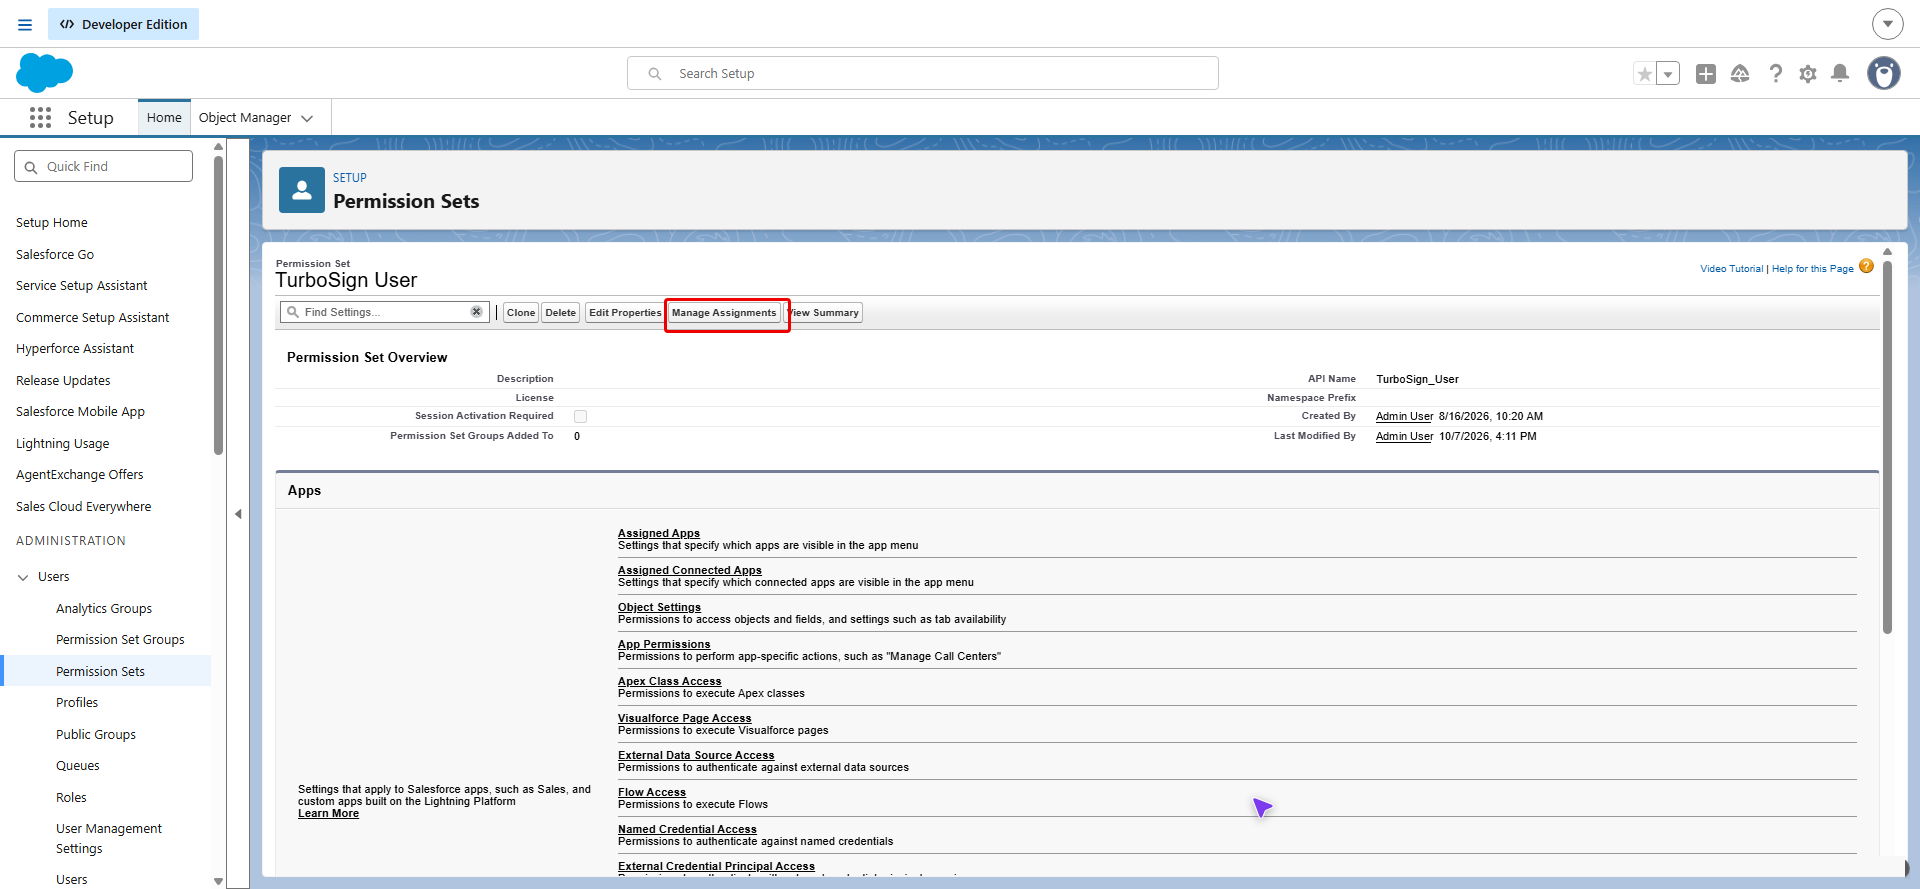
Click TurboSign User.
-
Click Manage Assignments.
-
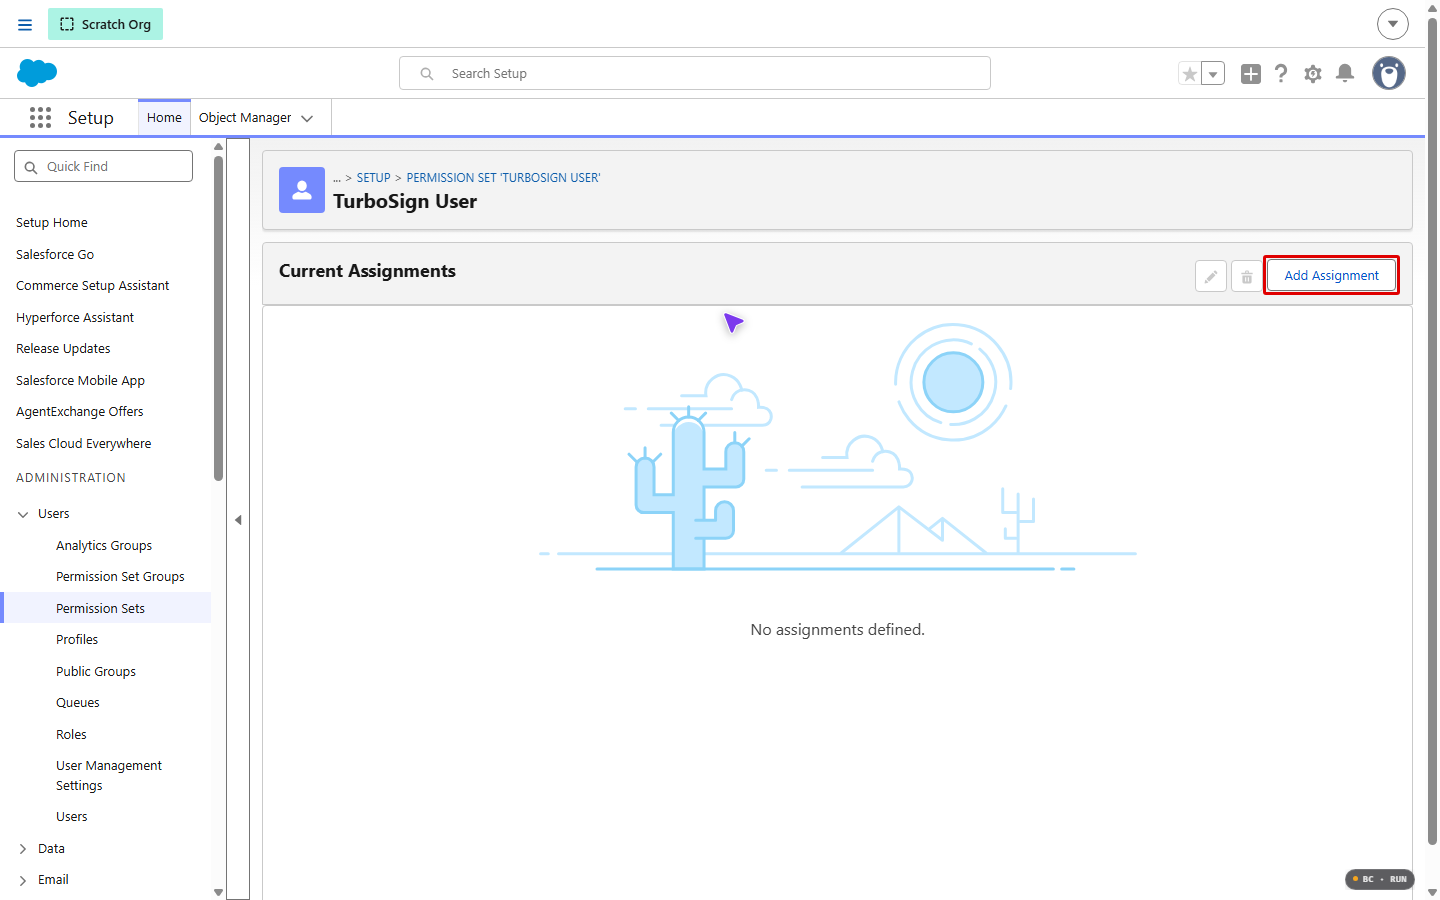
Click Add Assignment.
-
If the list of users is empty, open Select a List View and pick Recently Viewed. A new org may have only that view. If your org has All Users, you can pick it instead.
-
Select your reps, then click Next. On the next page, leave No expiration date selected and click Assign.
-
Repeat for TurboSign Admin with your admins.
Requests run as whoever triggers them. If a Flow, a data load, or an integration user sends, reminds, or voids envelopes, assign TurboSign User to that user as well.
Step 4: Connect Salesforce in TurboDocx
TurboDocx saves the signed PDF back to Salesforce through the Salesforce connection in your TurboDocx settings.
The Salesforce integration is included on the TurboDocx Pro and Enterprise plans. Sending documents for signature from Salesforce works without it. You need it to save the signed files and the signing status back to Salesforce.
If you don't have that connection yet, follow Salesforce Integration, Steps 1 to 3 to create the External Client App in Salesforce and connect it in TurboDocx. If you already use the TurboDocx Salesforce integration, check that it meets everything below.
- Connect the same Salesforce org the package is installed in. The package sends its Salesforce org ID with each document. When the document is signed, TurboDocx saves the files through the connection to that same org. Only active connections of active TurboDocx users count. If no connection matches the org, nothing is saved, and TurboDocx records the failure. Saving signed files back needs TurboSign for Salesforce 1.1.0 or later, which sends the org ID. Earlier versions still send and sign, but the signed files are not saved back.
- Connect with the right Salesforce user. That user must be able to create files and edit the records you send from, including the field you pick under On Completion. A dedicated integration user works best, so the connection doesn't break when a person leaves or changes their password.
- You can connect more than one Salesforce org. For example, connect both a sandbox and production. Each send uses the connection to the org it was sent from.
- Check the app's scopes. The connection needs the api scope, the refresh_token (offline access) scope, and the openid scope, because TurboDocx checks which Salesforce org each connection belongs to. See Configure API Settings. If you added openid to an existing app, reconnect Salesforce in TurboDocx.
- Leave the refresh token policy as Salesforce sets it. New External Client Apps expire a refresh token that isn't used for 30 days, and the Refresh token is valid until revoked option no longer exists. TurboDocx keeps the connection active automatically. See Edit Policies.
- If the connection stops working, for example because a Salesforce admin revokes it, TurboDocx shows a Reconnect Salesforce message in the Salesforce settings dialog and emails your organization's admins. To see the message, open Settings > Features and integrations and click Configure SalesForce on the Salesforce card.
- Reconnecting is safe. Your current connection keeps working until the new one succeeds.
Saving signed files back to a sandbox works. Connect that sandbox in TurboDocx: in the Salesforce settings dialog, choose Sandbox in the Environment list, so the connection signs in at test.salesforce.com. If your sandbox uses a My Domain login, click Use Custom Domain on the Salesforce login page and enter it.
Step 5: Build a document setup
A document setup tells TurboSign which template to use, which Salesforce fields fill it, who signs, and where. The steps below build a Service Agreement sent from an Opportunity.
Start a new setup
-
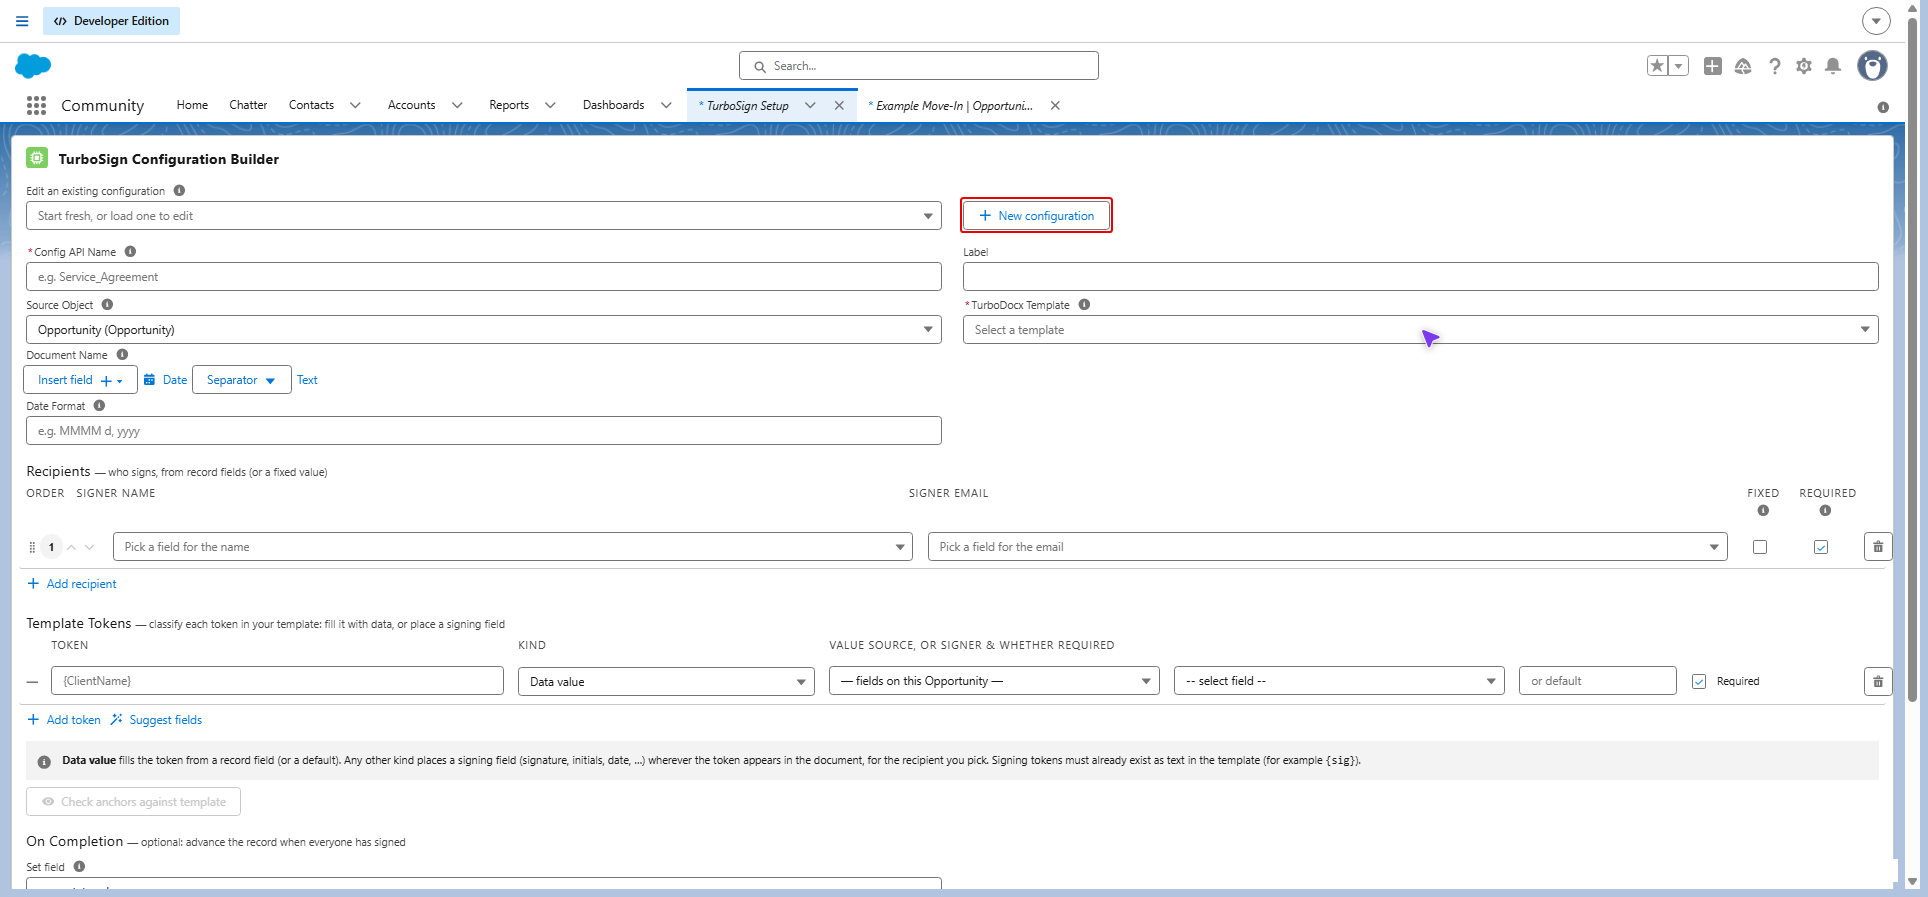
Open the App Launcher (the nine dots, top left), search for TurboSign Setup, and open it. The builder opens with a blank form.
If the form already holds another setup, click New configuration to clear it.
-
Type the Label first, for example
Service Agreement. The Label box is to the right of Config API Name. Reps pick setups by this label. -
Check Config API Name, the box on the left. It fills in from the Label, for example
Service_Agreement. You can change it before you save, using letters, numbers, and underscores only.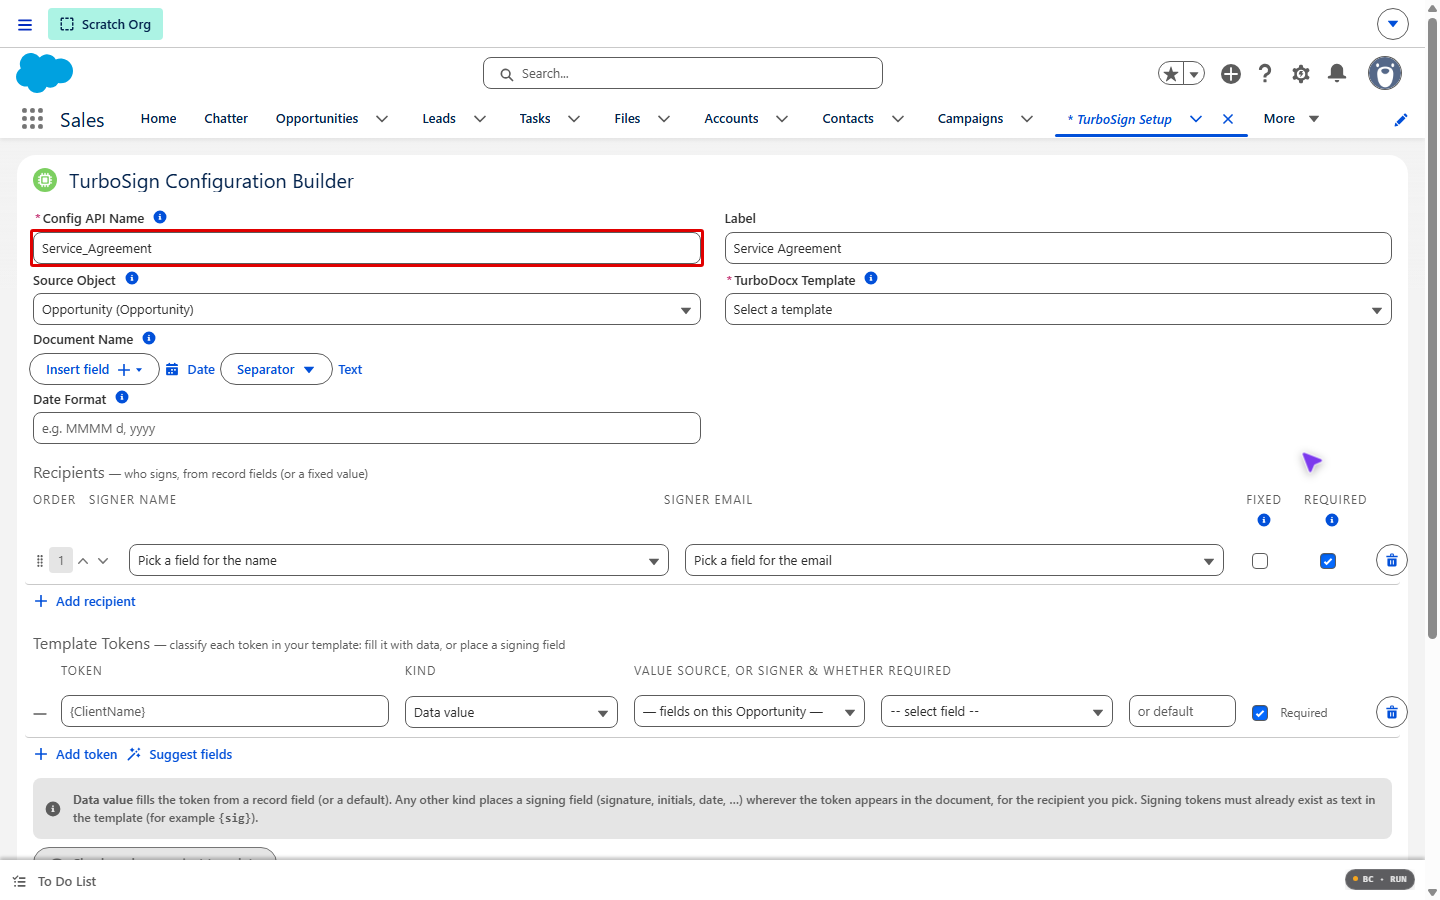
-
Leave Source Object as Opportunity.
-
Open TurboDocx Template and pick your template. The builder lists every token in the template under Template Tokens, including signing tokens such as
{sig}.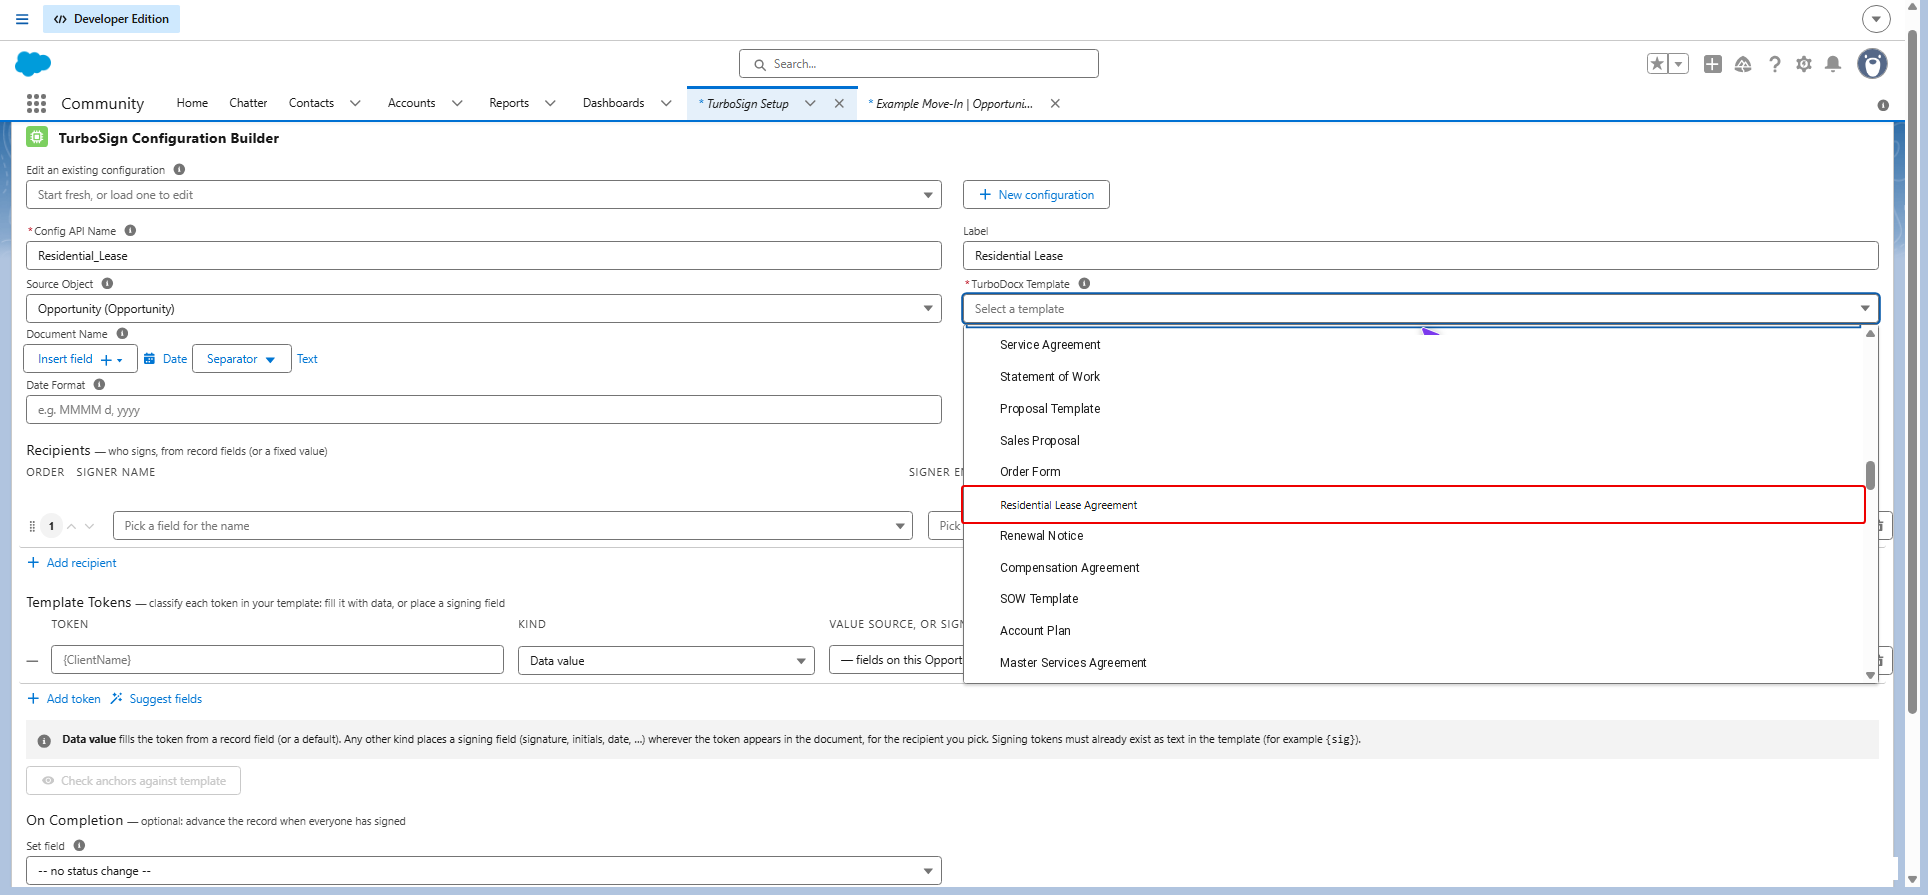
Name the document
Under Document Name, build the name each document gets, for example Service Agreement - Acme Corp - October 9, 2026:
- Click Clear to remove the template name.
- Click Text, click the new text box, and type
Service Agreement -(with the spaces). - Click Insert field and pick Account Account Name (Name). The list is long, and this entry is far down.
- Click Text, click the new text box, and type
-. - Click Date.
The Preview line shows the result. Until you pick a record under Test with a record, it shows placeholders, for example Service Agreement - [Account.Name] - (today's date). The Separator menu adds a single character with no spaces, so use Text when you want spacing.
Date Format is optional. It sets how dates look in the document and in its name, using a pattern such as MMMM d, yyyy (for October 9, 2026). Leave it blank to use the default: dates from the record follow the sending user's Salesforce locale, and the date in the name looks like October 9, 2026.
Fill the data tokens
-
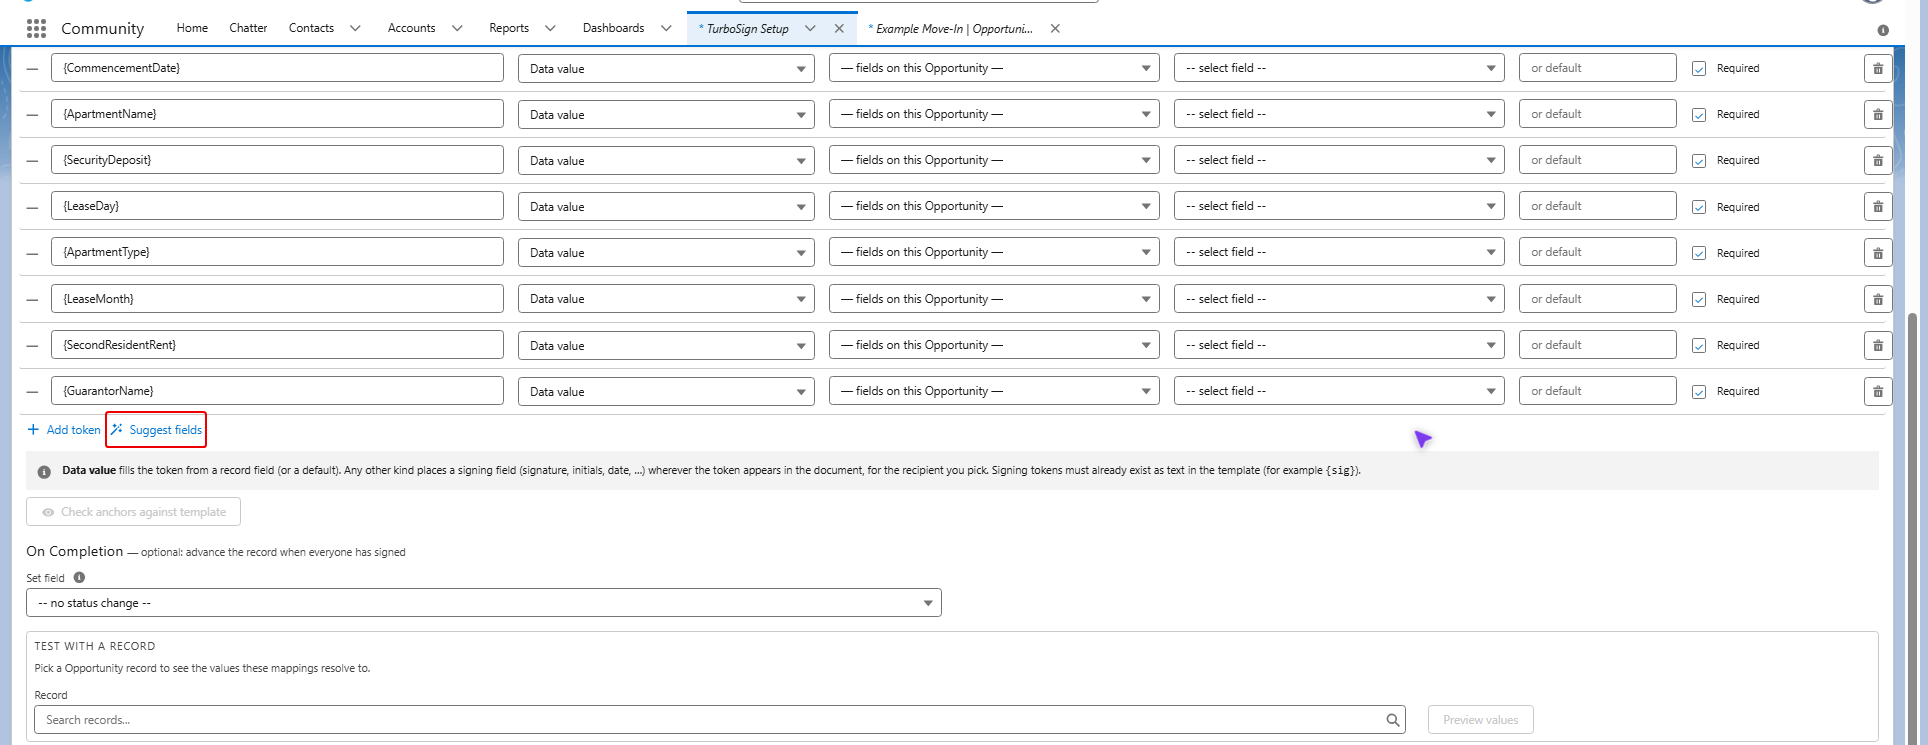
Click Suggest fields. The builder guesses a Salesforce field for each data token.
-
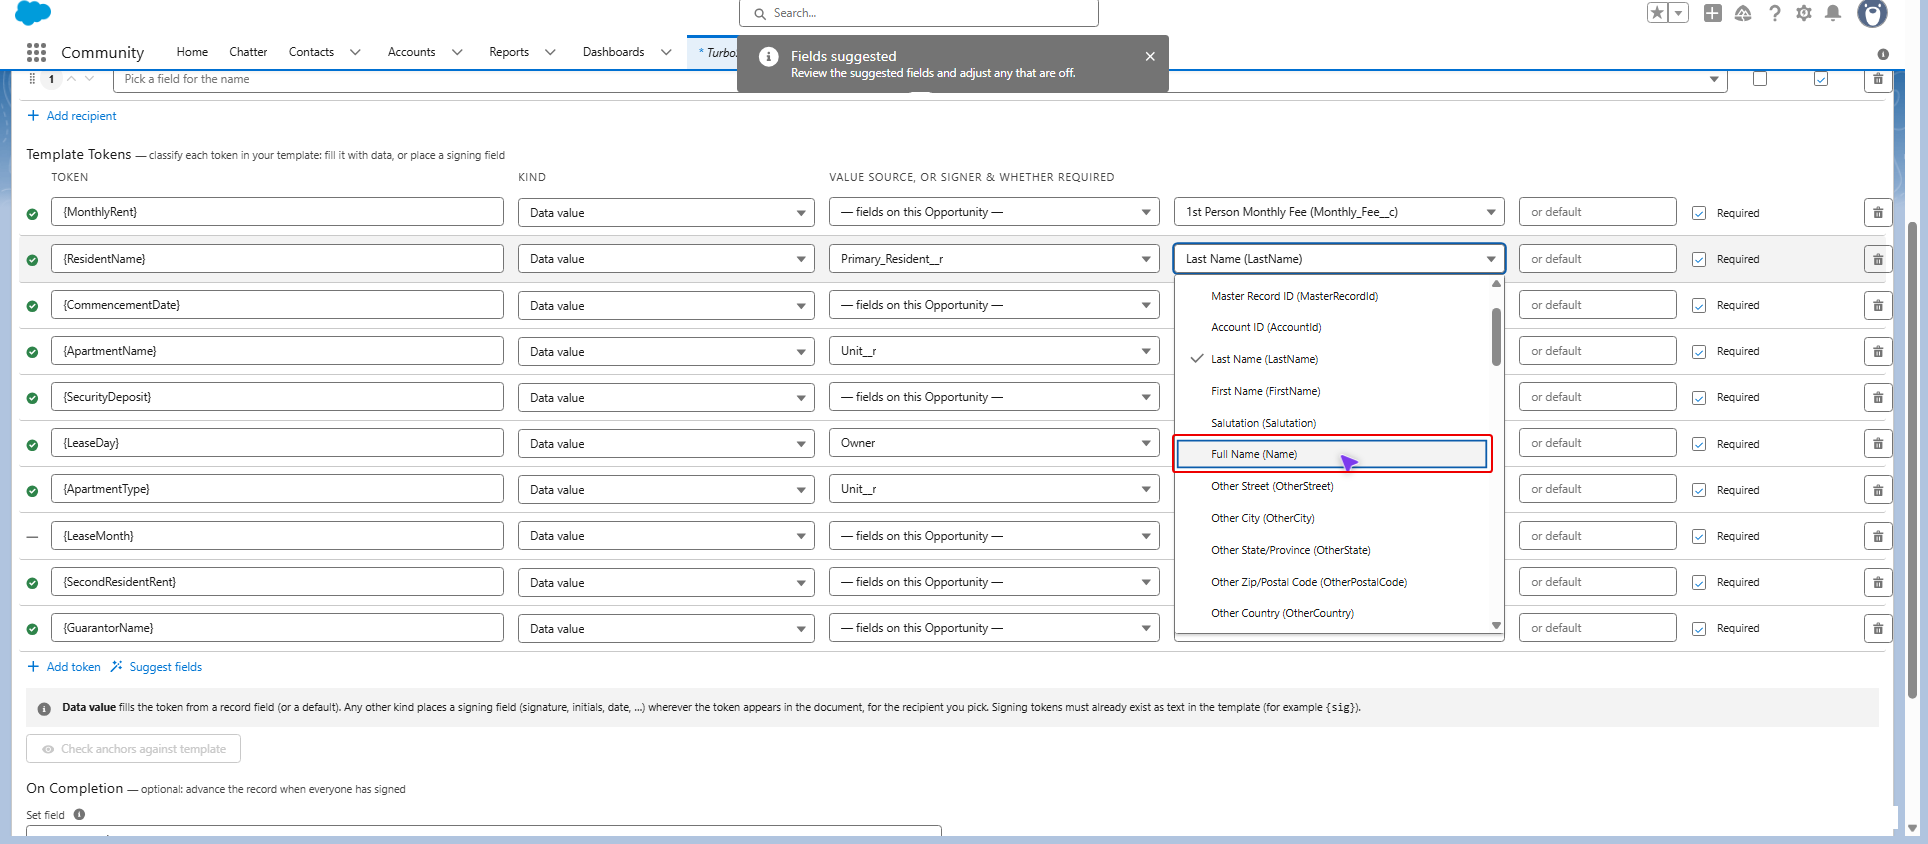
Check every suggestion. Suggestions are a starting point, and they are often wrong. To change one, pick the relationship in the first box (for example Account) and the field in the second box (for example Account Name).
-
For a value that never comes from a field, leave the field empty and type it in Default.
-
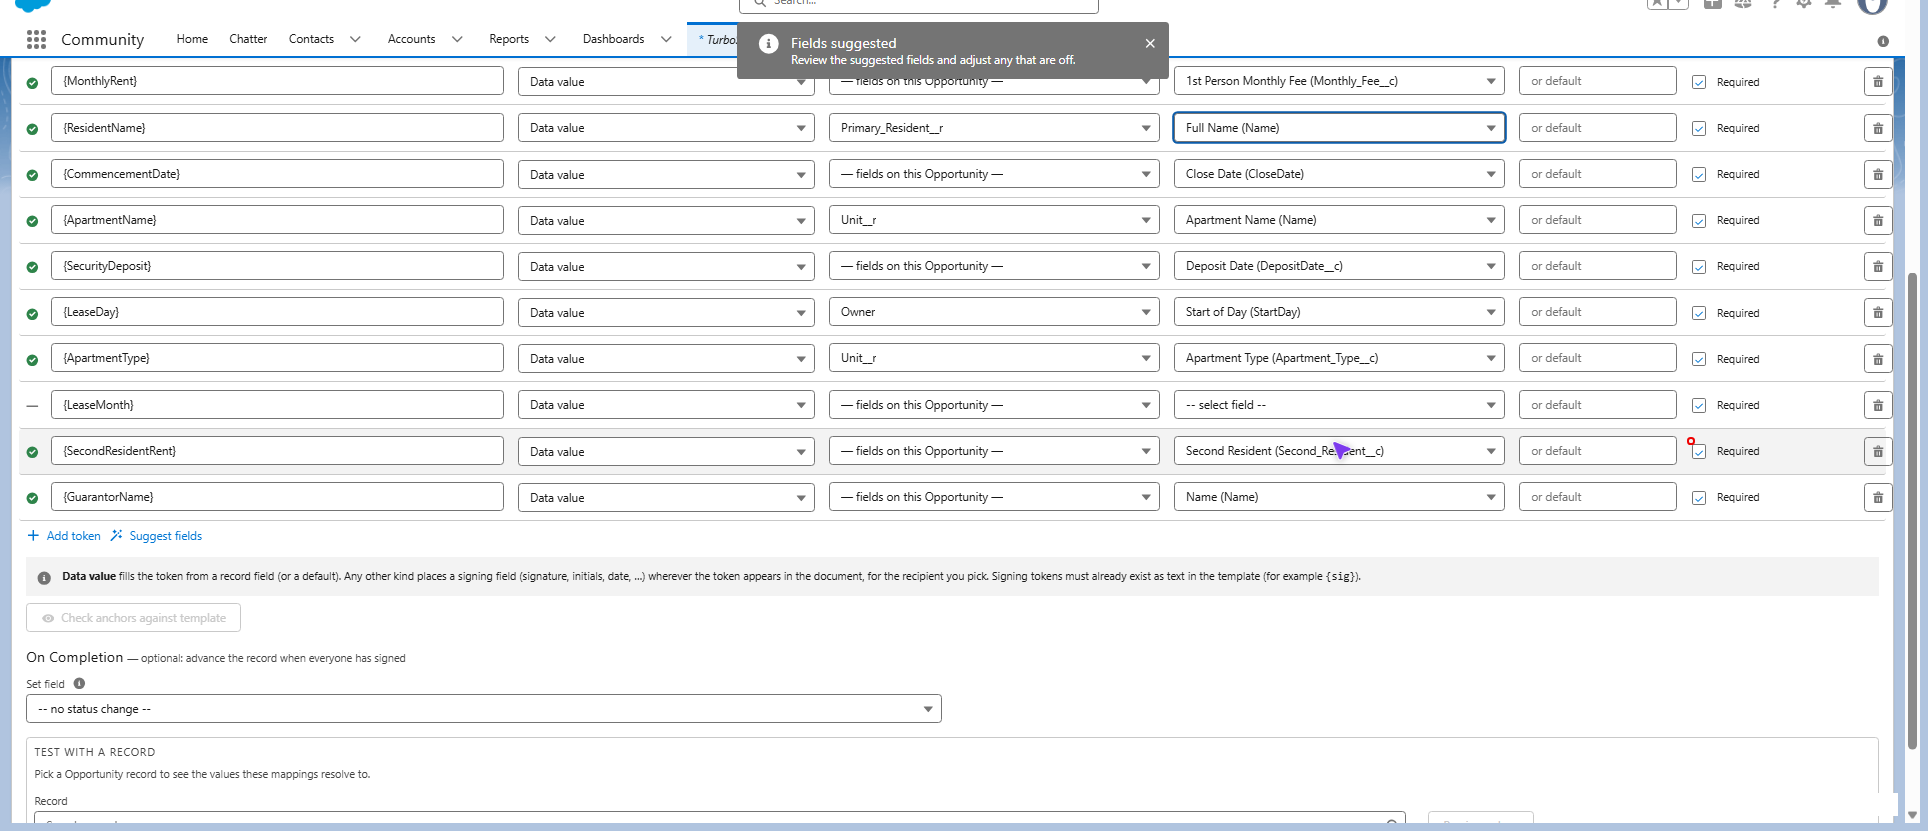
Use Required to decide what happens when a value is empty:
- Checked: the send stops and tells the rep which value is missing. Use this for values the document cannot go out without, such as the client name.
- Unchecked: the spot is left blank in the document. Use this for values that only apply sometimes.
Leave the signing tokens, such as {sig} and {date}, for Place the signing spots.
Add the signers
Each row under Recipients is one signer. They sign in the order shown.
-
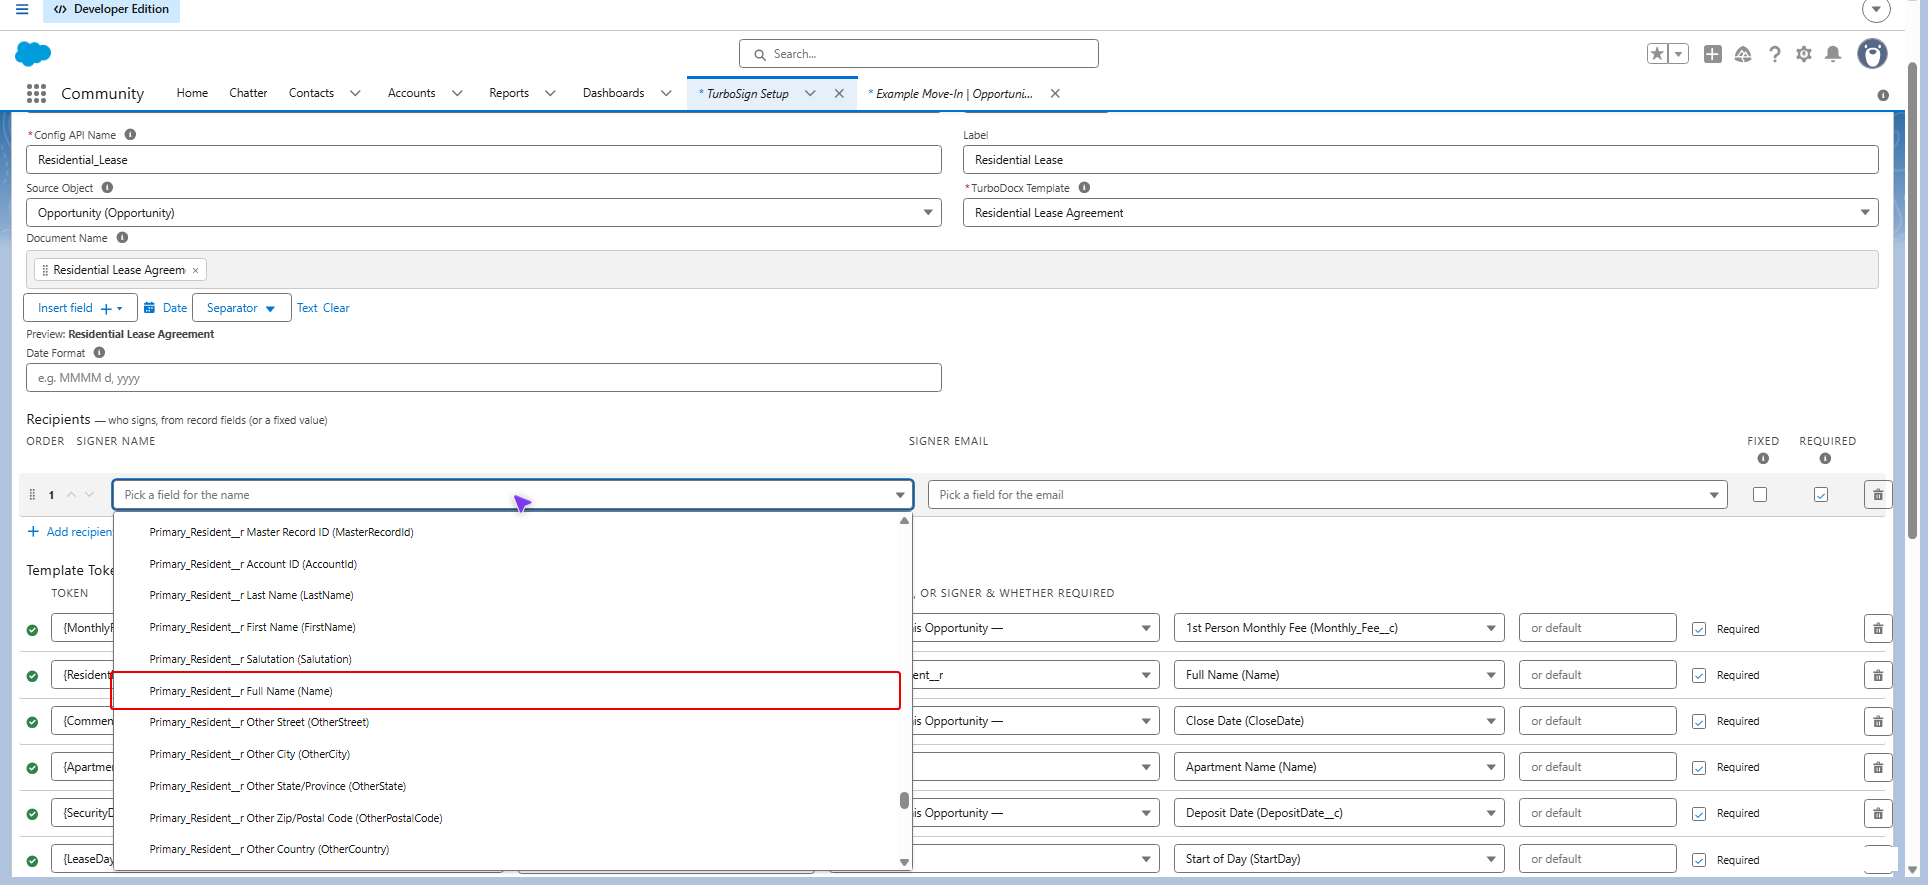
For the first signer, pick the field that holds their Signer name and Signer email, for example the Opportunity owner's name and email.
-
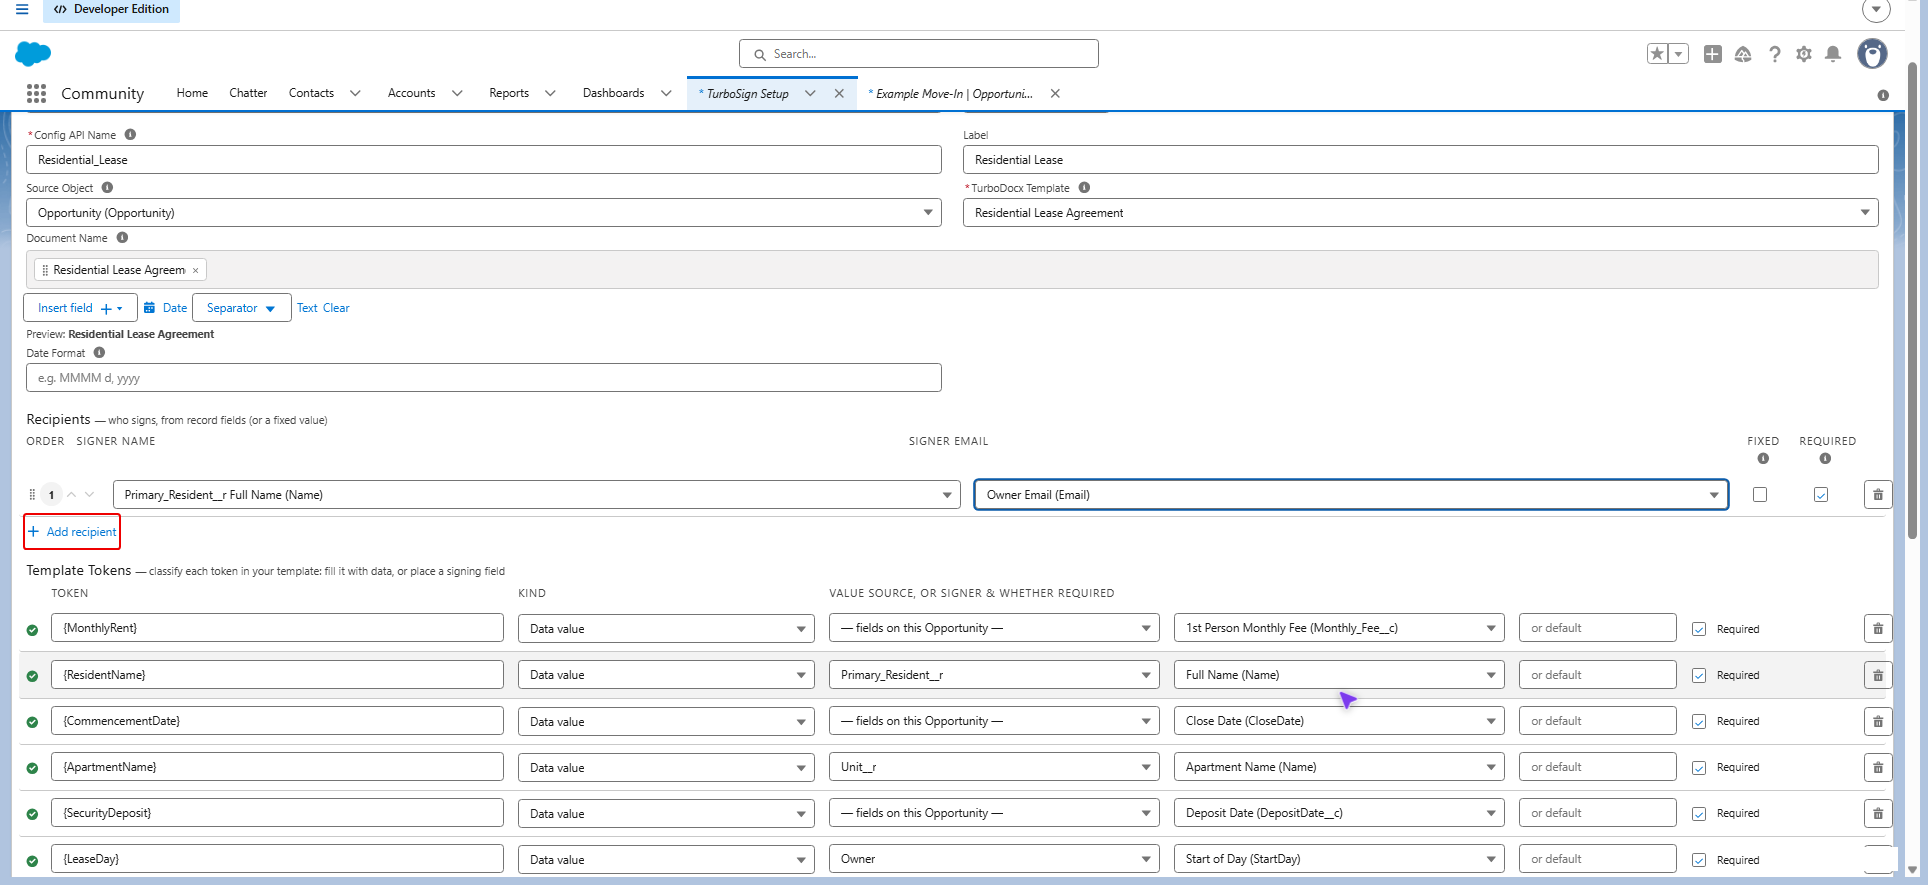
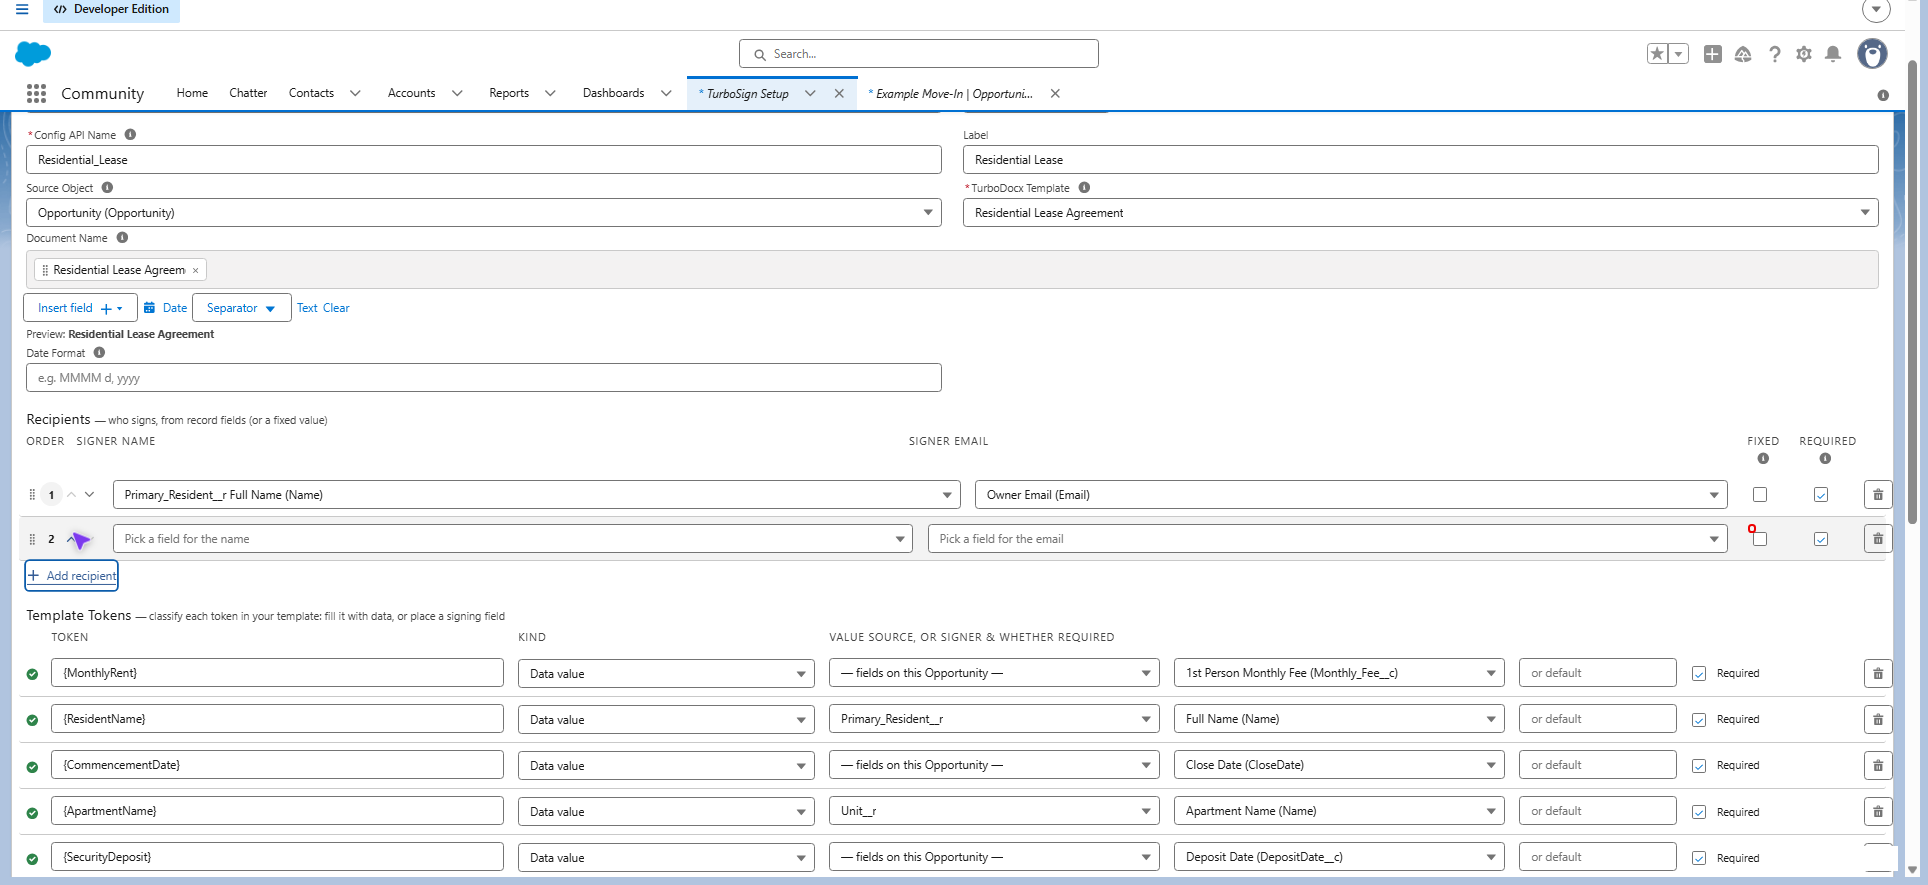
To add someone who is not on the record, such as a person on your team who countersigns, click Add recipient.
-
Check Fixed value on that row and type their name and email.
-
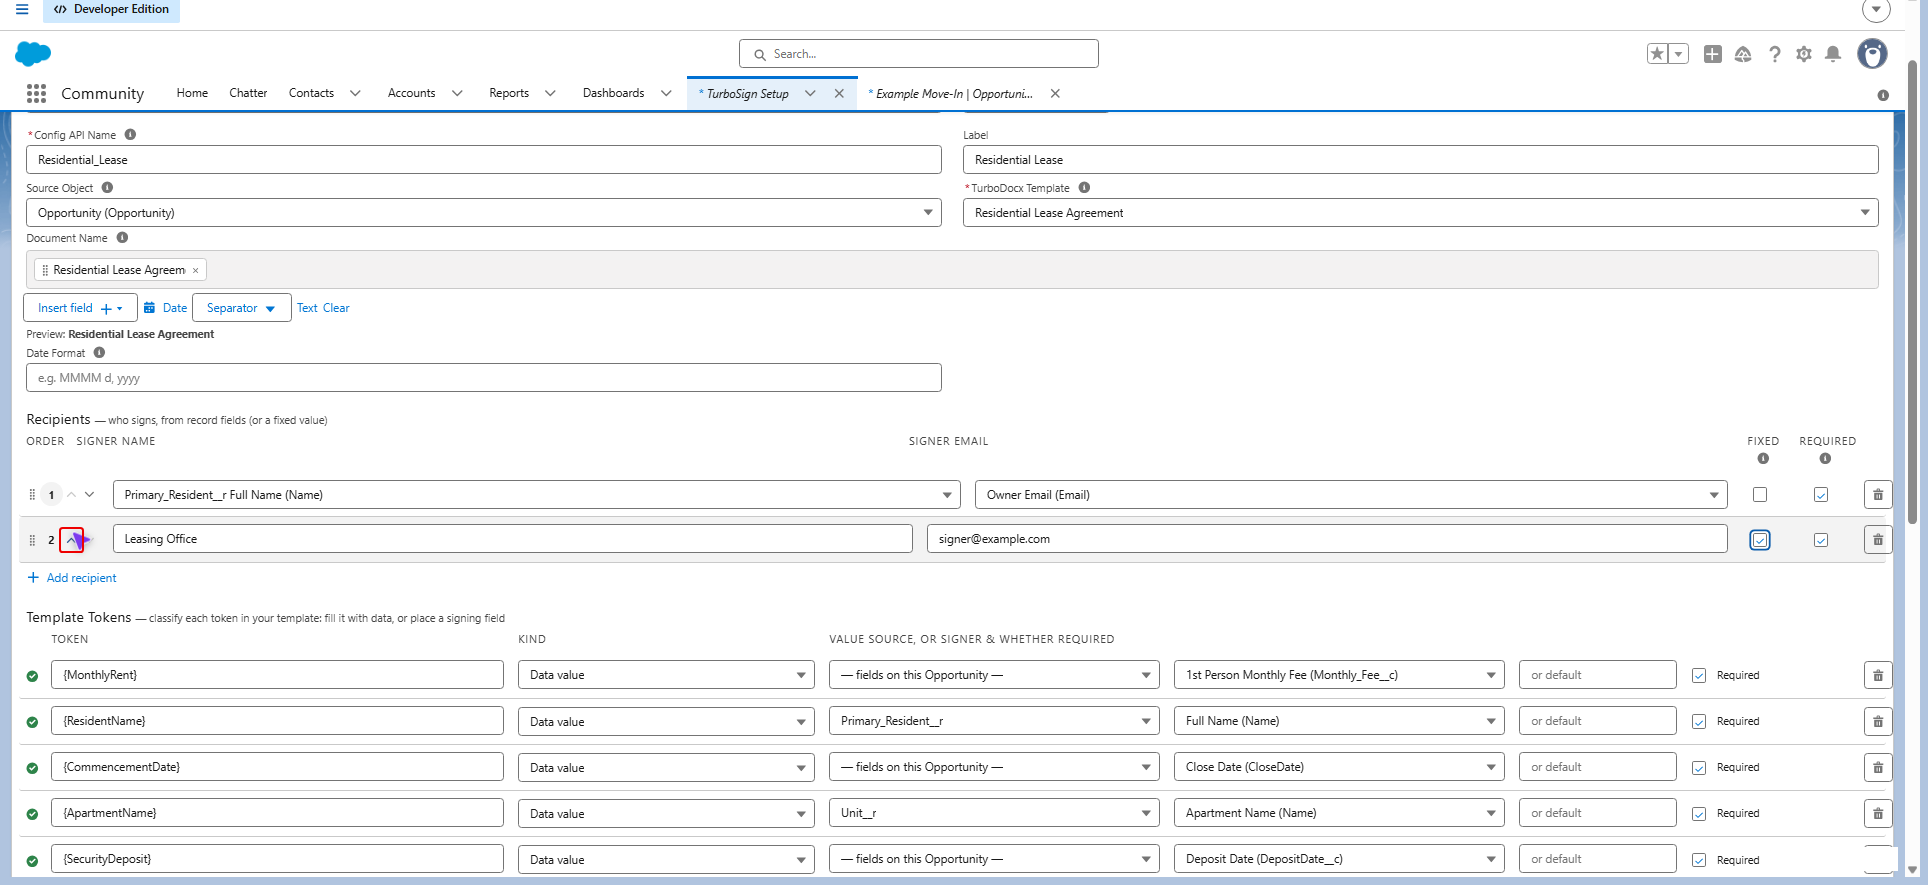
To change the order, use the up and down arrows next to the number, or drag the row.
-
Uncheck Required on a signer who only signs sometimes. When their email is empty on the record, they are skipped.
Place the signing spots
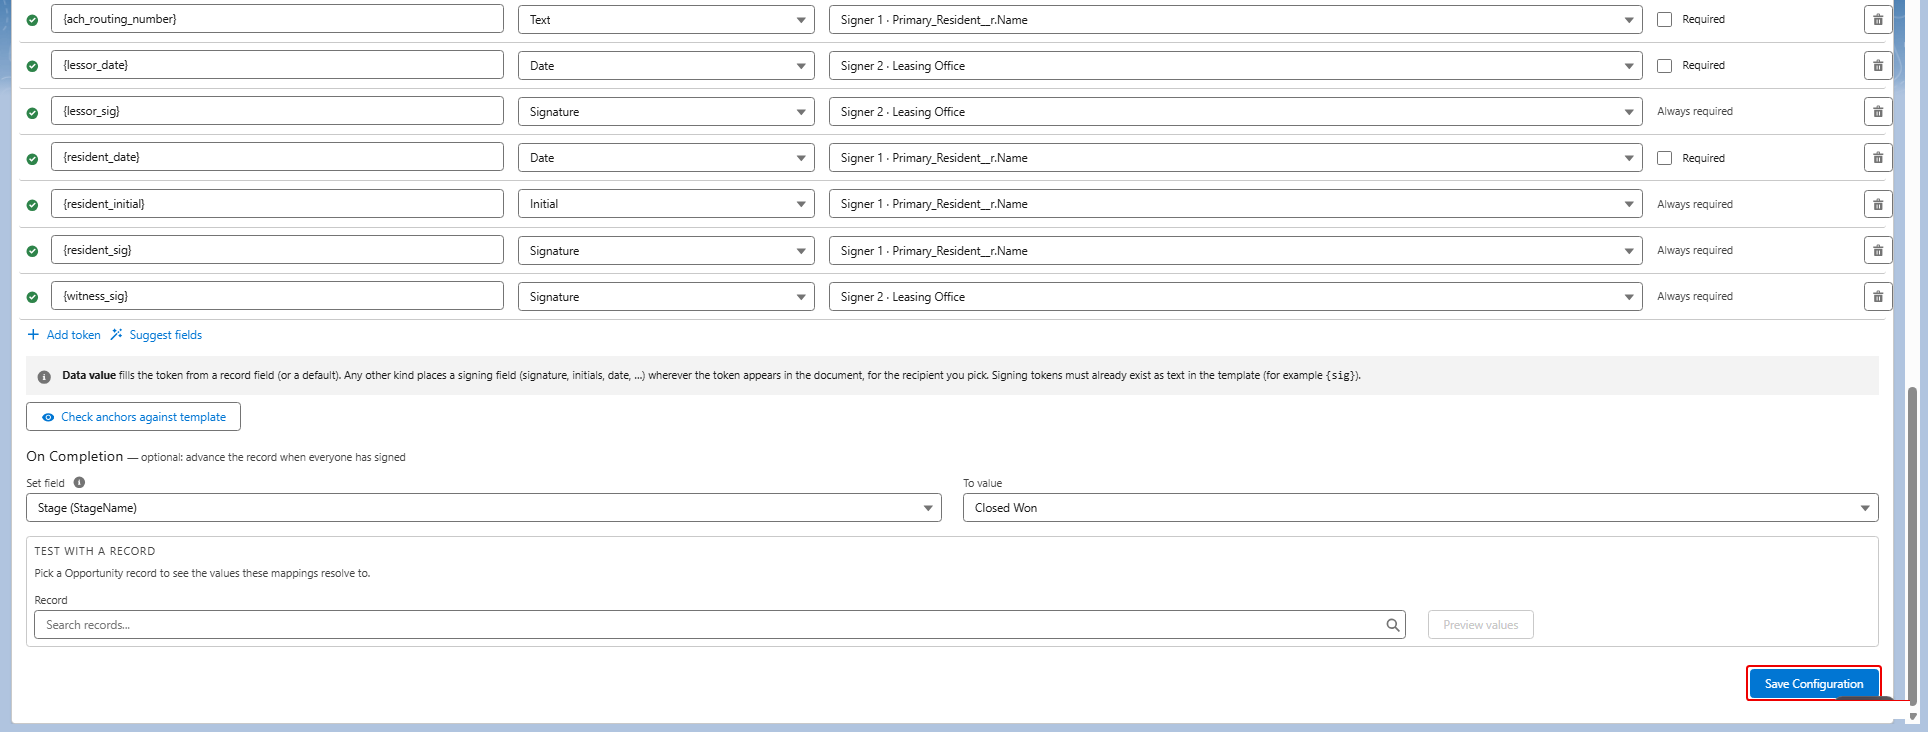
The builder already lists every token in the template, including signing tokens such as {sig} and {date}. It adds each one as a Data value row with Required checked. Turn each signing token into a signing spot:
-
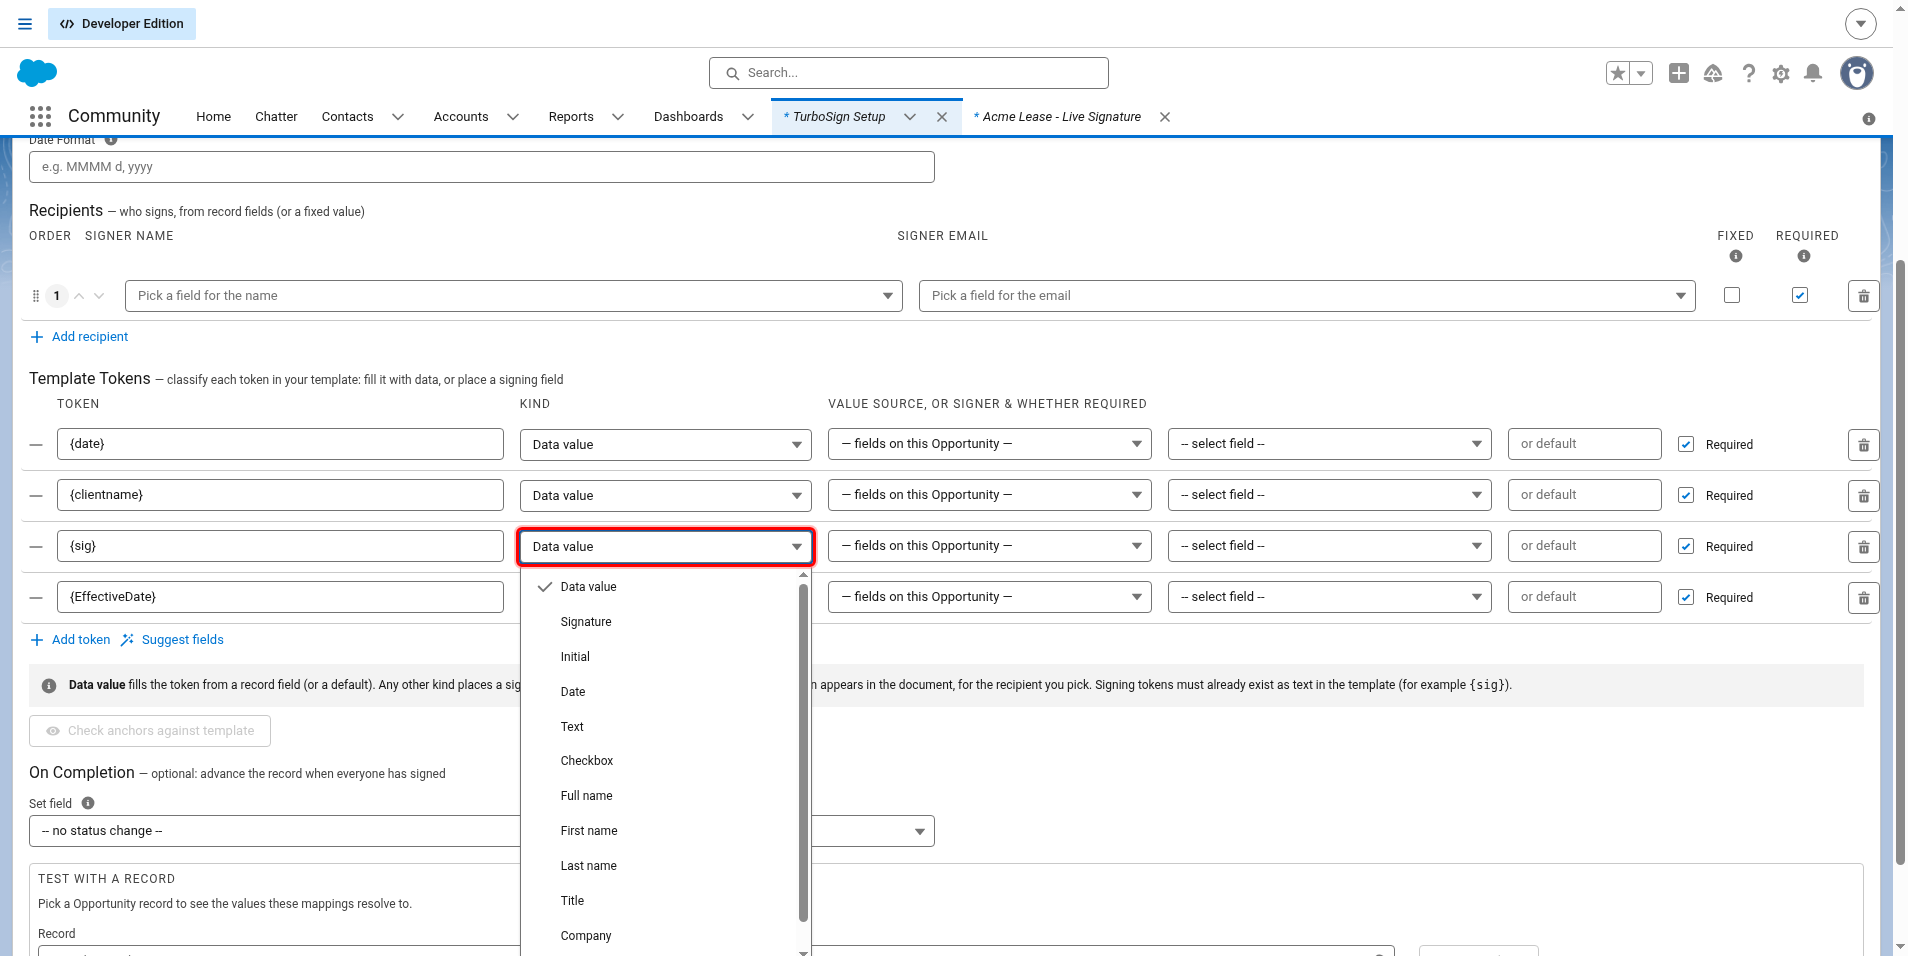
On the signing token's row, open Kind.
-
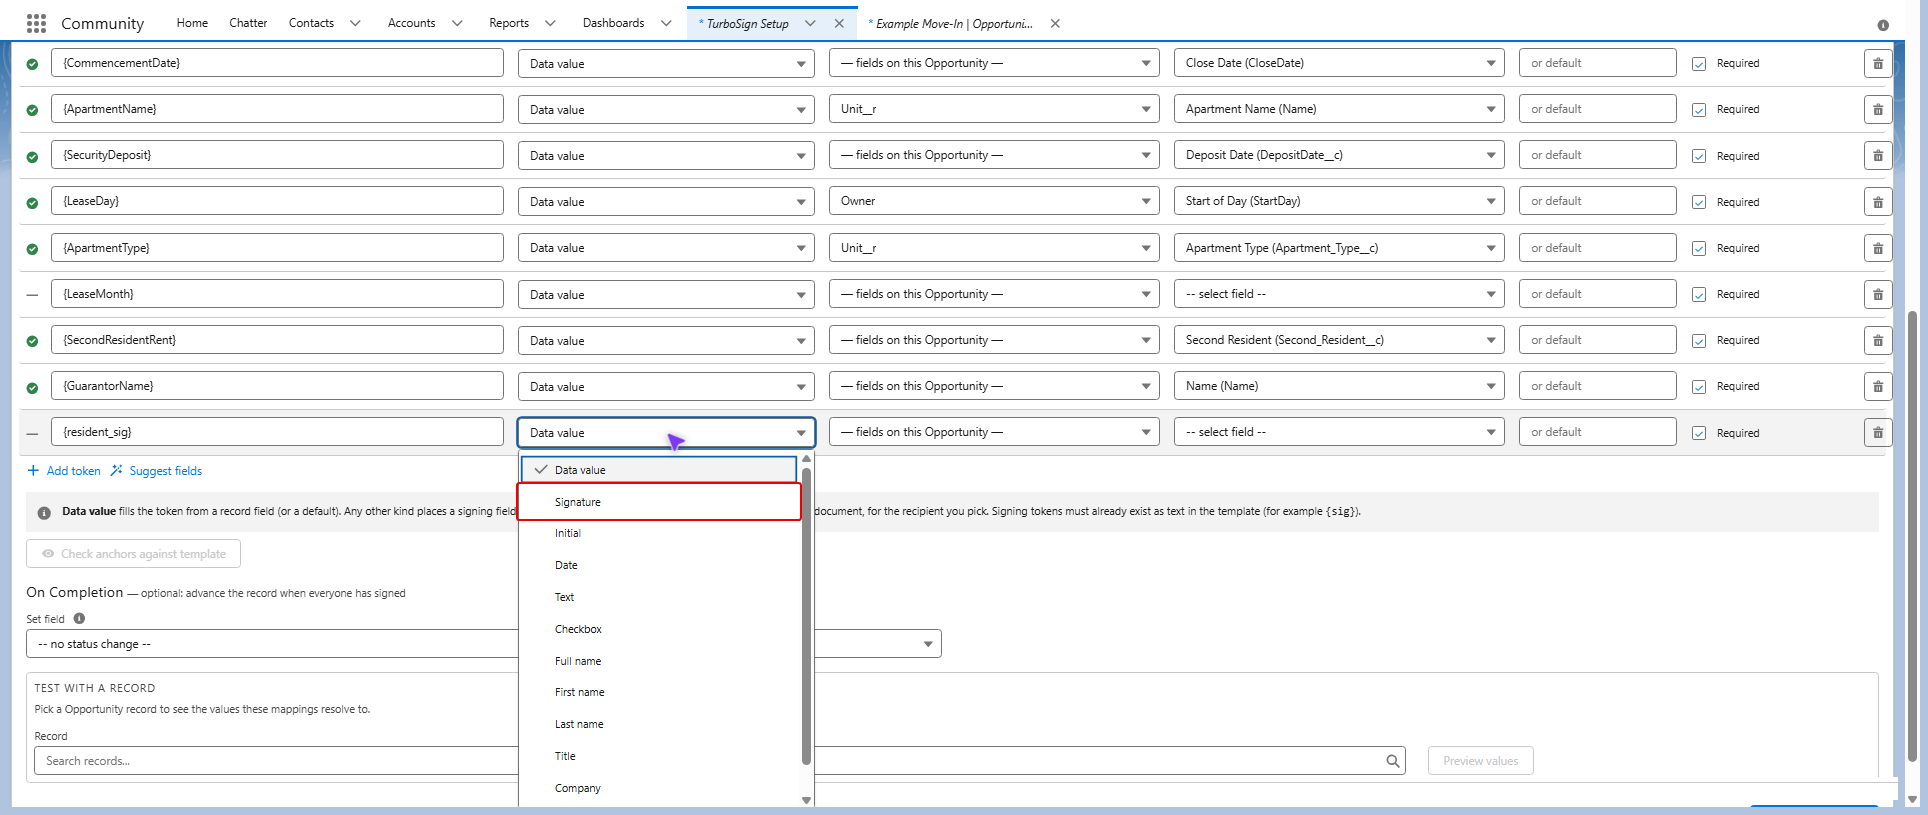
Pick what goes there: Signature, Initial, Date, Text, and so on.
-
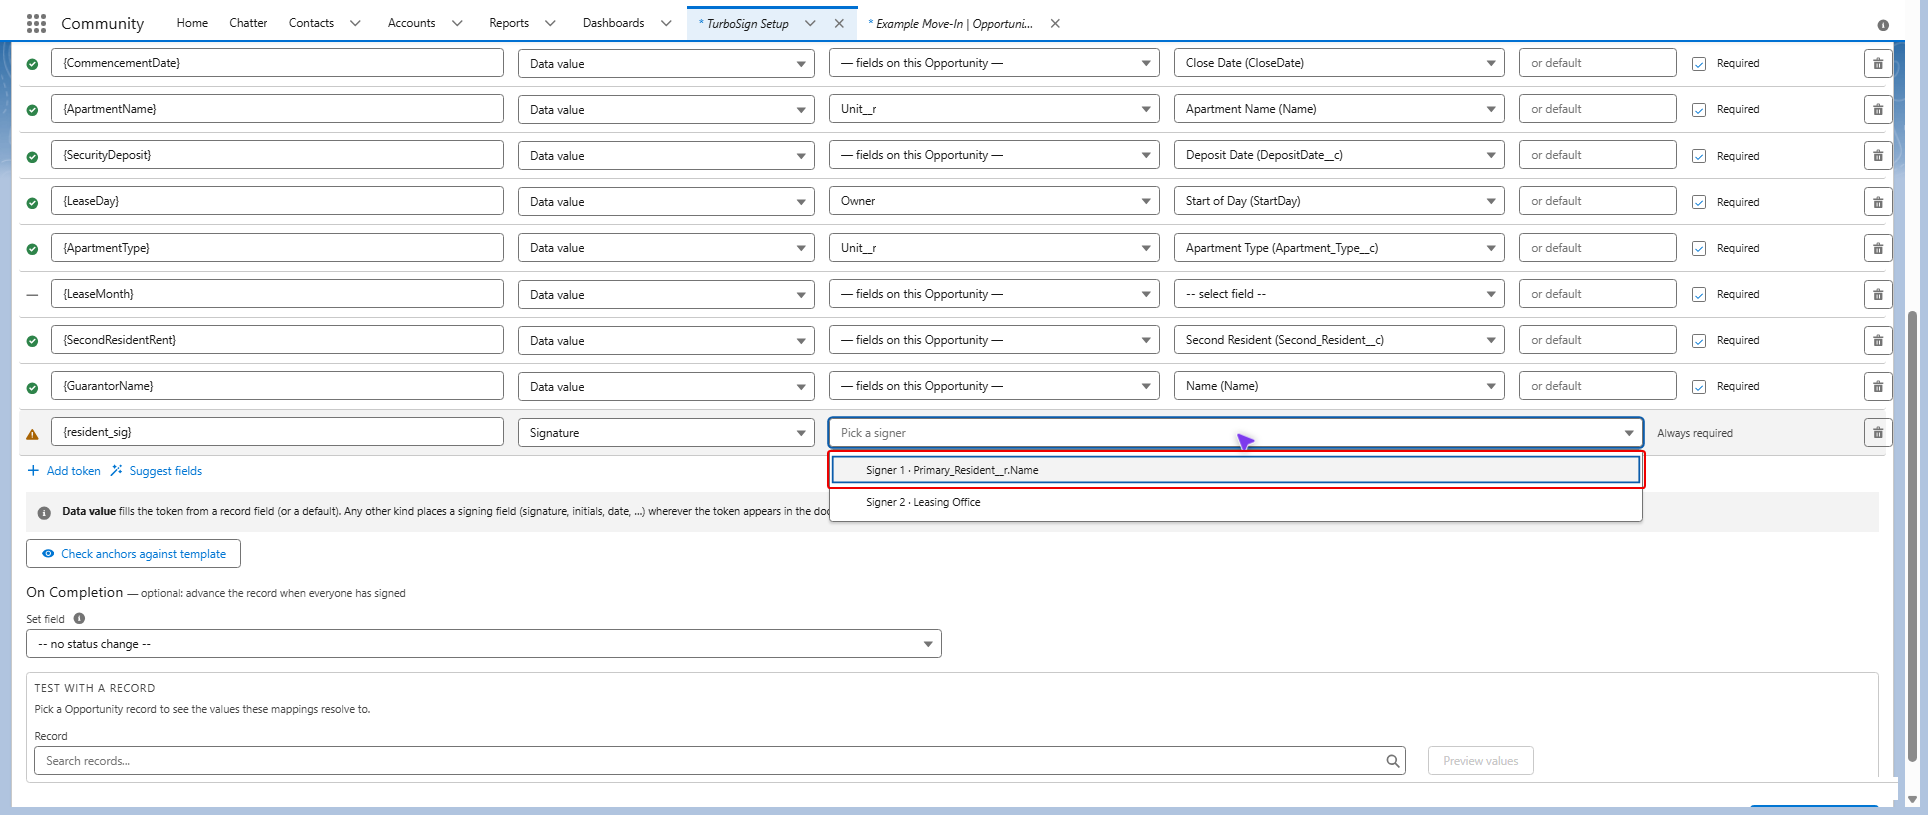
In Recipient, pick who fills it in.
-
Set Required. Signature and Initial spots are always required. Other kinds, such as Date or Text, can be optional.
-
Repeat for every signing token.
If a signing token isn't in the list, click Add token, type it exactly as it appears in your template, for example {sig}, and then set its Kind and Recipient. Use Add token only for a token the builder didn't find.
If your template has signature lines for roles you don't use (a guarantor, for example), leave those tokens as Data value with nothing in them and uncheck Required. The line is left blank in the document instead of showing the raw token.
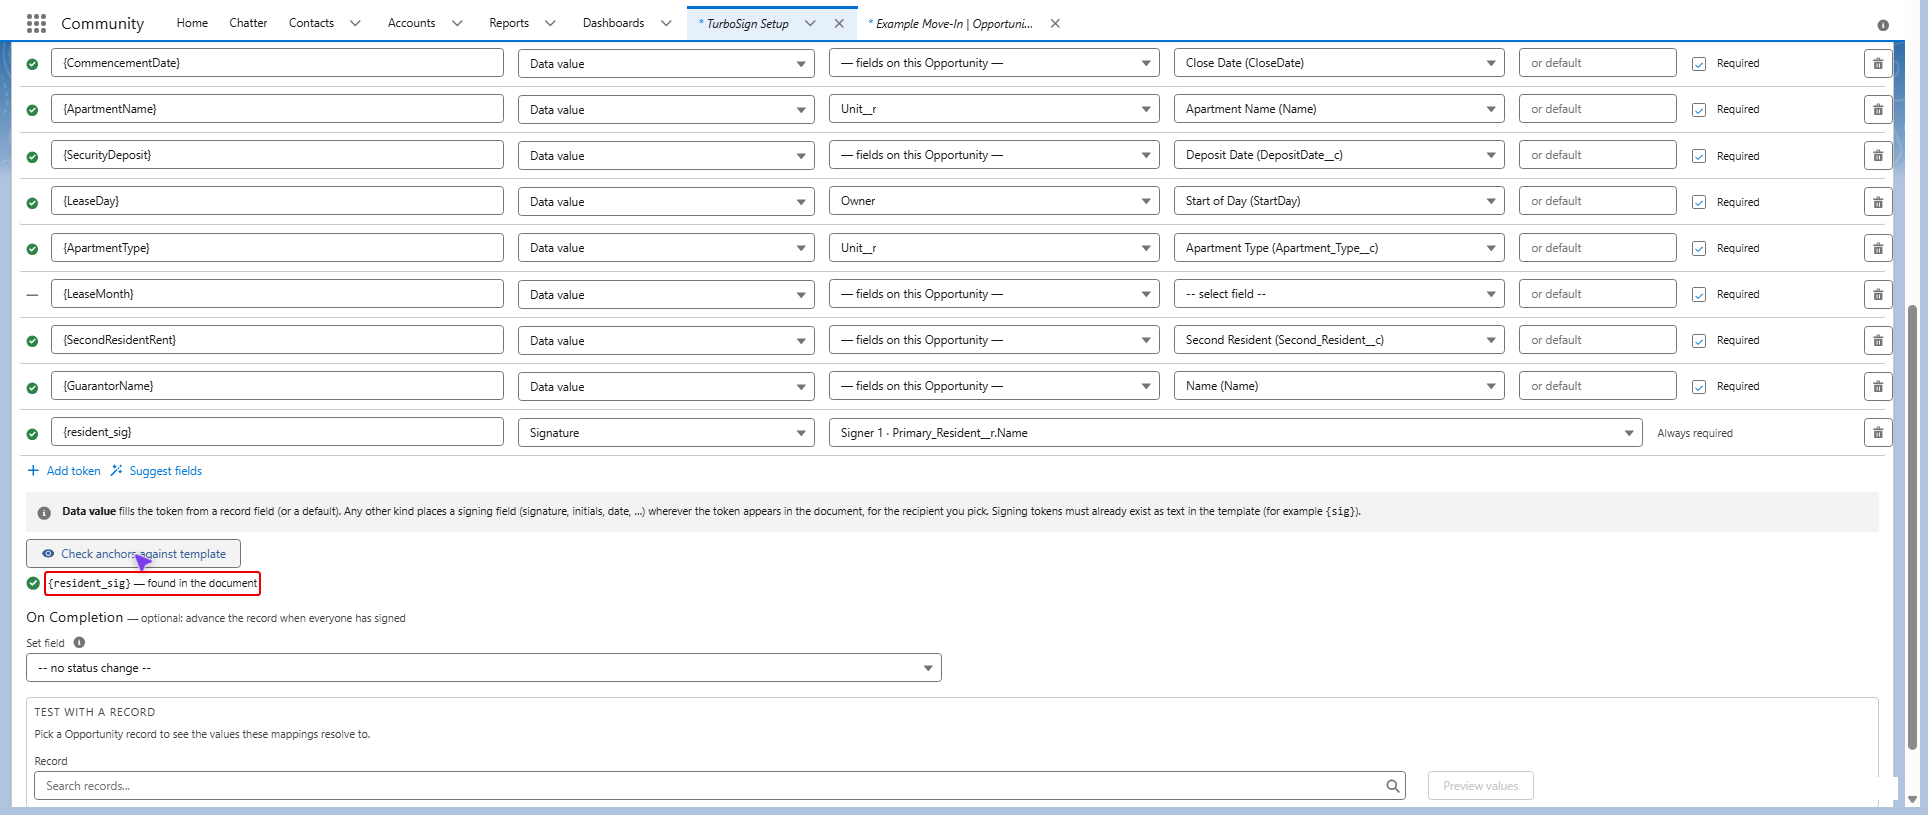
When every signing token is set, click Check anchors against template. Every token should say found in the document. Fix any that don't before you save.
Move the record forward when everyone signs (optional)
-
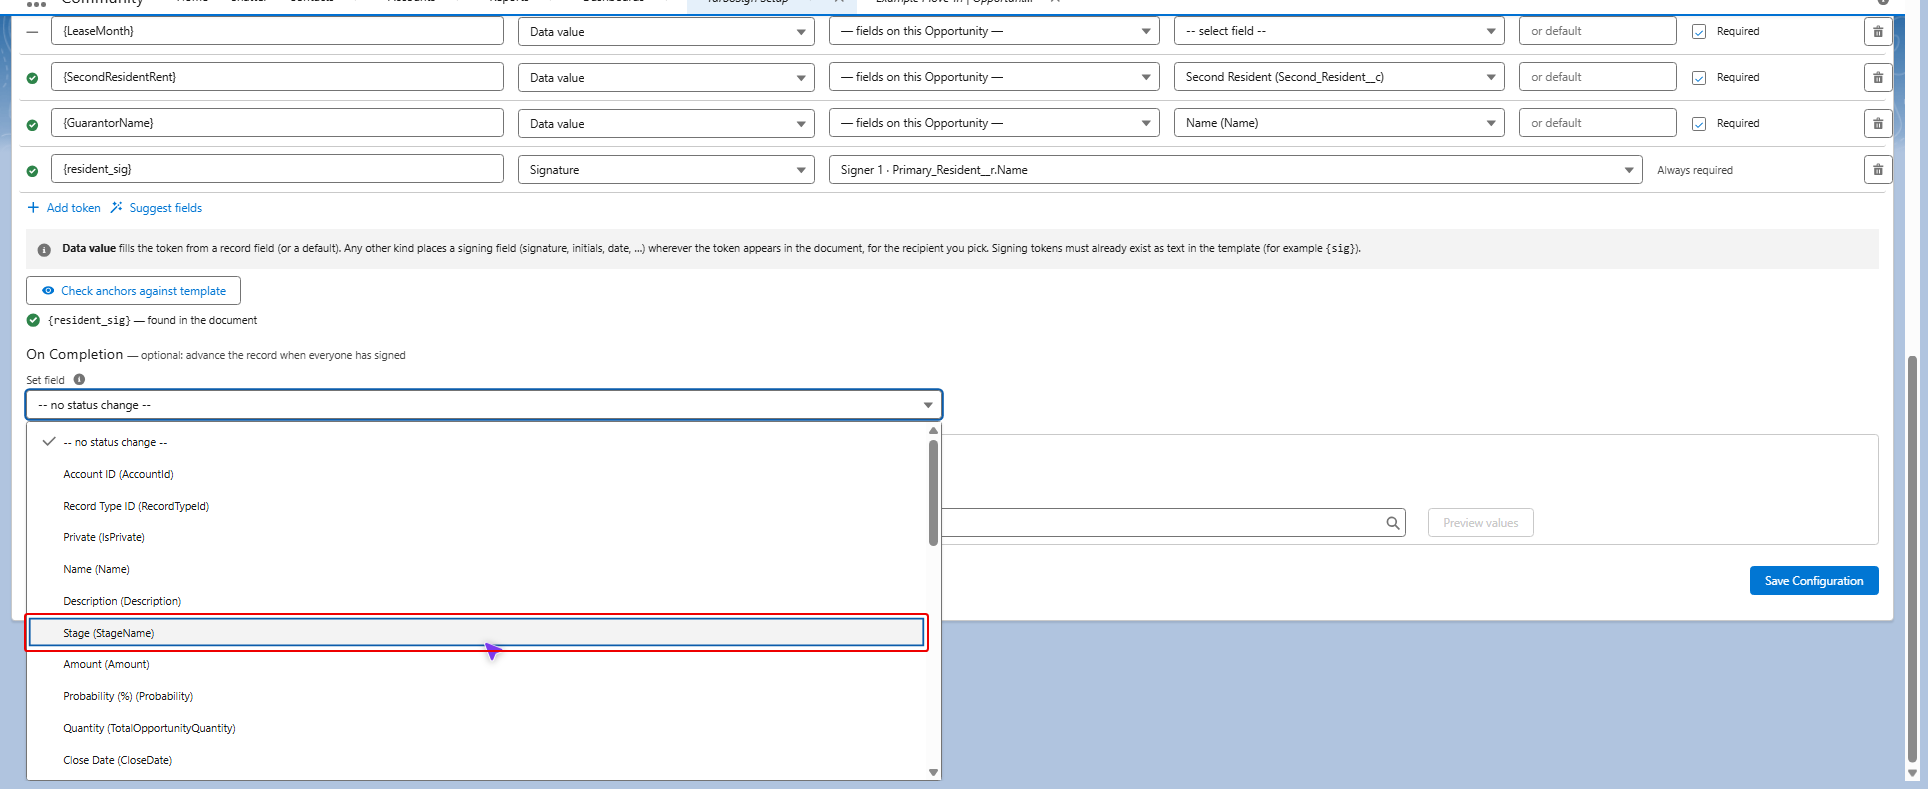
Under On Completion, open Set field and pick the field to change, for example Stage.
-
Pick the value in To value, for example Closed Won.
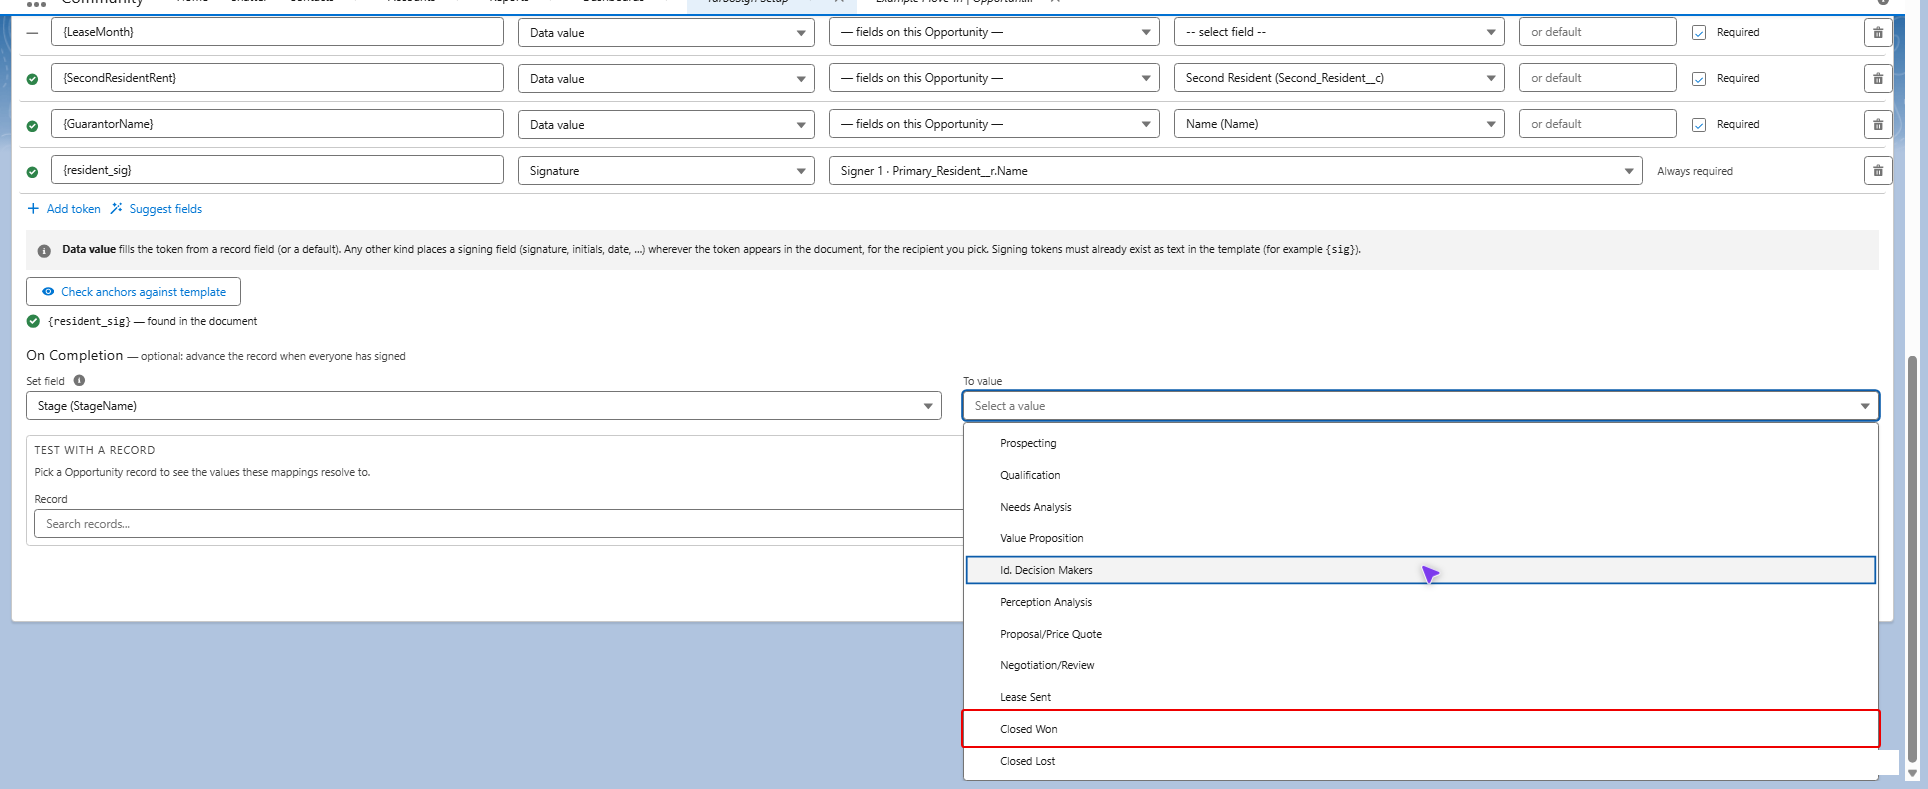
When an Opportunity moves to a Closed stage, such as Closed Won, Salesforce can also set its Close Date to the day it closed. This is standard Salesforce behavior, not something TurboSign changes.
Test and save
-
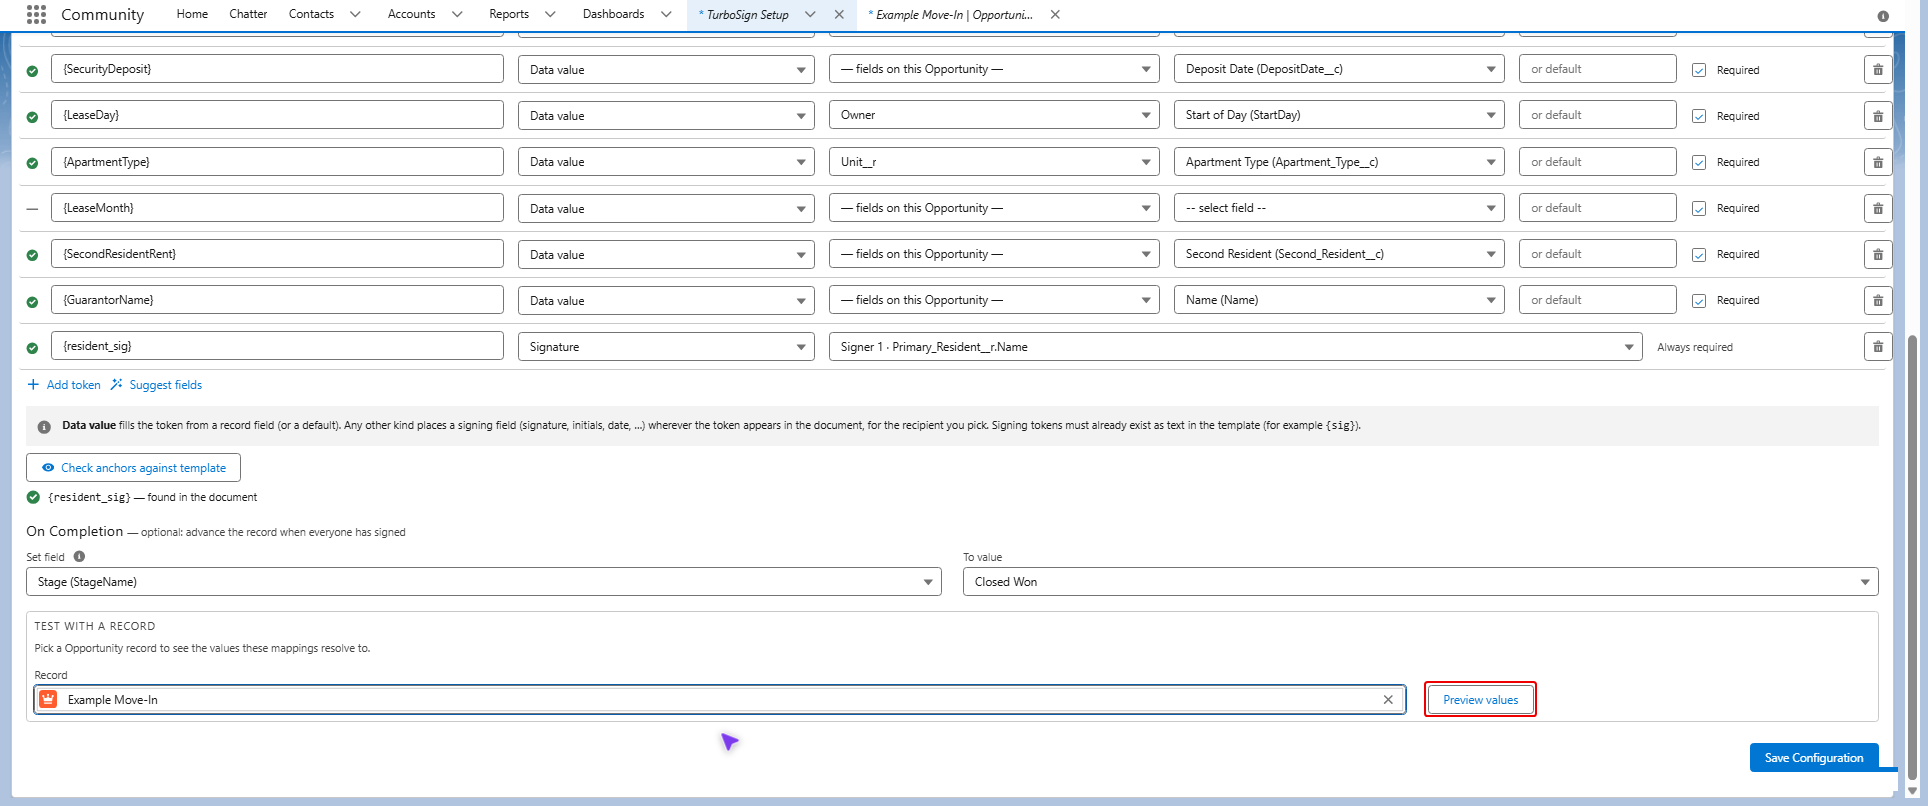
Under Test with a record, search for a real record and pick it.
-
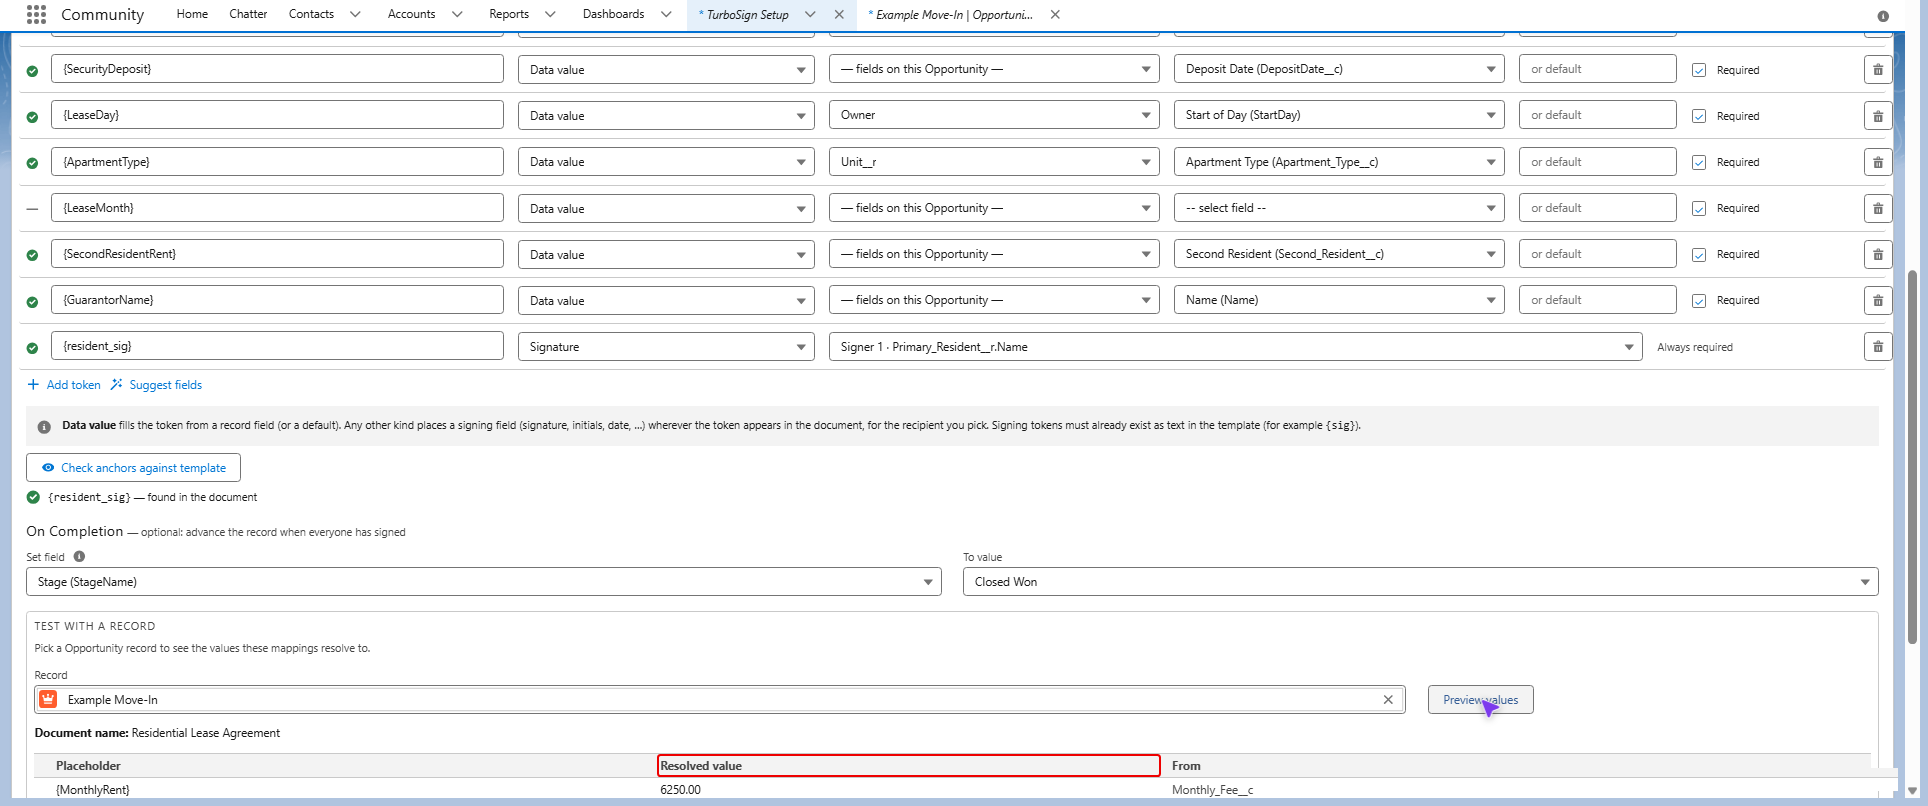
Click Preview values to see what every token resolves to on that record.
-
Click Save Configuration. A message may confirm that the setup is live. Either way, the setup now appears in the Edit an existing configuration list, which is how you can confirm it saved.
Change an existing setup
- Open TurboSign Setup.
- Pick the setup in Edit an existing configuration. The form loads it.
- Make your changes.
- Click Save Configuration.
When you remove a token or a signer and save, the builder switches that row off instead of deleting it. Sends ignore it from then on.
To start a new setup from an existing one, load it and click Duplicate. Type a New API name for the copy, then click Create copy.
To stop reps from using a setup, load it and click Deactivate, then click Deactivate again to confirm. The setup disappears from the document list reps see and from Edit an existing configuration. Its records stay in your org, switched off, and TurboSign Setup can't switch them back on.
If you may need the setup again, click Duplicate before you deactivate it. The copy is active, so reps see it in the document list too. This works best when you're replacing a setup with a changed copy.
To bring back a setup you already deactivated, the reliable way is to build it again in TurboSign Setup. You can reuse its API name: saving overwrites the switched-off records, and rows you don't add again stay off. Admins who use the Salesforce CLI can instead switch its records back on, as described in Bring back a deactivated setup.
Step 6: Put the Send button and status panel on the page
Add the Send for Signature button
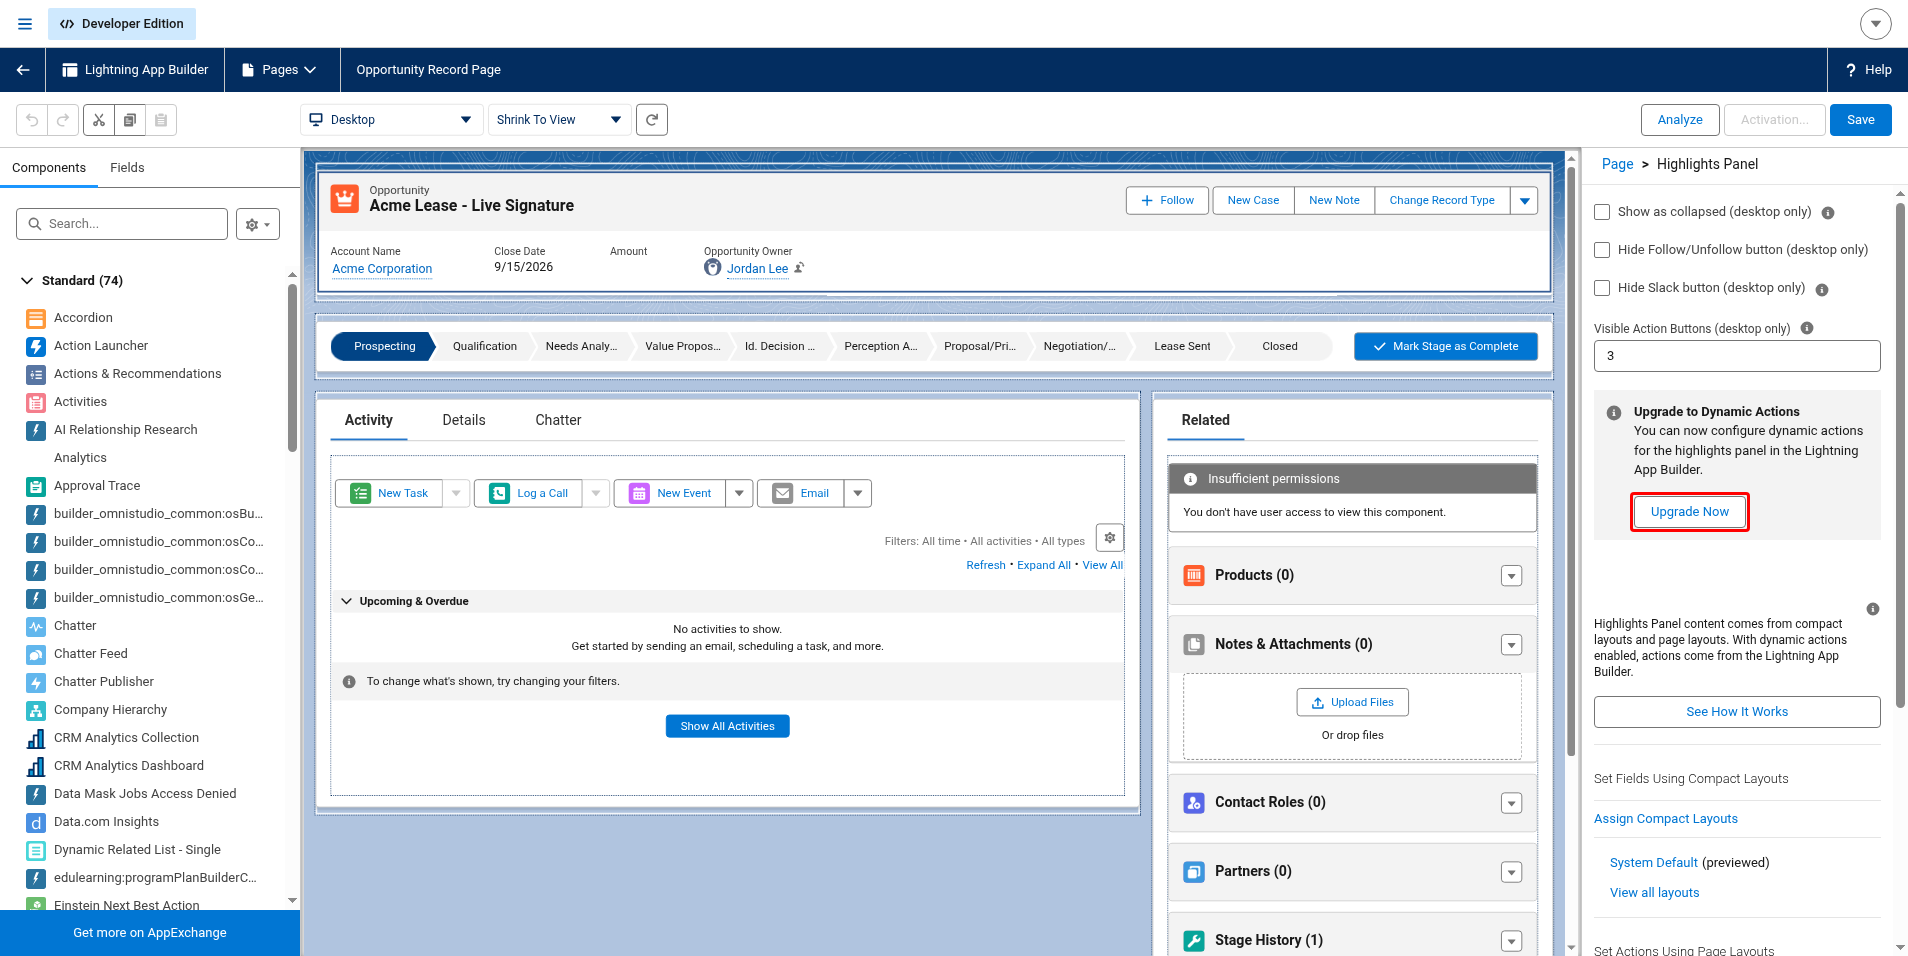
Opportunity record pages show their buttons in one of two ways. To find out which one yours uses:
- Open any Opportunity.
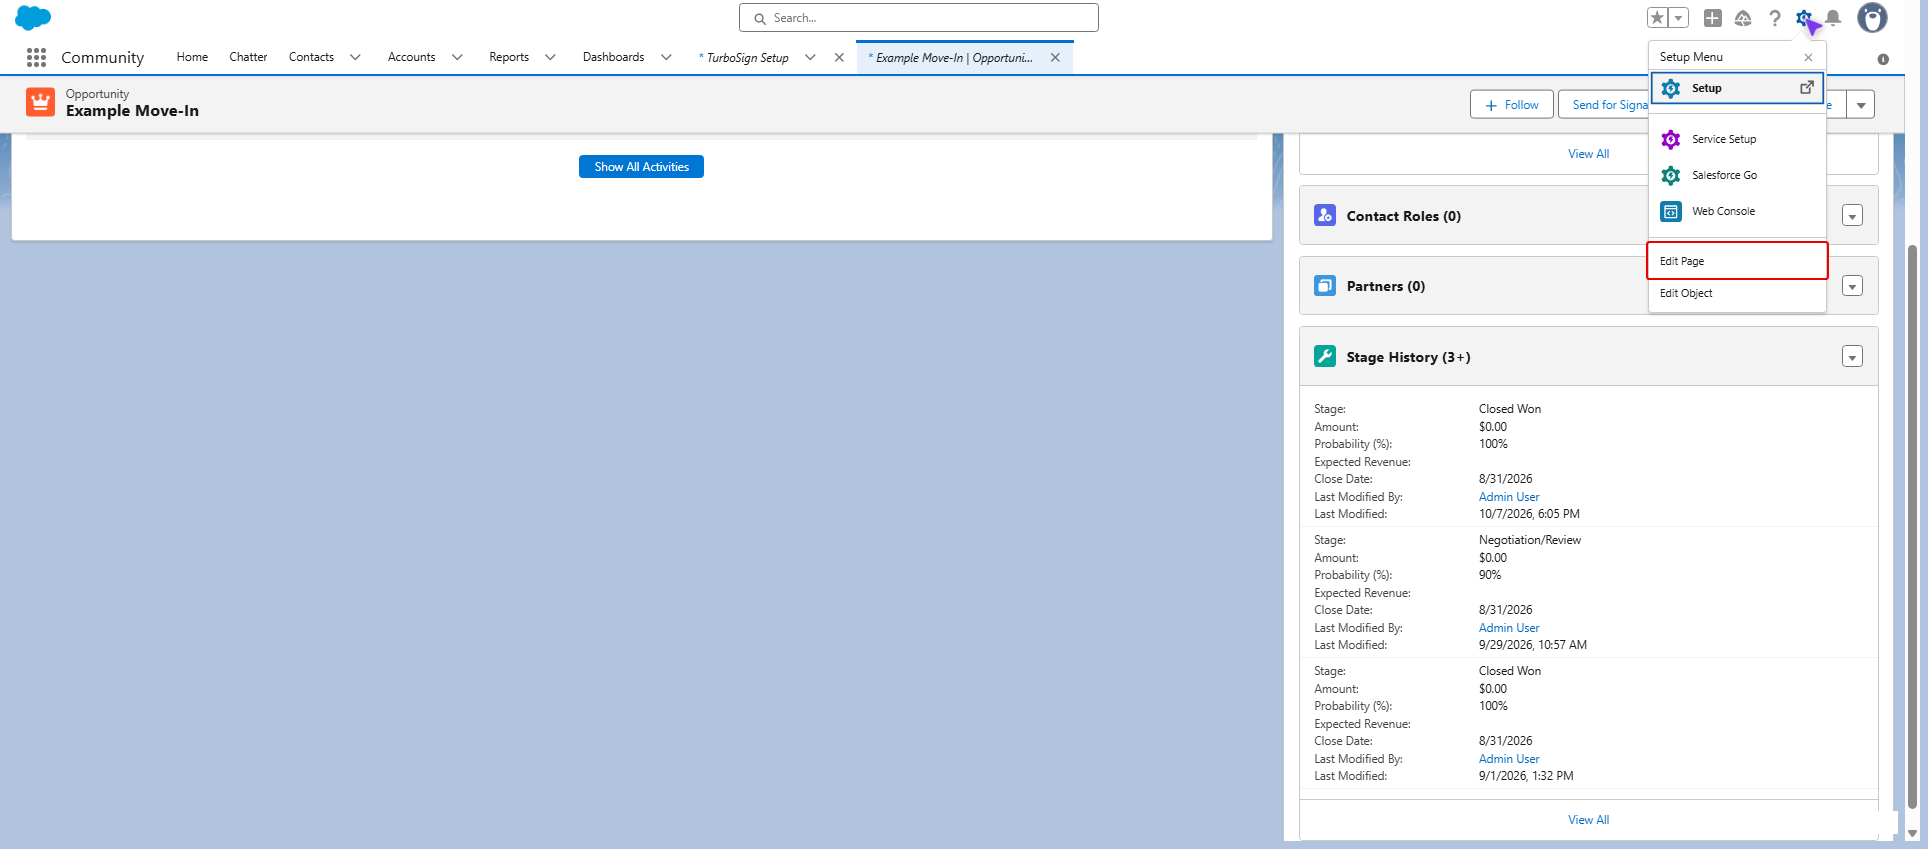
- Click the gear icon, then Edit Page.
- Click the Highlights Panel at the top of the page.
If the properties pane on the right lists actions with an Add Action button, the page uses Dynamic Actions. If it offers Upgrade Now instead, the page still takes its buttons from the page layout, so use page layout actions.
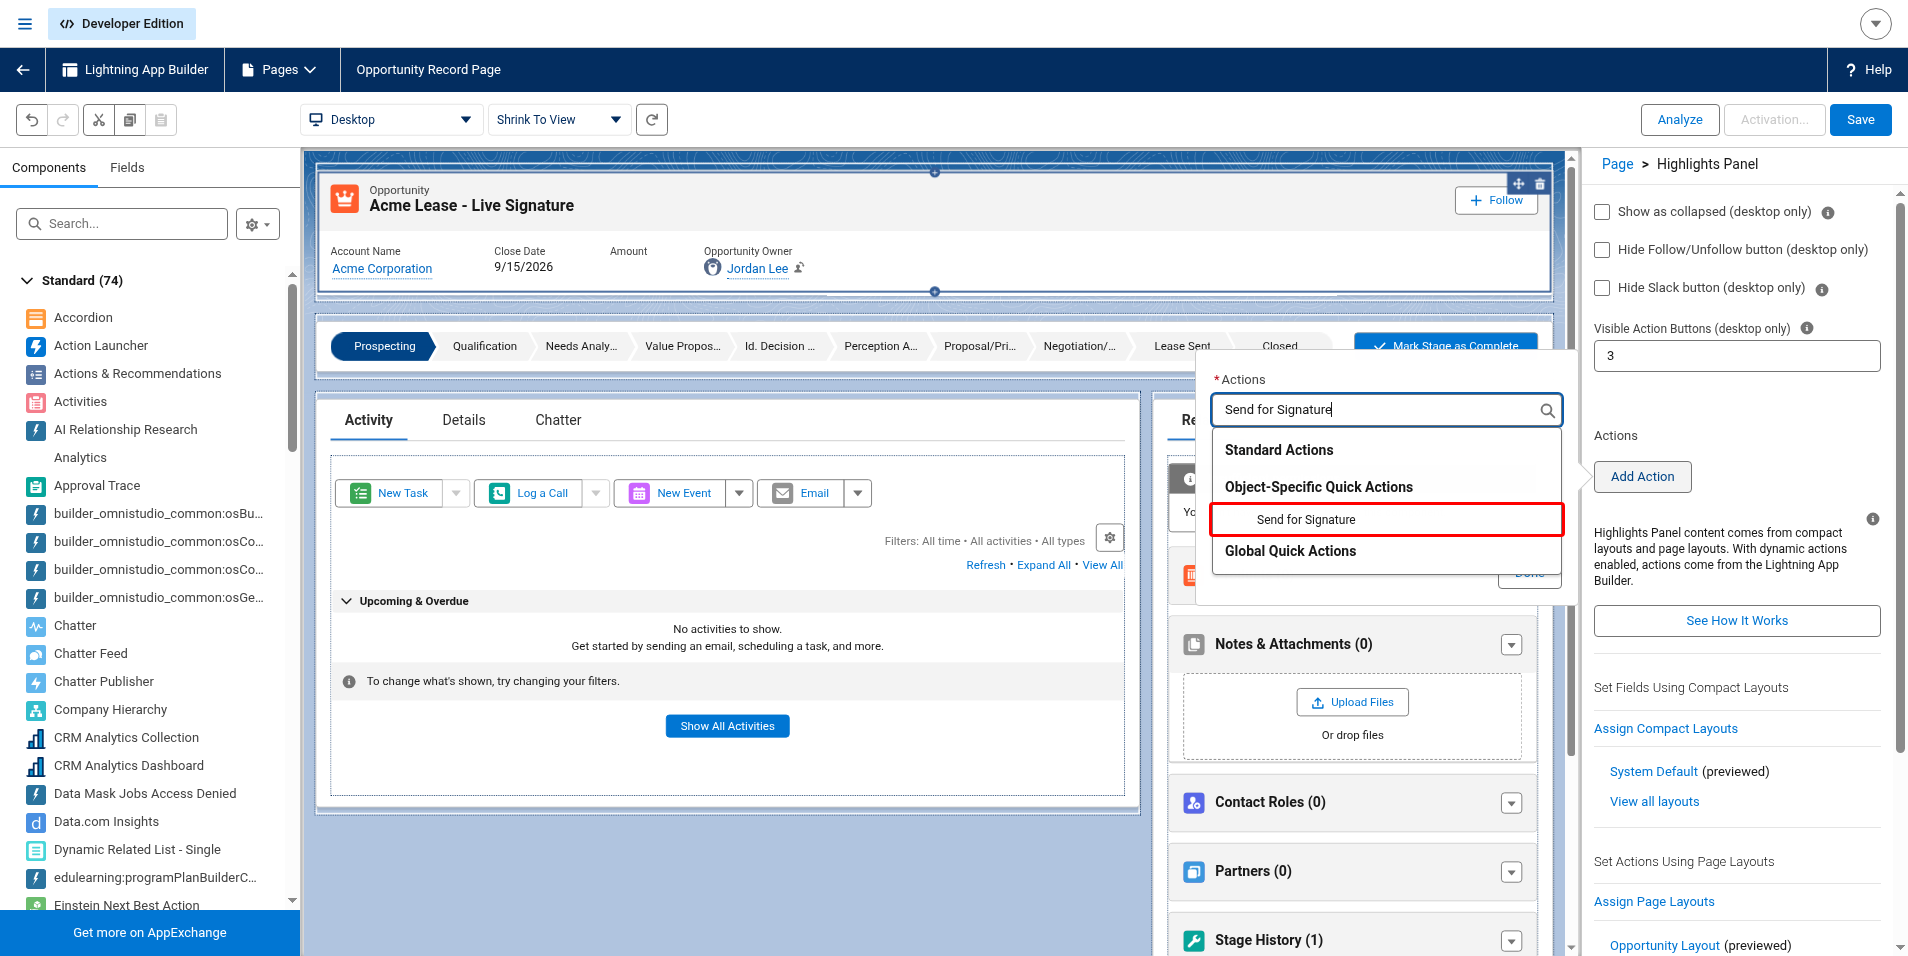
If the page uses Dynamic Actions, stay in the Lightning App Builder:
- With the Highlights Panel selected, click Add Action.
- Search for
Send for Signatureand select it. - Click Done.
- Click Save.
- If Salesforce asks, activate the page as described in Activate the page.
If the page uses page layout actions:
- In Setup, open Object Manager.
- Click Opportunity.
- Click Page Layouts.
- Click the layout your reps use. To find out which one that is, click Page Layout Assignment on the same page. It lists the layout each profile uses. In a new org, the System Administrator profile uses Opportunity Layout.
- In the palette at the top, click Mobile & Lightning Actions.
- If the Salesforce Mobile and Lightning Experience Actions section says it uses predefined actions, click the override the predefined actions link inside it.
- Drag Send for Signature into the Salesforce Mobile and Lightning Experience Actions section, and drop it at the start of the list. The record page shows only the first few actions as buttons and puts the rest in a ▼ menu, so an action dropped at the end is easy to miss.
- Click Save.
Repeat for every page or layout your reps use.
Add the TurboSign Signatures panel (optional)
The panel shows each sent document's status on the record and lets reps refresh, remind, or void. Sending works without it.
-
Open any Opportunity.
-
Click the gear icon, then Edit Page.
-
Drag the TurboSign Signatures component from the Components list onto the page.
-
Click Save.
-
If Salesforce asks, activate the page as described below.
Activate the page
The first time you save a Lightning page, Salesforce asks you to activate it. Until you do, reps don't see your changes.
- Click Activate.
- Click Assign as Org Default.
- Choose Desktop and phone.
- Click Next, then Save.
If reps use the standard Sales app and the button or panel still doesn't show, activate the page again and also assign it as the App Default for that app.
You're done. Next, send your first document.